Showing posts with label bread. Show all posts

Monday, September 6, 2010

Take Your Pick of Round Challahs for Rosh Hashanah

My crazy schedule just got a little bit more crazy. You see, on top of the traveling, High Holidays, working full-time, and various other things going on in my life, I'm about to move and I wasn't expecting that. Not far from where I am now. But still. Moving is moving. Hopefully I don't end up needing to pack all my kitchen equipment until the last second, so I can still enjoy a September full of homebaked goodies.

But that crazy schedule does mean I haven't had a chance to try a new round challah recipe this year. So instead, I'm reminding you of two previous posts I did on round challahs in preparation for Rosh Hashanah this week. If you haven't already tried them, you are in for a treat.

OPTION 1: Vanilla Challah and a Super Cool Round Braid Method
The first option is a very neat braiding technique that looks much harder than it is. Check my step-by-step photos for help. You can do this with any challah recipe, though the one I demonstrate with is one of my all time favorite recipes...a vanilla challah by Beth Hensperger.


OPTION 2: No-Knead Round Challah
The second option is a no-knead where you braid the challah in typical three-strand, straight line fashion, then lift the braid up and place it, curved, into the round baking pan.


Either way, you are going to be really pleased with how they come out. They are delicious and regal-looking!

L'Shanah Tovah!

Tuesday, June 29, 2010

Orange Poppy Seed Challah


I was in the mood to bake bread. On a weeknight. On a night when I didn't get home from work until 7:30pm. The baking project probably wouldn't start until 8pm. So I wasn't feeling too adventurous; I mean, if the bread got challenging and had unexpected fancy technique involved, I might be up really late...on a work night.

Enter: challah. Challah is something I can practically do in my sleep. So all that was left was choosing a challah recipe. I decided on a challah from Marlene Sorosky's Jewish holidays cookbook. And I was inspired by a note she had at the end of the recipe for alternative flavors to traditional challah. I tweaked the orange date alternative she had listed there, and the same old tried and true plain jane loaf quickly became orange poppy seed challah! It just so happened I had orange juice and an orange in my fridge.

The little flecks of orange peeking out of the shaped, risen, ready-to-bake dough got me excited. The aroma of baking bread combined with the citrus in this special version made my place smell amazing. Slicing through the cooled, baked bread, the orange flecks are still apparent. The taste is definitely citrusy, but not over the top in any way. The crumb is perfect, and I'd describe it as feathery rather than chewy or gummy bread. My mom had the brilliant idea to take slices of this orange poppy seed loaf and make french toast sandwiches with a layer of cream cheese and a layer of orange marmalade in between. The thought of that makes me salivate.

To turn a conventional challah into something extra special, try this orange poppy seed version. It will be even better if you knead in a cup of chopped semi-sweet chocolate. I think I'll do that next time.


Orange Poppy Seed Challah
Adapted from a recipe by Marlene Sorosky in Fast & Festive Meals for the Jewish Holidays

1 package active dry yeast
1 teaspoon plus 1 tablespoon sugar, divided
1/4 cup warm water (105 to 115 degrees F)
3 1/2 cups all-purpose flour, plus about 1/2 cup more
2 teaspoons salt
2 large eggs, beaten then divided
1/2 cup boiling water
1/4 cup orange juice, preferably pulp-free
Zest of one medium-size orange, grated
1/4 cup vegetable oil
Poppy seeds for topping

To make the dough, in a small bowl, combine yeast, 1 teaspoon sugar, and warm water. Set aside for 5 minutes, or until foamy.

In a large mixing bowl with beaters, mix 3 1/2 cups flour, salt, and 1 tablespoon sugar on low speed until combined.

In a small bowl, whisk eggs until frothy and then measure out 1 tablespoon to place in a separate tiny bowl to reserve for the egg wash when it comes time to bake the challah. Add the egg (all but the 1 tablespoon reserved) to the flour mixture. Then add the foamy yeast mixture to the flour. Add the boiling water, orange juice, grated orange peel, and oil, and mix for a few minutes on medium-low speed. Scrape down sides of bowl.

Switch to the dough hook and add flour, a tablespoon at a time, until the dough pulls away from the sides of the bowl and is smooth and elastic. You shouldn't need more than about a half a cup of flour for this. You can also do this by hand; just be sure the board and your hands are well-floured and try not to touch the dough with your fingers. Kneading in the mixer will take about 8 minutes but watch it closely because you don't want to overmix it thereby introducing too much gluten into the dough. Transfer the kneaded dough from the mixer onto the dough board and gently knead it for another minute so it forms a nice ball. Kneading by hand will take about 12 minutes.

For the first rise, spray a large bowl with Pam, place dough inside so the bottom of the dough is greased, and then flip the dough so the other side is greased, too. Cover with a lightly dampened towel and place in a warm, draft-free place until double in bulk, 60 to 90 minutes. When you poke the dough with your finger, an imprint should remain. Punch dough down, remove to a lightly floured board, and knead until smooth and shiny, about 2 minutes.

To shape into a long braid, divide dough into 3 pieces. With your hands, roll each piece into a long, smooth rope, about 20 inches long by 3/4 inch wide. Place on a greased baking sheet or silicone baking mat. To braid, bring left rope under center rope and lay it down. Bring right rope under new center rope and lay it down. Repeat to end. Pinch ends and tuck under to seal. If you want to finish the challah tomorrow, you can refrigerate the loaf overnight at this point. If chilled, the second rising will take at least twice as long.

For second rising, let loaf rise at room temperature, covered, in a draft-free place until double in bulk; about 45 minutes if at room temperature, at least 1 1/2 hours if chilled overnight.

To bake, preheat oven to 375 degrees F. Brush loaf with the 1 tablespoon beaten egg you had reserved (you can use a pastry brush or your finger) and sprinkle poppy seeds on top right away (the egg wash will dry quickly and then the seeds won't stick). Bake for 35-45 minutes, or until golden brown and bread sounds hollow when tapped. If crust starts to get dark before the bread is done baking, cover loosely with foil for remainder of baking time. With a giant spatula, remove from baking sheet and cool on wire rack. Cooled bread may be stored at room temperature, sealed in a plastic bag overnight, or frozen.

Makes 1 loaf.


Step-by-Step in Pictures
Combine the yeast, 1 teaspoon sugar, and warm water and let stand a few minutes until foamy...

In a large mixing bowl, combine flour, salt, and the one tablespoon sugar, then add the eggs...

Then add the foamy yeast mixture to the flour...

Zest the orange...

Add the zest, orange juice, boiling water, and oil to the flour...

Switch to the dough hook and add a tablespoon at a time of flour until the dough starts to pull away from the bowl and becomes smooth and elastic...

Knead on a dough board to form a ball...

Place in a greased bowl, then turn dough over to grease other side...

Let rise, covered, about 60 to 90 minutes, until doubled in size...

Turn the dough out onto a floured surface and divide into three pieces...

Roll each piece into a log and place all three strands on a baking sheet...

Shape into a braid on the baking sheet (I started in the center and worked outward in one direction and reverse braid in the other, in order to create a more even-looking loaf)...

Tuck the ends under and pinch to seal...

Cover and let double in size, about 45 minutes...

Brush with the reserved beaten egg, then sprinkle with poppy seeds...

Bake at 375 degrees F for 35 to 45 minutes. Cover with foil during baking if the loaf gets dark too quickly...

Let cool completely, then slice and serve!

Wednesday, January 27, 2010

Baking Bread in Jerusalem

The baker carefully pulling the baked bread out of the oven with tongs

As I mentioned in my last post, I just returned from 2 weeks in Israel. I traveled all over the country and took over a thousand photos and an hour and a half of video on my HD Flip Mino. Much of the footage is of my meals, or of restaurants or markets. I'm a little obsessed with food. And the food of Israel is delicious and amazing.

On my very last day in Israel, my friend Joel, who moved to Jerusalem about 10 months ago, took me to a bakery in Jerusalem just outside the shuk (outdoor market). It was my birthday. Joel thought I'd get a kick out of the unusual way this bakery bakes its bread. He was right. I was fascinated by the bizarre oven pits and baking method. You stretch out the bread dough on what looks like a round pillow cushion, then carefully hold the edge of this cushion with your hand, stick your arm in the oven, and slap the cushion against the oven wall so that the dough sticks to the wall. It bakes for 3 minutes.

The baker saw how interested I was in what he was doing, and kindly invited me into the kitchen. He showed me the whole process, then showed me the scars on his arm from several burns, and then asked me to try my hand at slapping dough into the oven. Um, in that order. Let me repeat that. First he shows me his battle wounds, then says it's my turn. Suffice it to say, I was scared to death.

Without further ado, here's my 5 minute video of bread baking in a Jerusalem bakery. Enjoy!


Video:
Marni and Joel Go Inside a Jerusalem Bakery Kitchen


Photos:
In the Bakery Kitchen!


The baker preparing the portions of dough


The baker and Marni hanging out in the kitchen


Dough baking against the oven wall


The bakery sign as seen from Agrippas Street


My friend Joel and me enjoying the just-baked bread!

Monday, December 7, 2009

No-Knead Onion Bread


Oh baby this bread is goooooooooood! We made it for Thanksgiving dinner. It uses onion soup mix, which is full of great hearty flavor. Lipton's makes a perfect onion soup mix and I think they come two packets to a box. So, if you make the Spinach Kugel I posted a few months ago, you can use one onion soup packet for that, and the other for this delicious bread. The recipe calls for dill, but in the crazy kitchen chaos hours before Thanksgiving dinner, we couldn't find dill in the spice cupboard so we skipped it. I made the bread again last night and did use dill in it, and holy mother of breadgoodness, it adds wonders to an already spectacular loaf! So with or without dill, this bread is a keeper.


After Thanksgiving was over, the leftover loaf made a great sandwich with some swiss cheese, lettuce, and avocado. Yum! And did you notice in the title that it's no-knead? That means no pulling out the pastry board, dirtying extra dishes, and putting your fists into it. Easy breezy yeast bread!


No-Knead Onion Bread
Recipe by Marlene Sorosky in Easy Entertaining with Marlene Sorosky

Note from author: Lots of onion soup mix and dill lace this tender, even-grained peasant loaf. A perfect partner to heaty soups and entrees.


1/4 cup warm water (110 to 115 degrees)
1 package dry yeast
1/4 teaspoon sugar
1 cup small curd cottage cheese
2 tablespoons butter or margarine, cut into small pieces
3 tablespoons honey
3 tablespoons dry onion soup mix
1 tablespoon dried dillweed
1/4 teaspoon baking soda
3/4 teaspoon salt, or to taste
1 egg, lightly beaten
2 1/2 cups bread flour
1 egg mixed with 1 teaspoon water for glaze
Butter for serving, if desired

Pour water into a large bowl. Stir in yeast and sugar; let sit 5 minutes or until foamy. In a medium saucepan, heat cottage cheese, butter or margarine, honey and onion soup mix until buter melts and mixture is warm to the touch. Stir in dill, baking soda, salt and egg. Stir into yeast mixture. Stir in flour; the batter will be stiff. Cover with a piece of oiled plastic wrap and a damp towel. Set in a warm place and let rise 1 hour or until doubled in bulk. Punch dough down and place in a well greased 9x5x3-inch loaf pan. Cover and let rise 1 hour.

Preheat the oven to 350 degrees. Brush the top of the loaf lightly with egg glaze. Bake for 30 to 40 minutes or until the top is browned. Remove from oven, immediately go around edges with a knife and invert loaf. Turn right side up and cool on rack. Serve with butter, if desired.

*The bread may be wrapped in foil and stored at room temperature up to 2 days or frozen.

Makes 1 loaf.


Step-by-Step in Pictures

Combine cottage cheese, butter, honey, and onion soup mix and heat until butter is melted...

Stir in dill, baking soda, salt, and egg...

Add this warm cottage cheese mixture to the yeast, water, sugar mixture...

Add flour. Dough will be stiff...

Cover and let sit about one hour until doubled in size...

Pat into greased loaf pan. Let rise again until doubled in size, then brush with egg wash...

Bake at 350 degrees F for about 40 minutes...

Remove from pan, turn over, and tap the bottom to listen for a hollow sound, which indicates it's done.

Turn it over again so it is right side up and let cool...

Slice and serve!

Monday, November 2, 2009

Sweet Vanilla Challah and a Super Cool Round Braid Method


This vanilla challah is my mom's favorite challah recipe and I love it, too. It's a great one to add chocolate chips to, so I did that for two of the three loaves. Come on, vanilla + chocolate in egg bread? Heaven!!!

This is the challah recipe we served at my sister's August wedding. For the wedding, we shaped the challah into rolls to serve in bread baskets for each table. Perhaps you recall from a previous blog post that my mom and cousin Rachael spent an entire day making hundreds and hundreds of rolls. Yup, they were these Beth Hensperger babies! Hensperger is a bread mastermind, and maybe we're a little biased because she's also a Northern California local. Her book The Bread Bible really is just that to so many people.


The round braid shape featured in this blog post (which is not from Beth Hensperger's recipe) is perfect for Rosh Hashanah, but it's fun and special to do any time of year. And it's so easy! When I first saw step-by-step photos on the Orthodox Union website, I thought I'd never figure it out. But once it connected for me, I laughed at myself for ever calling it impossible. Hopefully my photo demonstrations show the steps easily enough, but I promise you, if you spend a few extra minutes, you will figure it out and be so happy you did!


Sweet Vanilla Challah
Recipe by Beth Hensperger in The Bread Bible

1 tablespoon active dry yeast
1/2 cup sugar
1 tablespoon salt
6 1/2 to 7 cups unbleached all-purpose flour or bread flour
1 3/4 cups hot water
4 large eggs, at room temp, lightly beaten
1/2 cup vegetable oil
1 1/2 tablespoons pure vanilla extract

Vanilla egg glaze
1 large egg yolk
1 teaspoon pure vanilla extract
1/2 teaspoon sugar

In a large bowl or mixer, combine the yeast, sugar, salt, and 2 cups of flour. Add the hot water, eggs, oil, and vanilla. Beat hard until smooth, about 3 minutes. Scrape down the sides of the bowl occasionally. Add remaining flour, 1/2 cup at a time, switching to a wooden spoon when necessary if making by hand. Continue beating until the dough is too stiff to stir.

Turn dough out onto a lightly floured work surface with the plastic pastry scraper and knead until soft and springy and a layer of blisters shows under the skin, about 4 min. Dust with flour only 1 tablespoon at a time as needed to prevent sticking. The dough needs to be slightly firm for free-form loaves.

If kneading by machine, switch from the paddle to the dough hook and knead for 3 to 4 minutes, or until the dough is smooth and springy and springs back when pressed. If desired, transfer the dough to a floured surface and knead briefly by hand.

Place dough in a greased deep container. Turn the dough once to coat the top and cover with plastic wrap. Let rise at room temperature until doubled in bulk, 1 1/2 to 2 hours.

Grease or parchment-line 1 or 2 baking sheets or the springform pans. Gently deflate the dough. Turn the dough out onto a lightly floured work surface. Divide the dough into 2 equal portions. Roll each portion out into a smooth, thick strip about 30 inches long, with 1 end 2 to 3 inches wider than the other. Roll to lengthen and taper the thinner end. With the wide end on the work surface, lift the tapered end and wind the rest of the dough around the corner section 2 or 3 times, forming a compact coil. Pinch the end and tuck it under. Place the coils, with the swirl pattern facing up, on the baking sheets or in the springform pans. Cover loosely with plastic wrap and let rise until almost doubled in bulk, 30 to 40 minutes. Because of the eggs, this loaf does not need to double completely; it will rise enough in the oven.

Twenty minutes before baking, preheat the oven to 350 degrees. To make the vanilla egg glaze, in a small bowl, whisk together the egg yolk, vanilla, and sugar. Beat until well blended. Gently brush the dough surfaces with a thick layer of the glaze. Place the baking sheet or pans on a rack in the center of the oven and bake 40 to 45 minutes, or until a deep golden brown and the loaves sound hollow when tapped with your finger. Carefully lift the turbans off the baking sheets with a spatula and transfer to cooling racks. If using the springform pans, release the sides and then carefully remove the turbans from the pan bases. Cool completely before slicing.


Step-by-Step in Pictures

Combine the yeast, sugar, salt, 2 cups of flour, and then the hot water, eggs, oil, and vanilla...

Add enough flour to create a dough that comes together and pulls away from the bowl (but don't add too much flour; you can always add more when kneading)...

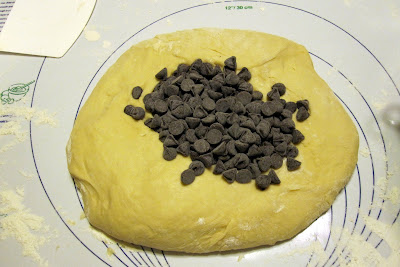
I kneaded chocolate chips into some of the dough...

Here it is kneaded with chocolate chips. Place the dough in a bowl and cover. Let it rise until doubled...

Here's the plain dough after it's doubled in size. Time to shape into a loaf!

Divide into four strands...

Create a pinwheel out of the four strands, carefully overlapping like a lattice...

Notice there are two strands on each side that work like pairs (and there are four pairs). Take the strand that is "the under," not "the over," and cross it over its pair so that if it was facing down before, now it is facing right (a new direction). It now belongs to a strand from a different pair.

Continue crossing strands over their pairs, alternating clockwise and counterclockwise for each cycle.

Your design is done when the strands can't reach to do another cycle...

Pinch the ends together and them pull them up to the center of the design, then flip the entire dough over so that the underside becomes the top of the challah when baking...

Here's the dough flipped over and ready for its second rising...

Now let's try the exact same process with the chocolate dough!

Divide the dough into four portions...

Roll the four portions into strands...

Create the lattice...

Cross "the under" strand over its pair so it now joins a strand in a different pair. Finish the cycle, then alternate between clockwise and counterclockwise until you can't do anymore cycles...

Pinch the ends together, bring them up and together, then flip the entire dough over and place on a baking sheet...
Here are the two chocolate chip challahs I shaped and then let rise until almost doubled...

When the challahs are almost doubled in size, prepare the vanilla egg glaze by combining the egg yolk, vanilla, and sugar...

Here's your vanilla egg glaze....

Brush the vanilla egg glaze over the loaves...

Bake for 40 to 45 minutes in a 350 degree F oven. Alternate the trays and turn them front to back. If they start to get dark but aren't done baking, cover with foil until they're baked through...

Tap the underside of the challah and listen for a hollow sound and a feeling of doneness...

Look how big they got because of the eggs in the dough!

Beautiful!

Served at a meal!
Related Posts with Thumbnails