Showing posts with label dessert. Show all posts

Thursday, February 19, 2015

No-Bake Cardamom Cashew Fudge Diamonds


You may have cooked with tofu before, but have you ever baked with it?

This is one of those really neat recipes where you can shock your guests when you tell them what's in it! Or don't tell them if they're not experimental or unconventional with their food. My dad, for example, would be better off not knowing what's in this! Hehe.


The method for the tofu is unusual and was developed by tofu genius Andrea Nguyen. You buy super-firm tofu and grate it on a box grater like you would a block of cheese. Stir it in with finely chopped cashews, heat that mixture on the stove with sweetened condensed milk, and add cardamom. Spread in a pan and top with chopped pistachios. Voila! Couldn't be easier. Trader Joe's actually sells a 16 oz. package of super-firm tofu that is perfect for this. Since that's double the quantity you need for this recipe, you could just double everything else and use all the tofu, and end up with a double batch. Or save the other half of the tofu for a stir fry or soup.

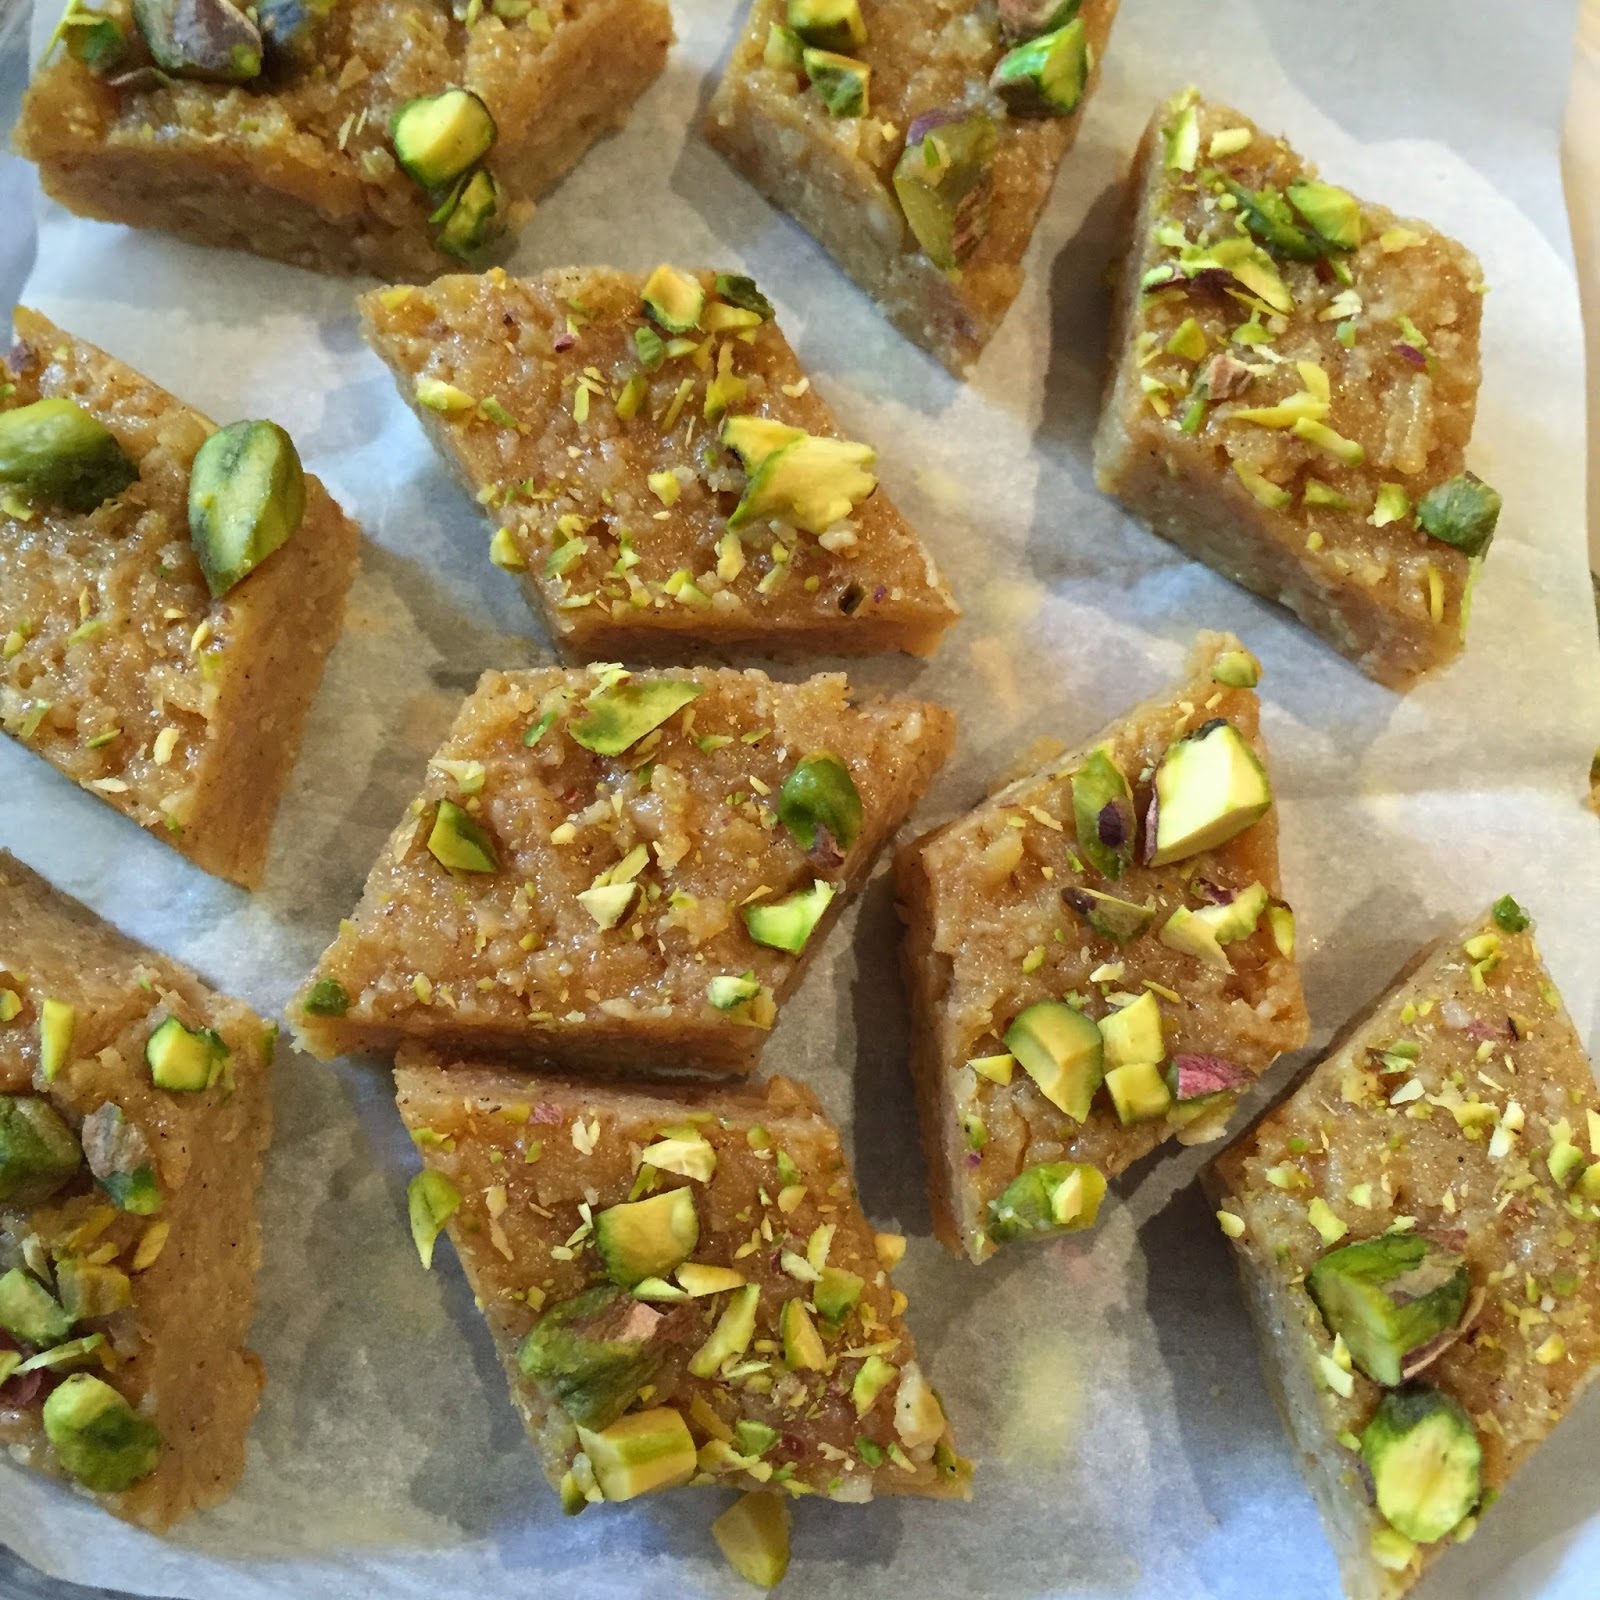
I made this recipe back in December for a holiday party, and it was everything I hoped it would be. Cardamom is one of my all-time favorite spices (Maybe my very favorite? I'm just afraid to commit to a favorite!). The texture of the fudge is chewy and a little sticky. It looks beautiful on a plate with the light green from the pistachios. And boy, oh boy, the aroma of the cardamom. I've been yearning for more ever since that delicious holiday event, so here I am, two months later, making the recipe again. Ask me in April and I will probably have made another batch. You can't keep me away. And now I'm going to turn you into an equally obsessed person. Good luck with that!


No-Bake Cardamom Cashew Fudge Diamonds
Adapted from a recipe in the "Genius Recipes" section of Food 52, originally from Andrea Nguyen's Asian Tofu cookbook (because Andrea is a genius!)

Makes approximately 36 small diamonds

8 ounces super-firm tofu (Trader Joe's sells this!)
3 1/2 ounces unsalted raw cashew pieces or whole nuts (Trader Joe's sells this!)
1 14-ounce can sweetened condensed milk
3/4 teaspoon ground cardamom
2 tablespoons coarsely chopped raw pistachios

Line an 8-inch square pan with parchment paper and leave enough on the sides to be able to lift it up out of the pan later. You can also use foil and lightly spray it. Set aside.

Take the tofu out of the packaging and dry it off with a paper towel. Using the smallest hole on a box grater or other cheese grater, grate the block of tofu into a bowl.

Pulse the cashews in a food processor until they resemble breadcrumbs. They should be very finely chopped, but not turn to dust. Add the cashews to the bowl of grated tofu and stir to combine.

In a medium-sized saucepan, combine the can of sweetened condensed milk with the tofu/cashew mixture. Cook on medium heat for approximately 15 minutes. Note that the mixture should never reach a boil. You can start out just stirring it occasionally, but as the mixture starts to thicken, you'll need to be stirring constantly because it will stick to the bottom of the pan and burn. Watch closely to make sure this doesn't happen! It will eventually resemble a really thick oatmeal. While you're stirring, if you notice that the mixture is pulling away from the sides of the pan or gliding around the bottom of the pan rather than scorching, it's ready.

Remove from the heat and stir in the cardamom.

Immediately spread into your prepared pan using an offset spatula to push the mixture toward the edges and corners of the pan. Smooth over the top so the surface is even. Sprinkle the chopped pistachios on top and gently press them down into the fudge so they stay put.

Chill in the fridge for at least an hour.

Lift up the parchment and place on a cutting board. Using a very sharp chef's knife, cut rows at an angle in one direction, and then cut rows horizontally in the other direction, so that the end result is a piece of fudge that looks like a diamond. Serve chilled or at room temperature.

Store in an airtight container in the fridge for up to 5 days, or freeze for serving at a later time. As this fudge is sticky, do not stack the pieces directly on top of each other. Instead, place them along the bottom of a container and then place a piece of parchment paper or wax paper on top of each layer before stacking more pieces of fudge into the container.


PHOTO GALLERY: How to Remove and Cut the Fudge

Lift up on the parchment paper to pull the fudge out of the pan...

Place the fudge down on a cutting board and spread the parchment paper flat to expose the sides of the fudge...

Cut rows at an angle across the fudge, then horizontally. This creates a diamond shape...

Admire your diamonds. :)

Stack the diamonds in an airtight container, separating each layer with parchment or wax paper. Store in the fridge... 

Saturday, April 23, 2011

My Mom's Favorite Ooey Gooey Pecan Bars for Passover


I got to my parents' house Thursday night and the first thing my mom says to me (after the big bear hug, of course) is, "Marni, you have to try these pecan bars." She all but stuffed one into my mouth. It wasn't exactly hard to give in and try one, but it was noteworthy that she was so eager. I mean, I'd just stepped off a plane and all she could think about was feeding me this bar.

Her alacrity was justified. One bite, actually, one look at these bars, and I knew I'd be sleeping happy (and waking up and going to the gym - but it would be worth it).


Just when I thought there'd be no new baking revelations this Passover, my mom drops this on me. Kaboom! Kerpow! And now I am a changed woman. Forever. Can a Passover Pecan Bar do that to a person? Yes, and I can't wait for you to try this. In fact, I urge you to use your leftover Passover ingredients after Passover is over and make this to bring to a picnic, or a work party, or whatever. No one will know it has matzah meal in it, but if they ask what's in it, tell them the truth. It will shock them.

Unfortunately, because my mom had already made these by the time I arrived, I wasn't there to take step-by-step photos. So these few finished product photos will have to do. I think you'll survive!


Ooey Gooey Pecan Bars for Passover
Adapted from a recipe by Marcy Goldman in A Treasury of Jewish Holiday Baking

Crust
1/2 cup matzah meal
1 cup matzah cake meal
1/2 cup ground toasted pecans
1 cup brown sugar
1/4 teaspoon salt
1/2 teaspoon ground cinnamon
1 cup (2 sticks) unsalted butter or margarine
1 egg yolk

Gooey Pecan Filling
4 eggs, lightly beaten
2 tablespoons unsalted butter or margarine, melted
1 1/3 cups brown sugar
Pinch of salt
1/2 cup Passover maple table syrup
1 teaspoon lemon juice
1 tablespoon Passover vanilla sugar (or Passover vanilla extract)
1/2 cup chopped pecans

Preheat the oven to 350 degrees F. Lightly grease a baking pan. My mom used a 9x13-inch and highly recommends it! You can also use an 8x11 (smaller pan) and the bars will be taller, even gooier, and more like the pecan pie you're used to around Thanksgiving.

For the crust, in a food processor or large bowl, stir together the matzah meal, cake meal, pecans, brown sugar, salt, and cinnamon. Add the butter and pulse in the food processor or use a pastry blender to cut the butter up into small morsels so that the crust mixture is crumbly. Add the egg yolk and stir to incorporate. Use your fingers to squish the mixture together and then press it into the prepared baking pan. Bake for 20 to 25 minutes. You'll know the crust is done when the edges are beginning to brown, but are not too dark. Cool on a wire rack for 15 minutes.

For the filling, in a large bowl, combine all of the ingredients and whisk to incorporate. Pour this filling onto the cooled crust and return to the oven for 20 to 25 minutes. Cool completely on a wire rack, then place in the fridge to chill further so that the filling sets. Cut into squares. A little goes a long way because these are so gooey and indulgent, so even bite-size pieces would work well.

Makes 3 to 4 dozen heavenly bars.

Friday, April 15, 2011

Mastering Wilton Cake Decorating by Practicing on My Sister's Birthday Cake

The cake I made for my sister's birthday,
using skills I just learned in the Wilton workshop!


A few weeks ago I was invited to a Wilton cake decorating workshop. Wilton is the brand of cake decorating supplies and resources I grew up with. Every birthday cake of my childhood (and that of my sister and brother) was a cake my mom made, guided by the Wilton yearbook of decorating ideas. I used to watch my mom stay up really late the night before my birthday party, creating amazing, beautiful, glorious, creative cakes. It's one of my happiest memories.

Practicing my piping skills in the workshop

So getting the invite to this Wilton workshop was pretty thrilling. Of course I said yes. And I spent 6 hours learning from the absolute masters of the art. Sandy Folsom is the Director of The Wilton School and watching her pipe buttercream out of a pastry bag onto a practice board to demonstrate proper technique, upside down no less (!!!), was one of the most amazing things to witness. She made piping look effortless.

Director of the Wilton School Sandy Folsom
demonstrating piping skills upside down!


Let me tell you right now, it is not effortless! It's a lot of work, a steady hand, knowing which angle to hold the bag relative to the cake surface, how much pressure to squeeze around the pastry bag, consistency, and the list goes on. There are so many instructions. In piping a rosette, you start at the 9 o'clock mark and squeeze clock-wise until the 6 o'clock mark, then gradually release so it fades to nothing by the time you return to 9 o'clock. Whew! So much to think about!

I even learned how to make fondant flowers

Six hours is hardly enough time to master a skill. But getting an overview of the basic skills required to decorate a cake was a blast, and extremely helpful. Nancy Siler, the VP of Consumer Affairs, was there to introduce us to all the new Wilton products and work the room, helping attendees with proper hand position and technique.

I met really interesting people in the workshop, mostly food stylists, a few bloggers, and even journalists. Shout-out to Hilary of Nosh With Me, a blog I've been following for years. How thrilling to meet the person behind the blog you read. Bloggers have offline lives, too, ya know! Hong of Ravenous Couple sat in front of me and I was constantly impressed with his handiwork. Food stylist Alice Hart sat behind me and kept tweezers/pincers in her pocket, because as a food stylist, you never know when you're going to need to adjust something without using your fingers. Right? So fascinating! Chef Jamie Gwen, who hosts a radio show on KFWB News Talk 980, was also in the class, and I worked with her (and Alice Hart) on a group decorating project.

Some of the group cake decorating projects during the workshop
(my team was the yellow cake in the center)


One of the neatest effects I learned at this workshop was the basketweave, a technique that makes your cake look like a basket. It's very impressive-looking, but the way you create it is not all that difficult, just tedious. I was very excited to try this at home, and with my sister's birthday coming up just days later, I decided to go for it!

I made my grandmother's chocolate birthday cake and frosted it with homemade buttercream. I then covered the entire perimeter with my first ever on-my-own, no-hand-holding-from-master-Wilton-cake-decorators basketweave! I piped roses and other flowers on the top and hanging off the edge onto the basket, and wrote a birthday message to my sister in the center.

The cake took two days. I baked the layers on a Monday, froze them so they'd be easier to frost, and then spent all of that Wednesday evening making buttercream frosting from scratch and decorating the cake. I'm really pleased with how it turned out. I'm proud of my first effort doing basketweave. And most rewarding of all, my sister loved it.

Presenting the cake to my sister (who's 5 months pregnant!)

Thanks to Wilton for giving me happy memories as a kid and still today. The workshop was incredible. I think I'd make a great postergirl for Wilton. Heck, between my mom and me, we own so many Wilton products we could open up a shop! As for my skills, I have a lot of practice to do before I reach mastery level. Maybe this will be the Year of the Cake. More roses, rosettes, and basketweaves until I drop! I'll name my autobiography From Basketweave to Basketcase. Ha! Could be a bestseller.


More Photos of the Birthday Cake I Made For My Sister


Thursday, March 24, 2011

Chocolate Orange Biscotti: Twice-Baked Heaven


NOTE: This post was originally published on Shabby Apple's blog on March 23, 2011, where I guest blogged as part of Shabby Apple's Roamin' Holiday Italian-inspired clothing line launch. If you are a fan of Anthropologie dresses (like I am!), you're going to LOVE Shabby Apple. Check it out here!

Biscotti is an Italian cookie that has superhero powers in the category of shelf life. That's because the cookie is twice-baked, and that process dries it out so it lasts longer. What exactly does it mean to bake a cookie twice? Well, first you shape the dough into a log on your baking sheet and bake it for Round 1. After this first baking period, you take the baking sheet out and slice the log into those familiar long cookies that we love so much. You then place them back on the baking sheet facing upright (imagine they're tanning at the beach and want to get maximum sun exposure), and off they go to bake for Round 2!


Those Italians sure came up with something good. And fortunately for us, it's a cookie that's available all over the place. You don't have to go to Italy to eat one (though a trip to Italy to get a biscotti makes a pretty good story, or an excuse for a vacation). Ever notice while waiting in the line at Starbucks that they sell individually wrapped biscotti? Makes sense. They are great coffee dunkers. And while biscotti just implies a simple twice-baked cookie with basic ingredients, gourmet, exotic, adventurous variations on the traditional can be found in cookbooks and bakeries everywhere. You'll find that nuts, dried fruit, and chocolate chunks all get tossed into the batter, or the finished, baked cookie even gets dipped in chocolate. In fact, a plain biscotti today seems so boring!

One of my favorite flavor combinations is chocolate and orange, so putting them together in a biscotti sounds like my kind of heaven. This recipe is easy to prepare and has a hearty helping of chocolate chunks and orange zest. Do take the time to chop up a chocolate bar. It will work (and taste) soooo much better than using mini chocolate chips. So far, I'm going on one week that these biscotti have kept like new in an airtight container. I love that I feel no sense of urgency to finish eating the whole batch quickly before they go bad. These guys are going to last. And that means I'm going to take my time, savor each bite, and probably still be eating them in two weeks. Truly a cookie with superhero powers.


Chocolate Orange Biscotti
Adapted from a recipe by Marcel Desaulniers in Death By Chocolate Cookies
Makes 4 dozen biscotti

4 cups all-purpose flour plus up to 1/2 cup for shaping the dough
1 tablespoon baking powder
1 teaspoon salt
1 1/2 cups granulated sugar
1/2 pound (2 sticks) unsalted butter, cut into 1-ounce pieces
4 large eggs
2 tablespoons minced orange zest (or more!)
6 ounces semisweet chocolate, chopped into 1/4-inch pieces (don't use chocolate chips because they're not easy to slice)

Preheat the oven to 325 degrees F.

Sift together the flour, baking powder, and salt onto a large piece of wax paper and set aside.

In the bowl of an electric mixer, beat together the sugar and butter on medium speed until soft, about 2 minutes. Scrape down the sides of the bowl as needed, and continue beating for 4 more minutes until very smooth. Beat in the eggs, one at a time. Add the orange zest and beat on high for 30 seconds. On low speed, gradually add the sifted dry ingredients by lifting the wax paper carefully to the mixer and pouring the ingredients in. Add the chopped chocolate and mix on low for 30 seconds. Remove the bowl from the mixer and and continue mixing the chocolate in until well incorporated. A wooden spoon or strong rubber spatula work well.

Prepare two baking sheets by lining with parchment paper or silicone baking mats. Lightly flour a work surface. Transfer the biscotti dough to this surface and divide the dough into four equal portions. Use additional flour as necessary if the dough gets sticky. Shape each portion into a log that measures 8 inches long by 2 1/2 inches wide and 1 1/4 inches high. You can also shape these logs directly onto the prepared baking sheets so you don't have to lift them once shaped. Two logs should fit on each baking sheet, placed about 2 inches apart.

For Round 1 of the two baking times, bake the biscotti logs on the top and center racks of the preheated oven for 35 minutes, until lightly browned and firm to the touch, rotating the sheets from top to center halfway through the baking time (at that time also turn each sheet 180 degrees). Remove the biscotti logs from the oven and reduce the oven temperature to 275 degrees F.

Let the logs cool for about 15 minutes so you'll be able to handle them. Then, place a log onto a cutting board and use a very sharp serrated knife to slice the log into 12 cookies. The slices should be at a diagonal angle and about 1/2-inch thick. The rounded ends of the log can be discarded or eaten (Mmmm, eaten is a much better option). Do the same for the other logs. Return the slices to the baking sheet, this time facing up. You might be able to fit all of them snugly onto the same sheet they were first baked on, but you might need a third sheet.

For Round 2 of the two baking times, bake the biscotti slices on the top and center racks of the preheated oven for 30 minutes until crisp and evenly browned, rotating the sheets from top to center halfway through the baking time (at that time also turn each sheet 180 degrees). Remove the biscotti from the oven and allow them to cool thoroughly before storing in an airtight plastic container.

Storage: The biscotti will last for 2 to 3 weeks stored in an airtight container at room temperature. They also freeze well. Just be sure to wrap them well and place in an airtight container in the freezer.


Step-by-Step in Pictures
Beat the sugar and butter together...

Beat in the eggs, one at a time...

Zest an orange...

Add in the orange zest...

Stir in the dry ingredients...

Measure 6 ounces of chocolate (I use a digital scale to measure - love this thing!! Worth every penny!)...

Chop the chocolate...

Stir the chopped chocolate into the dough...

Transfer the dough to a lightly floured work surface and add flour as needed to form a ball, then divide into four portions...

Shape each portion into a log and place two logs per baking sheet...

Bake at 325 degrees F for 35 minutes...

Allow to cool a few minutes so you can handle the log, then place on a cutting board and cut diagonal slices...

Return the slices to the baking sheets face up, reduce the oven to 275 degrees F, and bake for another 30 minutes...

Enjoy with a cup of coffee! Perhaps even dunk them!

Or package a few up in a treat bag, stick a label on it to let loved ones know who made them their treat, and get to sharing!

Sunday, March 20, 2011

Another Delicious Hamentaschen Recipe PLUS Super-Scientific Hamentaschen Filling Research


Happy Purim! Chag Purim Sameach! To be completely honest, I wasn't sure I'd even get around to making homemade hamentaschen this year. But there's something about this annual tradition that if missed, would make the holiday feel a little empty for me.


So I did it. But I didn't go back to one of the fantastic recipes I'd made in the past (here, here, and here). I wanted to use this once-a-year opportunity to choose a recipe from a different cookbook. So I sifted through my Jewish dessert cookbooks and decided on Gil Marks ' The World of Jewish Desserts. His dough was fantastic. Easy to work with, beautifully flecked with orange zest, and held its shape when baked.


I chose to make three fillings: apricot, chocolate, and poppy seed. But I did an interesting thing before I ended up with those filling choices. I posted an unofficial poll to my Facebook page. Apparently my friends have very strong, passionate feelings toward their hamentaschen fillings! 37 comments later, I had a fair amount of data. A couple of peculiar votes like pegasus meat, children's tears, and smaller hamentaschen (that is pure genius) made their way onto the list, but mostly it was your usual chocolate, fruit, and poppy seed filling votes.

Here's my Facebook post:


And here are the results, graphed, coming to you thanks to the Happy Go Marni Research Department:


Despite a lot of anti-poppy seed sentiment in this Facebook poll, it still ended up being the most popular filling! Apricot was extremely popular too, and without any real negative comments. Chocolate seemed like a no-brainer, but I was surprised it had so many fewer votes than poppy seed and apricot. What's wrong with you people! Why isn't chocolate number one? Ok actually, I love all three of the top winners, and those are the three I made! I think I'll save pegasus meat for another year. ;)

What's your favorite hamentaschen filling?


Hamentaschen
Adapted from a recipe by Gil Marks in The World of Jewish Desserts
Makes sixty 3-inch cookies

4 cups all-purpose flour
2 teaspoons baking powder
1/2 teaspoon salt
1 cup (2 sticks) unsalted butter or margarine, softened
1 cup sugar
3 large eggs
1/4 cup orange juice, milk, or water
2 teaspoons vanilla extract, 1 1/2 teaspoons lemon extract, or 1 teaspoon almond extract
2 teaspoons grated lemon or orange zest (optional)
About 2 cups hamentaschen filling (the sky's the limits, as you can see from the Happy Go Marni poll above)
Golden Egg Wash (recipe below)
Coarse sugar for decorating, optional

Sift the dry ingredients together: the flour, baking powder, and salt. In a stand mixer, beat the butter or margarine until smooth, about 1 minute. With the mixer on low speed, slowly add the sugar until the mixture is light and fluffy, about 4 minutes. Beat in the eggs, one at a time. Add the liquid (orange juice, milk, or water), extract, and optional zest. On low speed, add in the flour just until combined. The dough will be soft, not too dense. Wrap in plastic and chill in the fridge until firm, about 2 hours. You can leave it overnight, too. When you're ready to shape the dough, remove from the fridge and let sit out a few minutes to become malleable (won't take very long because it's a soft dough).

Preheat the oven to 350 degrees F. Divide the dough into thirds. Return the other two chunks to the fridge so they don't get too soft. With the remaining third, roll it out with a rolling pin on a lightly floured dough board or waxed paper to about 1/8 inch thick. If you prefer thicker dough, roll to about 3/8 inch thick. Using a 2 1/2 or 3-inch round cookie cutter, cut circles out of the dough. Save the scraps to roll out again and make more cookies.

Place 1 teaspoon of filling in the center of each round. Bring three corners of each round up toward the top, pinching two points together to form one corner, then continuing until you have three corners. I like to leave some of the filling exposed, not only because it's pretty to see some color peeking out, but because then you'll know which filling it has if you are making more than one filling! If when you pinch the edges together they don't stick well, rub a little cold water on the dough to act as glue. Place 1 inch apart on parchment or silicone baking mat-lined baking sheets.

Prepare Golden Egg Wash (see recipe below). Brush egg wash on all sides of each unbaked cookie with a pastry brush. Sprinkle with coarse sugar if you'd like.

Bake until golden, 15-20 minutes depending on your oven. I prefer my cookies a little chewy, so I err on the side of less baking time. Transfer to a rack to cool. Store in an airtight container at room temperature. The cookies will keep for about one week, or you can freeze them as soon as they've cooled and they'll be good for several months.


Golden Egg Wash
Recipe from my March 2010 hamentaschen post (Marcy Goldman's incredible recipe!)

1 egg plus 1 egg yolk
1-2 tablespoons milk or water
Pinch of sugar

In a small bowl, whisk together all the ingredients. Use a pastry brush to glaze or brush on prepared, unbaked hamentaschen.


Step-by-Step in Pictures
Beat butter or margarine until smooth...

Add sugar and beat until incorporated...

Add the eggs, one at a time...

Add the juice, vanilla, and zest...

Add the dry ingredients (which you had sifted together first)...

Beat just until incorporated...

Wrap the dough in plastic and chill in fridge...

Roll out the dough, a third at a time...

Cut 2 1/2 or 3-inch rounds in the dough...

Add a teaspoon of filling to the center of each round and fold up the sides to form a triangle...

Continue with the remaining two-thirds of the dough and any other fillings you want to try...

Brush with Golden Egg Wash and sprinkle with coarse sugar if you'd like...

Bake at 350 degrees F for 15-20 minutes, then let cool on a rack...
Related Posts with Thumbnails