Showing posts with label bread. Show all posts

Monday, October 5, 2009

The 9-foot Monster Challah

Baked in early September by Tony Sapia at Gemelli's Bakery near Penn State
Source: Collive.com

Run for your lives!!!!!!!!!!!!!!!!!!!!!!

Most of the time when I want an expensive kitchen item, I either save up money over time (ex. KitchenAid standmixer), or I come to grips with the fact that it's just not practical enough and I'll never own it (ex. juicer). In the case of the 10-foot oven, I haven't come to grips with anything and I still really want it.

Because how else do you expect me to reproduce this 9-foot challah at home?

Source: Collive.com

A-M-A-Z-I-N-G! Monster oven remains on my wishlist. I'm not budging.

Thursday, September 17, 2009

No-Knead Round Challah, Perfect for Rosh Hashanah


Shana Tova! Happy New Year to my fellow members of the tribe! Rosh Hashanah is here!

I love this Jewish holiday. It's such a joyous celebration spent with family, focusing on new beginnings, a clean slate, second chances, basically, a new year! And the food is fantastic! Besides making everything with apples and honey (I'm not kidding, you can throw those two ingredients into just about anything: pasta, meatloaf, chicken, kugel, salad, cookies, etc...), another tradition is to make a round challah, symbolizing the cycle of a year or the cycle of life (and oh man, there are so many other interpretations!). When I saw this King Arthur Flour no-knead round challah recipe featured in the blog Bakers' Banter and the accompanying gorgeous photos, I had to try it.


The concept of a no-knead challah is interesting, and it's becoming increasingly popular and trendy. I had never tried it before. This specific challah recipe is actually ideal for a busy, working person who can't put together a traditional loaf of bread in the evening after work unless she wants to be up till 1 in the morning. Kneading, plus two rising times, plus baking, means one really late night. But with this recipe, you make the dough, let it rise for about 2 hours, and then it goes into the fridge overnight! You take it out the following night, shape it, let it rise another 90 minutes, and then bake it! A two day process works perfectly for my busy schedule!

As you'll see in my photos, the challah grew A LOT during the rises and baking! More than in the photos from Bakers' Banter. Maybe I have superhero super active yeast. Still, without comparing it to anything, it's a gorgeous, regal loaf. And I'm patting myself on the back for successfully making a yeast bread without kneading it at all. The urge was there but I resisted!


No-Knead Challah
Recipe from King Arthur Flour

Dough
6 3/4 cups or 7 3/4 cups King Arthur Unbleached All-Purpose Flour*
1 tablespoon + 1/2 teaspoon salt
1 1/2 tablespoons instant yeast
1 1/2 cups lukewarm water
4 large eggs
1/2 cup honey
1/2 cup melted butter or vegetable oil
*See step #1, below.

Topping
1 egg (any size) beaten with 1 tablespoon cold water
2 to 3 tablespoons sesame seeds or poppy seeds, optional

1. The flour/liquid ratio is important in this recipe. If you measure flour by sprinkling it into your measuring cup, then gently sweeping off the excess, use 7 3/4 cups. If you measure flour by dipping your cup into the canister, then sweeping off the excess, use 6 3/4 cups. Most accurate of all, and guaranteed to give you the best results, if you measure flour by weight, use 33 ounces.

2. To make the dough: Combine all of the dough ingredients, in the order written, in a very large bowl (at least 6 quarts). Stir to make a sticky dough. You can do this in a stand mixer and then transfer to a larger bowl; or simply use a big bowl and spoon (or dough whisk).

3. Cover the bowl, and let the dough rise for 2 hours at cool room temperature.

4. Refrigerate the dough for at least several hours, to chill it and make it easier to work with. It can be refrigerated for up to 4 days before using.

5. When you're ready to make challah, remove the dough from the refrigerator, and scoop out about one-third of the dough (about 21 ounces). Transfer it to a floured work surface; a silicone mat works well here.

6. Divide the dough into three pieces, and shape each piece into a log about 24" long.

7. Braid the logs, pinching the strands together at each end.

8. Lightly grease an 8" x 2" round cake pan. It's important that the pan is at least 2" deep. If it's not use, a 9" round pan. Coil the braid into the pan.

9. Cover the pan, and allow the braid to rise for about 90 minutes, till it's quite puffy. Towards the end of the rising time, preheat the oven to 350°F.

10. Uncover the challah, and brush it with the egg/water mixture. Sprinkle with seeds, if desired.

11. Bake the challah for 30 to 35 minutes, till it's golden brown and an instant-read thermometer inserted into the center registers at least 190°F.

12. Remove from the oven, and carefully turn out of the pan onto a rack to cool.

Yield: one 9" round braid. The entire recipe will make 3 loaves.


Step-by-Step in Pictures

Combine all ingredients for the dough into a mixing bowl...

Mix until a sticky mass forms...

Place in a bowl, cover, and let rise about 2 hours...

Here's the dough after 2 hours of rising...

Then place in the fridge overnight...

Next night, take the dough out of the fridge and divide into 3 portions...

Roll out each of the braid strands to 24 inches long...

To braid, I start from the center and work out from both ends. This ensures the braid will be evenly-thick, rather than thick at one end and tapered at the other.

There's nice even braiding...

Transfer the braid to a well-greased round pan...

Cover and let rise until puffy, about 90 minutes...

Just before baking, add the egg wash and sesame or poppy seeds...

Bake for at least 35 minutes...

Gorgeous loaf hot out of the oven!

Monday, May 4, 2009

Toasted-Coconut Rum Banana Bread


I came home from work completely exhausted, put my keys and purse on the kitchen table, readying to settle in on the couch for the evening, and then instead realized there was going to be a change of plans as I stared annoyingly at my blue hobnail Fenton glass bowl of four very ripe bananas. Four of them! Doh! Why did I wait? Or more fairly, why did I buy so many bananas when I knew I couldn't eat them fast enough? Or maybe it's not my fault at all. Why does Mother Nature let bananas turn brown so quickly? :(

Back in November, I blogged about a similar experience where I came home to find very ripe bananas on my countertop and had to decide what to make with them. Back then, I chose not to be as predictable as banana bread, and instead made Banana Chocolate Chip Ice Cream. It was incredible.

This time, I decided I would make banana bread. But this is no ordinary banana bread. It's got the flavors of Jamaica with coconut and rum mixed in with the banana. And as exotic and unconventional a banana bread as the title conveys, it's still an easy bread to make. Beatrice Ojakangas continues to be an excellent source for recipes.


Toasted-Coconut Rum Banana Bread
Recipe by Beatrice Ojakangas in Quick Breads

1/2 cup (1 stick) butter, at room temperature
2/3 cup sugar
2 eggs
3 tablespoons dark rum
1/2 teaspoon almond extract
2 cups all-purpose flour
1 teaspoon baking powder
1/2 teaspoon baking soda
1/2 teaspoon salt
1 cup mashed ripe banana (about 3 medium)
1 cup flaked coconut, toasted 5-8 minutes in a 350 degree F oven

Preheat the oven to 350 degrees F. Grease and flour a 9x5-inch loaf pan or three 5x3-inch loaf pans.

In a large mixing bowl, cream the butter and sugar. Beat in the eggs, rum, and almond extract. In another bowl, stir the flour, baking powder, soda, and salt together, then add to the creamed mixture. Blend in the banana and coconut. Turn into the prepared pan or pans. Bake 55 to 60 minutes for the large loaf or 45-55 minutes for the smaller loaves, or until they test done. Cool in the pan 5 minutes, then turn onto a rack. Makes one large or three small loaves.


Step-by-Step in Pictures

Cream the butter and sugar, then add the eggs, rum, almond extract, and dry ingredients...

Place your very ripe bananas in a bowl...

Mash them!

Here's your batter...

Pour into your well-greased pan...

Bake at 350 degrees F for 45-55 minutes (it took me about 55 min)...

Delicious cross-section with flecks of coconut...

Monday, December 22, 2008

Sugar 'n' Spice Wreath


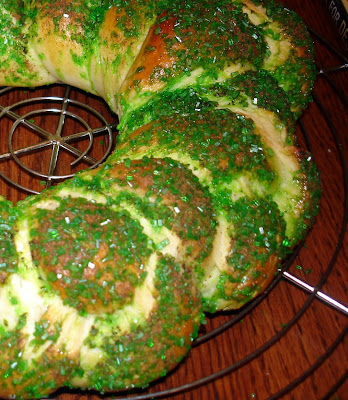
This wreath is similar to challah in that it, too, is an egg bread, gets braided, and is topped with an egg wash. But I actually found this recipe to be easier than challah (and as you probably know, challah is one of the easiest breads to make). One thing I especially love is that the wreath's first rising is only 10 minutes.

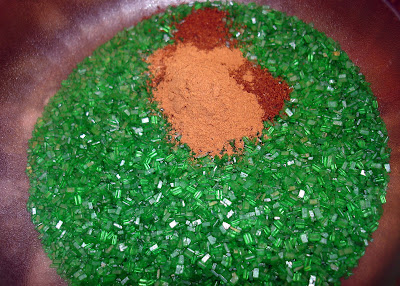
Though the recipe calls for white sugar crystals, I wanted this wreath to be more colorful for a holiday party, and so I opted for green. I could just as easily have gone with blue and white for Hanukkah. What makes this wreath a sugar 'n' spice wreath is that cinnamon, cloves, and nutmeg are tossed with the sugar crystals before they are sprinkled over the egg wash. This is a winning recipe.


Sugar 'n' Spice Wreath
Recipe adapted from Holiday Brunches (one of those grocery store checkout aisle booklets)

1/4 cup water
3 tablespoons granulated sugar
2 teaspoons bread machine or quick active dry yeast
3/4 cup sour cream
1 egg
3 cups bread flour
1 teaspoon salt
1 egg, beaten
3 tablespoons white coarse sugar crystals (decorating sugar) or granulated sugar
1/4 teaspoon ground cinnamon
1/4 teaspoon ground cloves
1/4 teaspoon ground nutmeg

1. In a mixing bowl, stir together the water, sugar, and yeast. Let stand for 10 minutes. To this mixture, add sour cream, egg, salt, and 2 cups of the flour. Slowly add the last cup of flour until a dough forms.

2. Remove dough from bowl, using lightly floured hands. Knead just until smooth, taking care not to overknead. Cover and let rest 10 minutes on lightly floured surface.

3. Grease large cookie sheet with shortening. Divide dough into thirds. Roll each third into 26-inch rope; place ropes side by side. Starting at middle, braid one end together gently and loosely; repeat with other end. Pinch ends to fasten. Shape braid into circle on cookie sheet; pinch ends together. (Note: Wreath can be covered with plastic wrap and refrigerated up to 48 hours. Before baking, remove the wreath from the refrigerator and remove plastic wrap. Cover with a kitchen towel and let rise in a warm place about 2 hours or until double.) Cover and let rise in warm place for an hour or until double. Dough is ready if indentation remains when touched.

4. Heat oven to 350 degrees F. Brush beaten egg over dough. Mix sugar crystals, cinnamon, cloves, and nutmeg; sprinkle over dough. Bake 25 to 30 minutes or until golden brown. 24 servings.


Step-by-Step in Pictures

Knead the dough into a soft mass...

Divide dough into three long ropes and braid...
Shape the braid into a wreath...
Cover and let rise until doubled, about an hour...
Combine spices with sugar crystals...
Sprinkle the sugar mixture over the egg wash...
Bake the wreath till golden and hollow sounding when tapped underneath...
Slice it up and enjoy!

Sunday, August 10, 2008

Zucchini Yeast Bread


With lots of zucchini in the fridge, it's tempting to pull out a zucchini quick bread recipe. But it occurred to me that zucchini probably works in yeast breads, too, and I was in the mood for a sandwich. I searched on Google and found a bunch of zucchini yeast bread recipes. The one below seemed perfect since it would use up most of my zucchini, and only had 5 ingredients. It turned out great. Brushing olive oil on top just before baking gave the bread a nice crust and the texture of the crumb was really chewy. I even admired the cross section, with flecks of green from the unpeeled zucchini. My ideal sandwich for this bread would be swiss cheese, a tiny bit of mustard, and some sprouts. If not that, simply butter would do.


Zucchini Yeast Bread
Recipe from RecipeSource
Yields 1 loaf

1 lb. zucchini, grated
2 tablespoons salt
1 pkg active dry yeast
1 1/4 c lukewarm water
3 1/2 c flour
Olive Oil - for brushing

1. In a colander, alternate layers of grated zucchini and salt. Leave for 30 mins over a bowl or sink. Then squeeze out the moisture with your hands.

2. Combine the yeast with 1/4 cup of lukewarm water, stir, and leave to dissolve for 15 minutes.

3. Place the zucchini, yeast, and flour in a bowl. Stir together, and add just enough of the remaining water to obtain a rough dough.

4. Transfer to a floured surface and knead until smooth and elastic. Return the dough to the bowl, cover with a plastic bag, and leave to rise in a warm place until doubled in size, about 1 1/2 hrs.

5. Grease a baking sheet. Punch down dough with fist and knead into a tapered cylinder. Place on baking sheet, cover, and leave to rise in a warm place until doubled in volume, about 45 minutes. (I baked my loaf in a 9x5-inch loaf pan as opposed to freeform.)

6. Preheat oven to 425 degrees F. Brush with olive oil and bake until golden, 40 to 45 minutes. Cool on a wire rack.


Step-by-Step in Pictures


Saturday, February 2, 2008

Carrot Ginger Bread

Today, I looked through my fridge for inspiration, found a bag of neglected carrots, and decided to put an end to that! I went to my cookbook collection, pulled a bread-only cookbook, and found the perfect recipe: Carrot Ginger Bread. Maybe I subconsciously figured groundhogs eat carrots so in honor of Groundhog Day, I needed to make this bread. Mostly, though, it just sounded really good and I had the ingredients on hand.

The cookbook I used is called Breads from Betsy's Kitchen. I love it. It doesn't have all the glossy glamour of a James Beard Award winner; instead, it's a very homey, down-to-earth spiral bound cookbook with recipe after recipe of fun, adventurous flavored breads. While flipping through it for a carrot recipe, I also paused on a couple of other tempting recipes: Honey Curry Bread, Semolina Olive Bread, Rosemary Raisin Bread, Sundried Tomato and Caramelized Onion Bread, Sesame Cheddar Bread, and Maple Wheat Berry Bread.

Betsy says this Carrot Ginger Bread would make a great chicken salad sandwich. I might just have to take her up on that. Sounds fabulous!!!

Carrot Ginger Bread
Recipe by Betsy Oppenneer in Breads from Betsy's Kitchen
Makes 2 loaves.

2 scant tablespoons or 2 (1/4-oz.) packages active dry yeast
1/2 cup warm water (about 110 degrees)
1 1/2 cups warm milk (about 110 degrees)
2 tablespoons honey
2 tablespoons soft butter
2 teaspoons salt
2 cups peeled and finely shredded carrots
1 tablespoon ground ginger
5 1/2 to 6 1/2 cups unbleached flour

1. In a large bowl, stir yeast into water to soften. Add milk, honey, butter, salt, carrots, ginger and 3 cups flour. Beat vigorously for two minutes.

2. Gradually add flour 1/4 cup at a time, until the dough begins to pull away from the side of the bowl.

3. Turn dough out onto a floured work surface and knead, adding flour as necessary, until you have a smooth, elastic dough.

4. Put dough into an oiled bowl. Turn to coat the entire ball of dough with oil. Cover with a tightly woven towel and let rise until doubled, about one hour.

5. Turn dough out onto a lightly oiled work surface and divide in half. Shape each half into a loaf and place into well-greased loaf pans. Cover with a tightly woven towel and let rise until almost doubled, about 45 minutes.

6. About 10 minutes before baking, preheat oven to 375 degrees.

7. Bake for 25 minutes or until the internal temperature of the loaves reaches 190 degrees.

8. Immediately remove bread from pans and cool on a rack.


Related Posts with Thumbnails