Showing posts with label chocolate. Show all posts

Sunday, July 1, 2012

Stovetop Crispy Corn Flake Chocolate Peanut Butter Bars


If you are a peanut butter fan, this bar is for you! I can comfortably make that claim because I served it to a bunch of peanut butter lovers and they all had glowing assessments. One said, "I think you need to add this to your regular repertoire." Another said, "I really shouldn't have seconds but I'll make an exception this once! Darn you, Marni!" And another asked, "When is this going up on the blog!?!?!?!?!"


I love that it's a no-bake, stovetop-only bar. Put a couple ingredients in a saucepan, stir corn flakes in, spread the mixture into a foil-lined pan, and cover with melted chocolate and chopped peanuts. The bars never go in the oven. They just chill in the fridge for a few hours. Easy as pie, er, bars! And if you store the leftovers in the fridge (uhhhh, what leftovers?), the corn flakes seem to stay crispy for days! GREAT SUCCESS! GREAT SUCCESS!

Since these corn flake bars remind me a lot of a rice krispy bar, I'm kind of curious to try the exact same recipe using a different cereal next time. Though as they say, if it ain't broke, don't fix it! And these do not need fixing! A+!

Shabbat Note: It would be very easy to make these pareve for Shabbat. Simply use margarine instead of butter and use pareve bittersweet, dark, or semi-sweet chocolate for the top layer.


Stovetop Crispy Corn Flake Chocolate Peanut Butter Bars
Adapted from a recipe by Yvonne Ruperti in Serious Eats
Makes 16 hefty bars

4 tablespoons (1/2 stick) unsalted butter
1 cup creamy peanut butter
1/2 cup light corn syrup
1/3 cup light brown sugar
Pinch salt
4 cups corn flakes, lightly crushed
1/3 cup salted peanuts, chopped and divided (from the 1/3 cup measure, pour into a 1/4 cup measure and leave the remaining nuts in the 1/3 cup)
1 teaspoon pure vanilla extract
4 ounces bittersweet chocolate, finely chopped (or chocolate chips)

Line an 8x8-inch baking pan (or a 9x9-inch but the squares will not be as tall) with foil so that some foil hangs over the edge on two opposite sides (for pulling up the bars later).

In a medium or large saucepan over low-medium heat, melt butter. Add peanut butter, corn syrup, brown sugar, and salt and stir until all melted and smooth. Remove from the heat.

Stir in corn flakes, 1/4 cup peanuts, and vanilla until just combined. Pour into prepared pan and smooth top with the back of a spoon.

In the top of a double boiler over simmering water (or simply using the microwave), heat chocolate until just melted (if using microwave, be very careful not to burn the chocolate and heat just long enough to warm the chocolate pieces so you can stir them to melt them). Spread chocolate over top of corn flake mixture using offset spatula. Sprinkle with remaining chopped peanuts. Cover and chill until firm, about 2 hours. Remove from pan using the foil overhangs and cut into 2-inch squares. Or if you're like me, cut them into bite size pieces. A little goes a long way!


Step-by-Step in Pictures
In a saucepan, heat together the butter, peanut butter, corn syrup, brown sugar, and salt. Remove from the heat.

Add the corn flakes, 1/4 cup chopped peanuts, and vanilla and stir until everything is combined...

Pour this corn flake filling into the prepared pan and use the back of a spoon to smooth the top...

Melt chocolate and spread over the corn flake mixture in the pan...

Sprinkle with the remaining nuts, cover with foil, and chill in the fridge for at least 2 hours...

Once chilled, slice and serve!

Saturday, June 2, 2012

Chocolate Pecan Pie with the Flakiest Crust Everrrrrr!


This is such an amazing chocolate pecan pie, and I shouldn't be surprised...it's from Alice Medrich! Don't just make it at Thanksgiving time. Pecans are always readily available, and deliciousness should be fair game anytime of year. It's not a difficult recipe, either. The filling is pretty basic, and no challenging cooking technique required. The crust only has a few ingredients and you don't need a food processor. If you want to go all out, choose extra special chocolate. The chocolate shines through in this pie, so splurging on better quality chocolate is actually worth considering here.


Make it for a dinner party, a holiday get together, or for a weekend all by yourself. Just be sure to sign up for an intense cardio class at the gym if you opt for option 3.

I'm thinking there will be more pies in my future. This was really fun to make, impressive, and absolutely beyond delicious. The flaky crust did my guests and me in! I haven't recovered from that yet.


Chocolate Pecan Pie
Adapted from a recipe by Alice Medrich in Chocolate Holidays
Serves 8-10

Crust
1 1/2 cups all-purpose flour
3/4 teaspoon salt
10 tablespoons (1 1/4 sticks) unsalted butter, cut into chunks
4-5 tablespoons water

Filling
2 ounces bittersweet or semisweet chocolate, coarsely chopped
1/4 cup light corn syrup
1 tablespoon melted butter
1 cup (lightly packed) dark brown sugar
1/4 teaspoon salt
1 tablespoon rum, bourbon, or brandy
1 teaspoon vanilla extract
3 eggs
2 cups pecan halves, toasted
Vanilla bean ice cream or lightly sweetened whipped cream

For the crust, in a mixing bowl combine the flour and salt. Cut the butter chunks into the flour mixture using a pastry blender or two knives. Continue until the largest pieces are the size of peas and the rest are the size of bread crumbs. Be careful not to overmix or the butter will turn into a paste or even melt. Drizzle 4 tablespoons of water over the mixture and distribute this moisture into the dough with a rubber spatula, folding and pressing as you go, until the mixture is just wet enough to hold together. Add up to 1 tablespoon more water if necessary. Press the dough into a flat disk and wrap in plastic wrap before chilling in the fridge for 30 minutes and up to 3 days before using.

When you're ready to bake the crust, remove the dough from the fridge and let stand until you can roll it out on a lightly floured work surface and it won't crack. Roll the dough into a circle about 1/8-inch thick, rotating the dough as you go. Fold the dough into quarters and transfer to the pie pan. Unfold the quarters and carefully press into the pan so that the dough reaches 1 inch beyond the rim of the pan. With the dough that's hanging over, tuck it under and flute or crimp the edge. Chill the crust in the fridge at least 30 minutes before baking.

Position a rack in the lower third of the oven. Preheat the oven to 400 degrees F.

Remove the chilled pie crust from the fridge. Press foil (shiny side down) over the crust, taking care not to wreck the crimped edges. Use a fork to prick the bottom of the crust all over, piercing right through the foil. Use pie weights or dried beans to weigh down the crust. Bake for 20 minutes. Remove the foil liner and pie weights and return to the oven to bake for another 10 to 12 minutes or until the crust is golden brown.

For the filling, which you should prepare while the crust is baking, combine the chocolate with the corn syrup and butter in the top of a double boiler set over a pan of barely simmering water. Or you can skip the double boiler and cook directly over the stove, but you have to be much more careful about not burning the chocolate. Stir the chocolate until it is completely melted and smooth, then stir in the brown sugar, salt, rum, and vanilla. Add the eggs and continue stirring until well combined and hot to the touch. Remove the pan from the heat and stir occasionally until ready to use.

When the crust is done, remove it from the oven, but leave the oven on. Scatter the toasted pecans over the bottom of the crust. Pour the hot filling over the pecans and return the pie pan to the oven. Bake for 10 to 12 minutes, until the filling is puffed and cracked at the edges, golden brown in spots, but still jiggles in the center if poked or shaken slightly. Unfortunately you can't use the toothpick rule here because if you insert a toothpick, it's not supposed to come out clean. There will be gooey deliciousness stuck to it. As the filling is baking, if you notice that the crust is browning too fast, cover the edges with foil. Cool the pie on a wire rack. Serve warm or at room temperature with vanilla bean ice cream or lightly sweetened whipped cream. Enjoy!

Monday, January 9, 2012

Board Certified Banana Fudge Brownies with Walnuts


I brought these to work and people went bananas! I've learned over years of bringing treats to parties, work, friends' houses, etc, that certain flavor combinations are definite hits with crowds. And the popular opinion whole-heartedly supports chocolate and banana together. These brownies are the real deal. They mean business. Monkey business. So so good!


I doubled the recipe and used 3 ripe bananas I had on hand. The recipe supposedly comes from the California Walnut Board. Did you know such an organization existed? That's some serious dedication to a nut! The "supposedly" above is because my mom sent me the recipe, which she had saved on a recipe card in a binder, and can't recall for sure, but thinks it's from that walnut board. I'm going to assume she's right. Because board certified brownies simply sound better. It's like they passed a test or something. And hey, based on the faces of the lucky recipients of the batch I made, they passed with flying colors.

If you happen to know for sure that these don't come from the California Walnut Board, or heck, that the board is a fantasy all together, please keep it to yourself. I purposely didn't check Google for accuracy because I like a little mystery now and then. And I can't bear the thought of these brownies not being board certified. It would ruin my day. ;)


Banana Fudge Brownies with Walnuts
Adapted from a recipe by the California Walnut Board (if memory serves my mom right...hehe)
Makes an 8-inch pan of brownies (recipe can be doubled and baked in a 9x13-inch pan)

1/4 cup (1/2 stick) unsalted butter
6 ounces semisweet chocolate (can use chocolate chips)
3/4 cup all-purpose flour
1/2 cup sugar
1/3 cup mashed ripe banana (about 1 small)
1/2 teaspoon vanilla
1/4 teaspoon baking powder
1/4 teaspoon salt
1 egg
1/3 cup chopped walnuts, toasted

Heat oven to 350 degrees. Grease bottom only of 8-inch square pan. I like to line my pan with foil and then grease the foil so it's easy to lift the entire tray of brownies out and slice on a cutting board.

In a saucepan, melt together the butter and chocolate. Remove from the heat and beat in the flour, sugar, mashed banana, vanilla, baking powder, salt, egg, and walnuts with a wooden spoon.

Spread batter evenly in prepared pan.

Bake 20-25 minutes or until center is set (do not overbake or the brownies will be dry). Cool in the pan on a wire rack, then cut into 2-inch squares. Or smaller, bite-size squares, which is my preference.


Step-by-Step in Pictures
Melt the chocolate and butter together...

Remove from the heat and add the flour, sugar, baking powder, and salt...

Add the banana, egg, and vanilla...

Stir in the toasted walnuts...

Spread evenly in the prepared pan and bake for 20 to 25 minutes at 350 degrees F...

Cool, then slice and serve!

Monday, July 4, 2011

Chocolate Chip Cookie Dough Truffles


GASP! SHOCK! AWE! BEHOLD! A cookie dough truffle! Why haven't I heard of this before?! And for all you raw-egg-freaker-outers, there are no eggs in this cookie dough so don't get your panties in a bunch. Instead of eggs to bind the dough together, you use sweetened condensed milk!


Go crazy with topping choices. I opted for brightly-colored star sprinkles and some white chocolate that I melted and placed into a piping bag for a few more designs. The effect is so cool! For the 4th of July (Happy Independence Day to you!), try red, white, and blue candies, sprinkles, or dyed white chocolate. These would be festive and perfect to celebrate the holiday.


The truffles set up in a short time and then look really elegant and fun. And one of the best ways to customize this is, if you already have a favorite chocolate chip cookie recipe, feel free to use that dough instead of this one. Just replace egg with sweetened condensed milk. Voila.


Cookie Dough Truffles
Adapted from a recipe on FoodNetwork.com that was featured on Paula's Best Dishes, Episode: Sweet Somethings
Makes 5 dozen truffles

1/2 cup (1 stick) unsalted butter, softened
3/4 cup firmly packed brown sugar
1 teaspoon vanilla extract
2 cups all-purpose flour
1 (14-ounce) can sweetened condensed milk
1/2 cup semisweet mini chocolate chips (it's important they are mini!)
Semisweet chocolate for melting (I used a LOT, maybe 18 ounces or more?)

In a large bowl using an electric mixer on medium speed, cream together the butter and brown sugar. Add vanilla. Gradually beat in flour on low-medium speed (unless you want flour in your face). Then add the can of sweetened condensed milk. Add mini chocolate chips and mix until well combined. Chill the dough, covered, in the fridge for about an hour. Shape into 1-inch balls. It helps to use a cookie dough scoop to get evenly sized balls. Place on wax paper-lined baking sheet; chill 2 hours. You want the balls really firm before you roll them in the melted chocolate.

Melt chocolate in a glass bowl and place the bowl over a hot water bath so the chocolate stays liquidy and melty. Otherwise, you'll find yourself constantly microwaving the bowl of chocolate and huffing and puffing. Drop a cookie dough ball into the melted chocolate, turn to coat completely with a spoon. Lift up using a fork, thin spatula (such as metal offset spatula), or specialty dipping tool, shaking any excess chocolate off. Place on a wax paper-lined baking sheet. While the chocolate is still setting, top with desired sprinkles so they'll stick. If you want to pipe melted white chocolate on top instead of sprinkles, it's not as critical that you decorate right away because the white chocolate will stick no matter what. Once the baking sheet is filled, place in the fridge to chill and completely set the truffles. This takes about an hour. Then they're ready to serve!


Step-by-Step in Pictures
Cream together the butter and brown sugar...

Add the vanilla...
Add the flour...
Add the sweetened condensed milk...

Stir in the mini chocolate chips, then chill in fridge...
Shape into 1-inch balls of dough and return to fridge to chill...
Dip the balls in melted chocolate, then top with sprinkles...

Or decorate with melted white chocolate in a piping bag...

Chill the truffles in the fridge to set the chocolate completely, then enjoy!

Sunday, May 29, 2011

Chocolate-Orange Cupcakes with Bittersweet Chocolate Frosting


My cousin Jessica got married last weekend in a beautiful ceremony at a lakeside venue in Agoura Hills, California. She looked stunning! Her groom Alex is a lucky guy! And we're lucky to have Alex in our family now.


Family came in from all over and if there's one thing you should know about me by now, it's that sweet tooths and great bakers run in the family. My mom, my cousin Rachael (sister of the bride), a family friend, and I all baked for a dessert party hosted at the hotel the night before the wedding. It was a fitting event for our extended family.


Incredibly (but true), Rachael, with the help of a friend, spent two days in the kitchen and also made a dessert bar for the wedding reception, which featured a whopping 12 kinds of treats, everything from cookies, to truffles, to cupcakes. She outdid herself. And then, the sweet tooth-y relatives, who are used to this sort of over-the-top sugar overkill and would probably never admit something was "too rich," descended upon these treats, giving their inevitable thumbs-up. It was by far the most desserts I've ever seen at a wedding. And I didn't even mention there was a wedding cake, too.


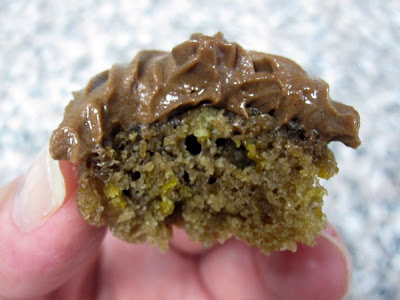
These chocolate-orange cupcakes are really delicious and easy to make. I brought them to the dessert party. The trick to making them elegant is putting the frosting into a piping bag and piping swirls onto the top of each cupcake. It brings a bakery-like quality to them, despite being as homemade as homemade can be!


Chocolate-Orange Cupcakes with Bittersweet Chocolate Frosting
Adapted from a recipe in The Williams-Sonoma Baking Book

3 tablespoons Dutch-process cocoa powder
1/4 cup hot water
1 1/4 cups all-purpose flour
1/2 teaspoon baking powder
1/2 teaspoon baking soda
1/4 teaspoon salt
1 orange
2 large eggs, at room temperature
3/4 cups granulated sugar
1/2 cup buttermilk, at room temperature
1/2 teaspoon pure vanilla extract
1/4 cup unsalted butter, melted and cooled to room temperature

For the frosting:
6 ounces bittersweet chocolate
1 cup unsalted butter, at room temperature
2 cups confectioners' sugar

Preheat the oven to 350 degrees F. Line 12 standard muffin cups with paper liners or 36 mini cupcake cups (which is what I did).

In a small glass measuring cup, heat water until very hot in the microwave and then stir in the cocoa until it dissolves; set aside.

In a bowl, sift the dry ingredients together: flour, baking powder, baking soda, and salt. Zest the orange and add the zest to the dry ingredients, stir, and set aside.

In the bowl of a stand mixer or a large bowl with an electric hand mixer, beat the eggs and granulated sugar until well blended. Beat in the buttermilk and vanilla, then the cocoa-water. Blend in the melted butter, and then add the dry ingredients.

The batter will be a bit thin, so carefully spoon enough batter into each muffin cup to fill it about half full. Bake until the tops of the cupcakes have puffed up and appear set and a cake tester inserted into the center of a cupcake comes out clean. For regular-sized cupcakes, this should take about 15 minutes, for mini cupcakes, check at about 9 minutes. Cool the cupcakes in their pan on a wire rack, then gently lift them up and remove from the pan.

To make the frosting, melt the chocolate in the microwave or in a double boiler. While the chocolate is cooling to room temperature, beat the butter and confectioners' sugar in a stand mixer fitted with the paddle attachment on medium speed until the mixture is creamy and smooth. This takes about 3 minutes. Beat in the melted, cooled chocolate until thoroughly combined. Fill a pastry bag with the frosting and use a large star tip to pipe a spiral onto each cupcake. Refrigerate the cupcakes to set the frosting, but take out of the fridge at least 30 minutes before serving so they are not chilled.


Step-by-Step in Pictures
Combine the dry ingredients. Add the orange zest and set aside...

Beat together the eggs and sugar...
Beat in the buttermilk and vanilla...
Add the cocoa-water, then the melted butter...

Blend in the dry ingredients...

Stir just until combined...

Spoon the batter into the muffin cups, filling halfway...

Bake at 350 degrees for 15 min (for regular size cupcakes) and 9 minutes for mini cupcakes. Cool completely before frosting the tops...

To make the frosting, beat the butter and confectioners' sugar...

Add the melted chocolate...

Stir until well blended...

Pipe the frosting into spirals on top of the cupcakes...
Related Posts with Thumbnails