Monday, March 30, 2009

2009 L.A. Cupcake Challenge Leaves a Pleasing Aftertaste

Delilah Bakery

The much hyped 2009 L.A. Cupcake Challenge sponsored by Nesquik happened yesterday and in two words: 5 stars. I had so much fun. And not just because I brought a whole posse with me. My mom flew in for the weekend, my sister and her fiance attended, my first cousin and her boyfriend, and a bunch of friends and coworkers.

Part of the ballot

My coworker's shoe

It took place at the Renaissance Hollywood Hotel in Hollywood, a perfect venue for the occasion. There was plenty of space to roam and sit and the cupcake booths lined the perimeter of the ballroom. The Nesquik bunny was there, posing for photos and handing out regular and mini sized versions of Chocolate and Strawberry Milk. A photobooth was stationed at one corner of the room allowing for unlimited corny photos with friends to be taken.

My sister Beth and me with the Nesquik Bunny

Flavor Feelings

I attended last year's Cupcake Challenge and learned a few things to make this year's experience more enjoyable (which seems hard to do when last year's was awesome). Namely, I learned not to eat whole cupcakes if I wanted to make it through all 37 flavors. And as a judge this year, I felt it my responsibility to try every single cupcake if my vote was going to be fair. Slow and steady wins the race. I was there the entire 3 hours in order to eat so many sweets. But I did it.

And on top of that, I broke my own rule: I fell in love with two cupcakes and ate the entire darned things, not sparing the tiniest crumb. The first time that happened, it was for Susie Cakes' Pineapple Upside Down Cake, and the second time, it was for Buttercake Bakery's Chocolate.

Susie Cakes Pineapple Upside Down - out of this world!

Buttercake Bakery Chocolate - again, out of this world!

While those were the only two cupcakes I gobbled up completely, there were plenty of others that caught my attention...The Lavender cupcake from Melli Belli was wonderfully moist and full of lavender flavor. The Coconut cupcake from Blue Cupcake made me want to order a full-sized 9 or 10-inch round layer cake for my next party. And the Chocolate Dipped Strawberry from Charmed Cupcakes had a perfect crumb, a strong chocolate flavor, and yummy pieces of strawberry in the cake, not to mention an attractive presentation with star-shaped chocolate candies stuck into the frosting. Miss Priss Cupcakes had an excellent banana chocolate chip cupcake named Monkey Bites and was, in my opinion, one of the prettiest ones to look at. Oinkster/Boho's Chocolate Bread Pudding was certainly memorable, though denser than I'm used to for a cupcake. As for booth decor, I was really impressed with Delilah Bakery's outdoor garden motif. All in all, it was an amazing afternoon of cupcake overload.

Melli Belli Lavender and Gingerbread cupcakes

Blue Cupcake Coconut and Chocolate cupcakes

Blue Cupcake Coconut cupcake display

Sugar Jones Blackberries & Cream

Miss Priss Cupcakes Monkey Bites

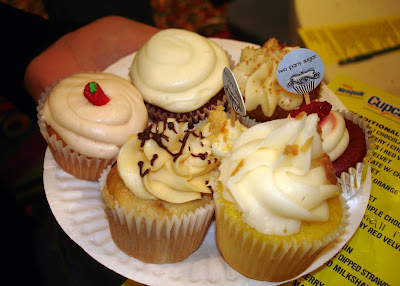
Two Parts Sugar Raspberry Red Velvet

Hotcakes Bakes Strawberry Cupcakes

Oinkster/Boho Chocolate Bread Pudding

Charmed Cupcakes Chocolate Dipped Strawberry and Red Velvet

Another important lesson I learned from last year is that bringing Tupperware is a VERY good idea. Many of the booths had leftover cupcakes at the end of the event and were happy to fill your boxes and bags if you had them. Plus, it's such a shame to throw out half of a wonderful cupcake simply because you can't eat 37 full cupcakes in one sitting. So Wise Marni brought a container this year and saved halfsies and a few more wholes for the road. I'll need a week to recover from the sugar coma, but then I'm sure I'll be able to dig right in.

Someone's makeshift "Tupperware" filled with whole cupcakes

Hats off to another successful Cupcake Challenge. It was well organized and the quality and range of bakeries was impressive. It's no wonder the place was packed, tickets were sold out, and blogs and news organizations spotlighted the event.

One of many trips to the booths

Judge's Wardrobe

In my last blog post, I asked you if it would be ok for me to wear the same shirt as I wore last year. The shirt read, "Make Cupcakes Not War." Many of you said it would be just fine and I was all set to wear it again, but with some time to spare hours before the Cupcake Challenge, I decided to return to Johnny Cupcakes on Melrose in West Hollywood and find myself a new wardrobe.

First of all, I decided on a really fun one - no words this time, just an image of stemmed flowers but with cupcakes as blossoms. I'm glad I decided to change shirts; I spotted a handful of people at the event with my last year's shirt.

Also, I can't get over how FUN this t-shirt store is! The place is decorated like a bakery, even though there's nothing edible inside. Glass display cases show off t-shirts, and retro ovens line the walls and randomly open so fake steam can blow out. You have got to visit their store sometime, and at the very least, visit their cool website designed to be an oven. I'm hooked on Johnny Cupcakes and will probably end up there again for a 2010 L.A. Cupcake Challenge costume change. :-)

Johnny Cupcakes store on Melrose in West Hollywood

Retro ovens on the wall at Johnny Cupcakes open randomly and let fake steam out!

**Note: Because votes could be submitted up until the very end of the event, winners were not announced at the event. They will be tallied and announced soon, but you're going to have to wait!

**Update: Winners have been announced! See my next blog post.

Friday, March 27, 2009

This L.A. Cupcake Challenge Judge Doesn't Know What to Wear!


Last year, May 18, 2008 to be exact, I attended the L.A. Cupcake Challenge. It was an amazing experience, delicious, sickening, and fun all at once. And I reported on the day in this very blog.

Well this year, I'm headed back, but I'm wearing a different hat. Ok technically I didn't wear a hat last year. But what I mean is, I'm a judge! The 2009 L.A. Cupcake Challenge, sponsored by Nesquik, is happening this Sunday, March 29.

But before that day arrives, where I will taste 34 cupcakes from 19 bakeries across the land and schmooze with the most discriminating of taste buds, I need your advice. I have but one question for you:
Can I pull off wearing the same shirt as last year? The shirt reads "Make Cupcakes Not War." The message will always be in fashion, but is wearing it two years in a row a faux pas? Let me know in the comments!

Monday, March 23, 2009

The Chocolate Pudding My Dad Wants Daily


My mom and I have the same Lori Longbotham cookbook Luscious Chocolate Desserts and we're both working our way through the entire thing. She beat me to the Chocolate Pudding recipe in here, and then told me I had to make it. What a surprise, another Longbotham winning recipe. Here's how my mom described to me the awesomeness of this chocolate pudding:
"I served this to Dad and he had one bite and then said he wanted a cup of it every day for the rest of his life. Now when I serve it to him, his face lights up and he exclaims, 'Oh boy!'"
There's just one distinction I want to make: Dad wants it every day, but it's no everyday chocolate pudding.

It's a double chocolate pudding made with dark chocolate and cocoa powder. In my first crack at it, I used a 3.5-ounce bar of Valrhona semisweet and a few more dark chocolate pareils to top the weight off at 4 ounces. I am adding this recipe to my repertoire, and I'll continue to try different chocolate brands since the pudding spotlights whatever you choose. Valrhona worked beautifully. Perhaps El Rey next...

I love the easiness of this recipe. All of the ingredients are basics you'd already have at home. It takes about 15 minutes total to put together, and then you refrigerate it in custard cups or ramekins. That means you can make it ahead and have an easy dessert for a dinner party, or individual servings for yourself after long days at work. As Lori Longbotham notes in the margin of her recipe, you can add a liqueur or flavoring to the pudding and it becomes a whole new treasure. I look forward to trying Grand Marnier, Bailey's, and mint extract.


My Dad's Favorite Chocolate Pudding
Recipe by Lori Longbotham in Luscious Chocolate Desserts
Note: I inserted "Dad's" into Lori's title for the pudding

1/2 cup packed dark brown sugar
2 tablespoons granulated sugar
1/4 cup unsweetened cocoa powder
2 tablespoons cornstarch
1/4 teaspoon salt
2 cups whole milk
4 ounces bittersweet or semisweet chocolate, chopped
1 teaspoon pure vanilla extract

Stir together the brown sugar, granulated sugar, cocoa, cornstarch, and salt with a fork in a large heavy saucepan until the brown sugar is broken up and the mixture is well blended. Add 1 cup of the milk and the chocolate and heat over medium heat, whisking, until the chocolate is melted and the mixture is smooth.

Whisk in the remaining 1 cup milk and cook, whisking frequently, for 6 to 8 minutes, until large bubbles pop on the surface and the pudding is thick and smooth. Remove the pan from the heat and whisk in the vanilla, then immediately transfer the pudding to a large bowl or 4 serving bowls or stemmed glasses.

Serve the pudding hot, warm, at room temperature, or chilled. If not serving immediately, whisk occasionally to keep a skin from forming as it cools.


Step-by-Step in Pictures

Combine the sugars, cocoa, cornstarch, and salt...

Mix until the brown sugar is no longer clumpy...

Add half the milk and all the chocolate...
Once the mixture is smooth, add the remaining milk and let bubble and thicken...
Remove from heat and add the vanilla...
Immediately pour into custard cups and cover the surface of the pudding so a skin doesn't form...
"Oh boy!"

Tuesday, March 17, 2009

Pinch Me! Sweet Pea Cupcakes


Happy St. Patrick's Day!

And on such an occasion, all things must be green. I spent the last few days looking for baked goods I could dye green, but when my friend Crystal reminded me of a cupcake in the Vanilla Garlic blog that featured an unconventional ingredient, one that just so happens to be naturally green, I knew what this year's St. Patrick's Day Marni Special would be...

The magic ingredient is a can of peas. I'm already a pea-a-holic (it's always been my vegetable of choice at family dinners), so this was an easy sell. The result, you ask? The cupcakes baked up nicely and have an interesting, sweet taste to them. The pea flavor is not subtle, so be forewarned if you're pea-peevish. I love the sour cream frosting, too. It has the perfect spreading consistency for cupcakes and is easy to whip up.

I found me pot o' gold manifested in a sweet pea cupcake!


Sweet Pea Cupcakes
Recipe from the Vanilla Garlic blog
Makes 20 cupcakes

3 eggs, room temperature
1 1/2 cups of sugar
1 teaspoon vanilla extract
2 cups of peas, pureed
1/2 cup of extra virgin olive oil
2 tablespoons of lemon juice
2 1/2 cups of cake flour
pinch of salt
1 teaspoon of baking powder

Whisk together the eggs and sugar until bright and well emulsified.

Add the vanilla, pea puree, oil, and lemon juice. Mix well.

Add the flour, salt, and baking powder. Beat until just mixed.

Scoop into cupcake paper liners and bake in a 375 F oven for 14-16 minutes or until a cake tester comes out clean. Cool completely before frosting.

Sour Cream Frosting

1/4 cup of butter, room temperature
1/3 cup of sour cream
2 1/2 cups of powdered sugar
1/8 teaspoon of vanilla extract
pinch of salt

Beat the ingredients until light and fluffy, and slightly stiff peaks form.


Step-by-Step in Pictures

Puree a can of peas...

The puree will be thick, mostly smooth, but with some pieces of pea...
Add the puree to the cupcake batter...
Here's your batter...
Fill the paper liners about 3/4 full...
Bake at 375 degrees F...

While the cupcakes are baking, start on the frosting and whip up till perfectly smooth...
Be sure the cupcakes are competely cool before frosting the tops...
I used an offset spatula to frost the cupcakes, making it easy to create a swirl design...
See? Swirls!

The End.

Friday, February 27, 2009

Marni Faces the Camera

I'm just going to come out and say it!

I am going to produce and host an offbeat, light-hearted video podcast series for Goldstar that, in each episode, centers around a musical, and then closes with a food tribute to that musical. Another excuse to bake! :-)

The following video is a little teaser we put together in the Goldstar Studios where I talk about my love of baking. Maybe you'll recognize a couple of the baked goods in the video...


Thursday, February 26, 2009

Making Waffles on the Stovetop?

I just opened up an email from Williams-Sonoma advertising a new product, and it did what it was supposed to do! Caught my attention! What is this Nordic Ware Waffle Pancake Pan all about?

It seems like a great idea since pulling out the waffle maker can be a pain in the rear, not to mention cleaning it afterward. But does the pan really replace tried and true waffles made in a waffle maker? A stack of these breakfast goods made in the pan sort of resemble pancakes, and they're certainly cooked similarly, that is, on the stovetop, but maybe they magically taste like waffles instead. I am interested to find out!

The pan is $39.95 and you can make 7 mini waffles at a time. I was reading a 5-star review of the product by a Williams-Sonoma customer who tested out the pan, and she nicknamed the edibles "paffles." That is just genius. Paffles they are!

Before

After

Saturday, February 14, 2009

Valentine's Day Cheesecake Brownies


Happy Valentine's Day! Now this is definitely one of the most edible holidays. I'm tempted to go crazy and make a dozen desserts - pink, chocolaty, rich, impressive. But the truth is, all of those attributes sound good to me year round, so I'm going to try to maintain my composure and not get my panties in a bunch and stick to one recipe.

I made these cheesecake brownies for work on Friday and dyed the cheesecake part pink for, well, you know, love's sake. They turned out neat looking and tasted great. They're the fudgy type of brownie (as opposed to cakey), and if I could do one thing differently next time, I'd line the pan with foil and then grease the foil before pouring the batter in. That way I could easily lift the entire piece of foil out of the pan once they've baked and cooled, turn them over, and peel the foil off. Because they are so fudgy, it was a losing fight trying to cut the bars away from the pan. But as they say, love is a battlefield.


Valentine's Day Cheesecake Brownies
Recipe by Marcy Goldman in The Best of Betterbaking.com (though Marcy's name for the brownies is Yin-Yang Cream Cheese Brownies)
Makes about 20 brownies

Cream Cheese Layer
8 ounces cream cheese at room temperature
1/4 cup sugar
1 egg
1/2 teaspoon pure vanilla extract
1 tablespoon all-purpose flour

Brownie Layer
6 tablesoons (3 ounces) unsalted butter
4 ounces semisweet chocolate, chopped
2 eggs
1 cup sugar
1 teaspoon pure vanilla extract
1/4 teaspoon salt
1/2 cup all-purpose flour

1/2 cup miniature semisweet chocolate chips (optional)

Preheat the oven to 350 degrees F. Spray a 7 by 11-inch pan with nonstick cooking spray and set aside. Line a baking sheet with parchment paper. Set aside.

For the cream cheese layer, combine the cream cheese and sugar in a medium bowl. Blend well. Stir in the egg, vanilla, and flour until smooth. Set aside.

For the brownie layer, melt the butter and chocolate in a double boiler over barely simmering water or in a microwave. Stir until smooth. Let cool to room temperature.

Put the chocolate mixture in a large bowl. Stir in the eggs, sugar, vanilla, and salt. Gradually stir in the flour until smooth.

Spread three-fourths of the brownie batter in the prepared pan. Use a small spatula dipped in water to smooth the batter. Drop on dollops of the cream cheese batter. Sprinkle with the chocolate chips, then top with the remaining brownie batter by placing small dollops on top of the cream cheese batter. Using a knife, cut through the batters to marbleize. Smooth the top with a wet knife or metal spatula.

Place the pan on the prepared baking sheet and bake for 30 to 35 minutes, or until the cream cheese swirl is set. It is hard to tell when these are done, so follow the time closely and make sure the cheesecake layer seems set. Let cool on a wire rack, then refrigerate for at least 1 hour before cutting.


Step-by-Step in Pictures

Combine the ingredients for the cheesecake layer...

Add red food coloring for Valentine's Day...
Make the brownie batter...
Have both mixtures ready to go for assembly...

Start with 3/4 of the brownie batter in the bottom of the pan...
Drop dollops of the cheesecake mixture on the brownie batter...

Top with dollops of remaining brownie batter...
Marbleize!
Bake the brownies...
Chill the brownies before cutting them into squares...
Related Posts with Thumbnails