Thursday, October 23, 2008

Food Tattoos


How much do you love food? And how do you show that love?

I consider myself a pretty zealous food lover because:
  • I have a food blog. Duh.
  • I'm pretty brave when it comes to trying new foods.
  • I'll wake up on a Sunday morning and watch cooking shows.
  • I sign up for cooking classes, even in other states.
  • I dream of spending thousands of dollars to take a Susan Herrmann Loomis cooking class in France or the Three-Day French Chocolate Indulgence with both Susan Herrmann Loomis and David Lebovitz.
  • I have a special budget devoted to unnecessary-for-most-people ingredients because I have a wider-than-most-people definition of pantry staples.
  • I read cookbooks from cover to cover like beach romance novels.
  • And on the topic of cookbooks, I have HUNDREDS and they are exploding all over my living room.
  • If I'm having a down day, the best cure for my woes is a trip to Williams-Sonoma to buy a useless baking pan.
  • I get as starstruck from seeing chefs as I do seeing Hollywood celebs.
  • One time I even dreamt I was competing on Iron Chef America. And I won!
But there's something absent from this list. Something I can't claim for myself. And after learning that this missing item is not even so uncommon, my list suddenly feels kind of blah.

Because NO, I do not have an image of food tattooed to my body for eternity!

If you were to get a food tattoo, what would it be of? Or do you already have one? Do tell!


Food Tattoos Gallery
There is a whole class of people who do have food tattoos! Now that's true love.


Cupcake Tattoos


No, your eyes do not deceive you. This girl got a Rachael Ray tattoo.


Monday, October 20, 2008

Pumpkin Praline Brownies


I got a much later start than I would have liked for Pumpkin-Everything-Time-of-Year. Hopefully I'll make up for it in record time. Do you have any idea how much I love pumpkin? A lot. Enough to have two pumpkin stuffed "animals" on my coffee table until we move into winter food season. Enough to buy 10 cans of pumpkin with no specific plans to use them, just the knowledge that I am sure I'll get around to it.

Tonight, I made Pumpkin Praline Brownies. Well, brownies they are not. But they are delicious, and sweet, and perfect for this pumpkin-loving girl. The recipe includes a cream cheese frosting that I skipped for a combination of health and laziness reasons. And honestly, these bars don't need the frosting; they are stand-alone yummy.


Pumpkin Praline Brownies
Recipe from The Brownie Experience by Lisa Tanner

2 eggs, beaten
1/2 cup butter, melted
1 cup brown sugar, packed
1/4 cup honey
1 cup pumpkin puree
2 cups flour
1 teaspoon cinnamon
1/2 teaspoon each salt, baking soda, and ginger
1/4 teaspoon each cloves and allspice
1 cup chopped pecans, toasted
3/4 cup butterscotch chips

Creamy Cream Cheese Frosting (recipe follows)
32 pecan halves

Preheat oven to 350 degrees. Butter a 13 x 9 x 2" pan.

Cream together eggs, butter, sugar, honey and pumpkin. In a separate bowl, stir together flour, cinnamon, salt, baking soda, ginger, cloves, and allspice. Slowly add dry ingredients to creamed mixture, stirring just to combine. Fold in chopped pecans and butterscotch chips. Pour batter into pan.

Bake about 25 minutes, or until toothpick inserted in center comes out clean. Cool completely in pan on wire rack.

Spread with Creamy Cream Cheese Frosting, then let set to harden.

Mark into bars and press a pecan half in center of each brownie. Chill, then cut through into bars.

Makes 32 brownies


Creamy Cream Cheese Frosting

1 3-oz. package cream cheese, softened
1 tablespoon cream or milk
1 teaspoon vanilla
2 1/2 cups powdered sugar

Cream together cheese, cream (or milk), and vanilla. Gradually add sugar, beating until smooth. Add more cream or milk, if necessary, to achieve a spreading consistency.


Step-by-Step in Pictures

Thursday, October 16, 2008

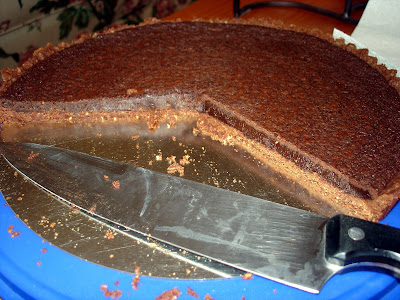
Perfectly Simple Dark Chocolate Tart


Did you miss me? :) I've missed you! I've been pretty busy at work and have not baked nearly as much as I'd like lately. Heck, forget baking, I haven't even had real dinners. It feels a little like my college years, feasting on cereal and milk or oatmeal. But I finally dusted off my neglected oven and re-entered the baking scene with a dark chocolate tart that is silky in texture and very rich. Take note, I don't use the word "rich" lightly. But what I really want you to take is a wild guess whose recipe this is. I dare you. Ok, you win. Lori Longbotham.


Perfectly Simple Dark Chocolate Tart
Recipe by Lori Longbotham in Luscious Chocolate Desserts
Serves 12

Crust
1/2 cup confectioners' sugar
1/4 cup toasted walnuts, cooled
3/4 cup all-purpose flour
1/4 cup unsweetened cocoa powder
1/4 teaspoon salt
1/2 cup (1 stick) cold unsalted butter, cut into small pieces

Filling
14 ounces bittersweet or semisweet chocolate, chopped
6 tablespoons unsalted butter
2 large eggs, lightly beaten
1/4 cup sugar
1 teaspoon pure vanilla extract

Cocoa powder for dusting

Position a rack in the middle of the oven and preheat the oven to 350 degrees F. Lightly butter an 11-inch fluted tart pan with a removable bottom.

To make the crust: Process the sugar and walnuts in a food processor until the walnuts are finely ground. Add the flour, cocoa, and salt and pulse just until blended. Add the butter and pulse just until the mixture begins to come together when a small amount is pressed between your fingers; do not over-process - the mixture should not form a ball. Press the dough evenly into the bottom and up the sides of the tart pan. Prick the dough all over with a fork.

Bake for 15 to 18 minutes, until the crust begins to pull away from the sides of the pan. Let cool on a wire rack while you make the filling.

To make the filling: Melt the chocolate with the butter in a heatproof bowl set over a saucepan of about 1 1/2 inches of nearly simmering water, whisking until smooth. Remove the bowl from the heat and whisk in the eggs and sugar until well blended. Whisk in the vanilla. Transfer the filling to the warm crust.

Bake for about 12 minutes, until the filling is set around the edges but still slightly jiggly in the center; the top of the tart will look a little blistered, and that's okay. Transfer to a wire rack to cool completely, at least 1 1/2 hours.

To serve, remove the pan rim. Lightly dust the tart with cocoa powder and cut into wedges.


Step-by-Step in Pictures

Make the dough for the crust and press into the tart pan...

Bake the crust...
Make the tart filling...
Spread the filling into the baked tart shell...
Bake the tart. Mmmmm...

Drool.

Friday, October 3, 2008

Country Plum Tart


Though this recipe has tart in the title, it's a lot heftier than the tarts I'm used to; it's really more of a pie. I baked mine in a springform pan and so the final product was the size of a cheesecake! It had quite the grand presence; I enjoyed just staring at it. :)

You may recall that I wrote a post back in May about two cookbooks that are out of print now and worth a small fortune. This Country Plum Tart comes from one of those two books: The Best of Betterbaking.com by Marcy Goldman, a veritable master baker and one of my heroes. Perhaps that makes this recipe worth a very small fortune, but alas, it can be found on Amazon in the "preview this book" section. And speaking of Amazon, you should buy this book. Just be prepared to pay upwards of $120.

The tart was fun and easy to make, and tasted great. It also involved an interesting technique for the dough I had never seen before. The dough is prepared, then divided in two, and one disk goes in the freezer, the other in the fridge. Now, I'm used to chilling my dough before rolling or pressing it into a pan, but freezing the dough? That's because the frozen half gets shredded on a box grater and then the shredded dough is scattered on top of the plum filling. I'll be the first to admit it was a little challenging to shred a really cold block of dough. But it worked, and looked neat, and put the "country" in Country Plum Tart.

Country Plum Tart
Recipe by the GREAT Marcy Goldman in The Best of Betterbaking.com
Makes 1 tart; serves 8 to 10

Tart Pastry
2 1/2 cups all-purpose flour
1 cup (8 ounces) cold unsalted butter, cut into small pieces
1/4 teaspoon cinnamon
1/2 cup cold heavy whipping cream
1 tablespoon sugar
3/4 teaspoon salt

Filling
2 1/2 pounds small plums, quartered and pitted
3/4 cup sugar
2 teaspoons fresh lemon juice
1 teaspoon raspberry or plum vinegar
1 teaspoon balsamic vinegar
1/8 teaspoon ground cinnamon
1 tablespoon all-purpose flour
1 tablespoon cornstarch

Confectioners' sugar for dusting (optional)

Lightly grease a deep 9- or 10-inch quiche pan with a removable bottom, or a 10-inch pie pan or tart. Line a baking sheet with parchment paper. Set aside.

For the pastry, combine the flour, butter, and cinnamon in a large bowl. Using a pastry cutter or your fingers, cut or rub the butter into the flour until the mixture resembles a course meal. Make a well in the center and add the cream, sugar, and salt. Stir to make a rough mass. If the dough seems too dry, add 1 or 2 tablespoons of water. Transfer to a lightly floured surface and knead very gently for a few seconds to smooth out the dough. Divide the dough in half, form each half into a disk, and wrap well in plastic. Put one half in the refrigerator and the other in the freezer for at least 1 hour or as long as overnight.

For the filling, combine all ingredients and toss to blend.

Remove both doughs from the refrigerator and freezer. Roll out the refrigerated dough into a 10-inch round to fit the bottom of the pan, then roll out and press the scraps into the sides of the pan and trim the edges. Mount the filling in the pastry shell.

Preheat the oven to 400 degrees F. Using the large holes of a box grater, shred the remaining dough into a bowl. If the dough is too cold to work with, let it warm for 10 to 15 minutes. Sprinkle the shredded dough over the fruit.

Place the pan on the prepared baking sheet and bake for 15 minutes. Lower the oven temperature to 375 degrees F and bake for another 20 to 30 minutes, or until the juices begin to bubble and the dough is lightly browned. Transfer the pan to a wire rack and let cool completely. If using a pan with a removable bottom, remove the pan sides and slide the tart onto a serving plate.

Before serving, dust with a generous amount of confectioners' sugar.


Step-by-Step in Pictures


Saturday, September 27, 2008

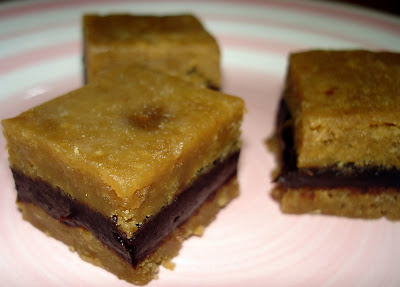
Ganache-Filled Brown Sugar Bars


Dare to be pretentious. Ignore the peeps who roll their eyes when they hear the title of your dessert. Who cares. Ask yourself these questions. Is the dessert worthy of high praise? Do you deserve to be proud? Did it come out? Did it stand up to its name? Could you make millions of dollars selling it to bakeries? Are people's eyes rolling into their heads in ecstasy instead of just rolling? Not all rolling is bad, ya see.

I dared to be pretentious, making something called Ganache-Filled Brown Sugar Bars. I'm not sure there's a more stuffy-sounding name. But here's the thing: I answer yes to all of the questions above. So I'm keeping the stuffy name!


Ganache-Filled Brown Sugar Bars
Adapted from a recipe by Lori Longbotham in Luscious Chocolate Desserts

1 3/4 cups all-purpose flour
1/4 teaspoon salt
1 cup (2 sticks) unsalted butter, at room temperature
1 3/4 cups packed dark brown sugar
2 large eggs, at room temperature
1 1/2 teaspoons pure vanilla extract
1/2 cup heavy (whipping) cream
8 ounces bittersweet or semisweet chocolate, chopped

Position a rack in the middle of the oven and preheat the oven to 350 degrees F. Lightly butter the bottom of a 10 x 15-inch baking sheet. Line the pan with wax paper, then butter and flour the paper and the sides of the pan.

Whisk together the flour and salt in a small bowl. Beat the butter and sugar with an electric mixer on medium speed in a large bowl for about 3 minutes, until light and fluffy. Beat in the eggs one at a time, beating well after each addition. Beat in the vanilla. Reduce the speed to low and add the flour mixture in 3 batches, beating just until well blended. The batter will be fairly stiff.

Spread the batter evenly in the pan with a long metal spatula. Bake for 18 to 20 minutes, until a wooden pick inserted in the center comes out clean but not dry; do not overbake. Transfer the pan to a wire rack to cool completely.

Bring the cream just to a boil in a small saucepan over medium heat. Add the chopped chocolate and stir for a minute, then take the mixture off the heat and continue stirring until the chocolate has completely melted and the mixture has thickened slightly. Transfer the ganache to a medium bowl and let stand at room temperature for at least 30 minutes to set; it should be spreadable but not runny.

Cover the baking pan with a large wire rack and invert the pan. Remove the pan and peel off the wax paper. Invert the cake again onto a large cutting board. Cut the cake crosswise in half with a long serrated knife. Spread the ganache evenly on one half of the cake to within 1/8 inch of the edges. Carefully set the other cake half on top, matching the cut edges. Cover and refrigerate until the ganache is set, at least 2 hours or up to 2 days.

To serve, trim the uncut edges of the cake with a long serrated knife. Cut the cake lengthwise into 4 strips, then cut each strip crosswise into 8 rectangles. Serve chilled or at room temperature.


Step-by-Step in Pictures

Make the batter for the bars...

Spread the mixture into the pan using an offset spatula...
Bake the bars...
Prepare the ganache...
Cut the baked bars in half...
Spread the ganache on one half, though not completely to the edges...
Place the non-ganache half on top of the ganache half...
Trim the edges so you have nice clean lines, then cut into square or rectangle shapes.

Sunday, September 21, 2008

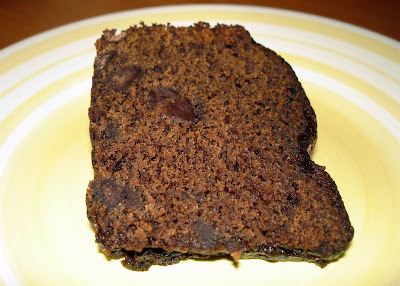
Chocolate Chip Gingerbread Cake


It's that time again. Time for another Lori Longbotham recipe because as you all know by now, I'm addicted enough to her to write a poem about her brownies. This time around, I made something that is probably more traditionally served in November or December. I'm just not that traditional, I guess - or patient. Gingerbread is something I enjoy year round. All of the ingredients to make the cake are readily available 365 days a year, and my taste buds don't know the difference if it's December, April, or September, anyway.

To alleviate some of your first impression squirmishes as you glance over the recipe, do not be alarmed by the number of ingredients. Half of them are spices...spices you probably have in your pantry already. Stop your whining; it's a fantastic cake! :)


Chocolate Chip Gingerbread Cake
Recipe by Lori Longbotham in Luscious Chocolate Desserts

2 1/2 cups, plus 2 tablespoons all-purpose flour
1/2 cup natural cocoa powder, plus additional for dusting
1 teaspoon baking soda
1/2 teaspoon salt
1 1/2 teaspoons ground ginger
1 teaspoon ground cinnamon
1/2 teaspoon ground allspice
1/4 teaspoon ground cloves
1/4 teaspoon ground nutmeg
1/4 teaspoon freshly ground black pepper
One 12-ounce package miniature semisweet chocolate chips
3/4 cup (1 1/2 sticks) unsalted butter, at room temperature
1 1/4 cups sugar
1 teaspoon pure vanilla extract
2 large eggs
1 cup dark molasses
1 cup very hot water

Position a rack in the middle of the oven and preheat the oven to 350 degrees F. Butter and flour a 10-cup Bundt pan.

Whisk together 2 1/2 cups of the flour, the 1/2 cup cocoa, baking soda, salt, ginger, cinnamon, allspice, cloves, nutmeg, and pepper in a medium bowl.

Toss the chocolate chips with the remaining 2 tablespoons flour in another medium bowl.

Beat the butter, sugar, and vanilla with an electric mixer on medium-high speed in a large deep bowl, occasionally scraping down the sides of the bowl with a rubber spatula, for about 3 minutes, until light and fluffy. Reduce the speed to medium and add the eggs one at a time, beating well after each addition.

Whisk together the molasses and hot water in a 4-cup glass measure or a bowl. Reduce the mixer speed to low and add the flour mixture alternately with the molasses mixture in 3 batches, occasionally scraping down the sides of the bowl with a spatula and beating just until well blended. Fold in the chocolate chips.

Transfer the batter to the prepared pan. Bake for 55 to 60 minutes, until the cake begins to pull away from the sides of the pan and is firm to the touch. Cool the cake in the pan on a wire rack for 20 minutes. Invert the cake onto the rack and cool completely.

Serve, lightly dusted with cocoa, and cut into wedges.


Saturday, September 13, 2008

Chocolate Zucchini Cake


I had a little bit of a fiasco while making this superb cake. It was 11:30pm when I started. Halfway through measuring ingredients, I ran out of flour. Seriously, dude, ran out of flour?

Anyone who knows me well would be horrified by this since I normally have back ups of every staple ingredient in my pantry in order to avoid such middle-of-the-night fiascos. But sure enough, I was unprepared. The recipe calls for 2 1/2 cups all-purpose flour. I had about 1 cup and another few tablespoons. Aaaack! Quick decision needed to be made: Go to the grocery store at midnight? Or get creative and find a substitute for all-purpose flour. Ding ding ding. Option B won. I found some cake flour in the cupboard and used 1 cup plus 2 tablespoons sifted cake flour for each cup all-purpose flour I needed. Fortunately, it all worked out in the end. I'm alive to tell about my late night flour fiasco!

And about the cake, yes, it has zucchini in the title (and in the recipe), but you would never know it from tasting it. The zucchini, along with the yogurt, just make it really moist. I followed a suggestion from King Arthur Flour's baking blog to sprinkle course sugar crystals on top of the chocolate glaze and that added a nice crunch to each bite. One thing about the original recipe, I needed to bake the cake for significantly longer than the 30-35 minutes suggested - probably more like 45 or 50 minutes. Just insert a cake tester at 35 minutes and judge then whether or not it needs more time.

Chocolate Zucchini Cake

Recipe from King Arthur Flour

1/2 cup (1 stick, 4 ounces) butter
1/2 cup (3 1/2 ounces) vegetable oil
1 3/4 cups (12 1/4 ounces) granulated sugar
1 teaspoon vanilla
1 teaspoon baking soda
1/2 teaspoon baking powder
1/2 teaspoon salt
2 large eggs
1/2 cup (4 ounces) sour cream or yogurt
2 1/2 cups (10 1/2 ounces) all-purpose flour
3/4 cup (2 1/4 ounce) Dutch-process cocoa
2 teaspoons espresso powder, optional but tasty
2 cups shredded zucchini (about one 10" zucchini, about 12 ounces)
1/2 cup (3 ounces) chocolate chips
1 cup (6 ounces) chocolate chips, for icing

Preheat the oven to 325°F. Lightly grease a 9" x 13" pan.

In a large mixing bowl, cream together the butter, oil, sugar, vanilla, baking soda, baking powder, and salt. Beat in the eggs.

Stir in the sour cream or yogurt alternately with the flour. Then add the cocoa and espresso powder, mixing till smooth. Finally, fold in the zucchini and 1/2 cup chocolate chips.

Spoon the batter into the prepared pan. Bake the cake for 30 to 35 minutes, till the top springs back lightly when touched, and it seems set. Slide the cake out of the oven, sprinkle it evenly with the 1 cup chocolate chips, and return it to the oven for 5 minutes, or until a cake tester inserted in the center comes out clean. Remove the cake from the oven, and use a cake spatula or rubber spatula to spread the chocolate chips into a smooth glaze. Cool on a rack. Yield: 24 servings.


Step-by-Step in Pictures

Related Posts with Thumbnails