Sunday, March 2, 2008

Sisters Go Baking

I must say, living 5 minutes from my sister is a really nice thing. It allows me to see her regularly and talk about the mundane. I wouldn't normally advocate mundane anything, but it's the ultimate sign you are keeping up a relationship. Conversation topics aren't, "Wow, I love how you've decorated your place"; they're, "Can I borrow your Anchorman DVD? I'll bring it back tomorrow." My sister Beth and I do a pretty good job with the mundane.

Today was a special sister outing. Completely un-mundane. Beth and I attended a wonderful baking class featuring a traditional Jewish cookie and a traditional Southern treat: Rugelach and Pecan Tassies. The class was taught by Amy Ostrower, who just published a book of recipes and memories called Nana Lena's Kitchen: Recipes for Life. Amy shared endearing stories of her grandmother, some of which made me think Nana Lena and my great grandmother could have been BFFs. Amy even let us use Nana Lena's rolling pin (an heirloom) for our rugelach dough. I thought that was really nice of Amy, but I also thought she was nuts for sharing it!

I wish I could capture in a bottle the smell of rugelach wafting through Amy's house. I actually left the kitchen just so I could walk back in and get a better whiff. But smell, shmell. One taste and you'll be sold. Oh my gawwwwwd. Nana Lena knew her stuff! You really should pick up a copy of Amy's book. And check out her cute website.

I also have to give a little shout out to Brandeis University. This baking class was organized by the Los Angeles alumni group, of which my sister is a part. What a fun alumni event...and the perfect sisterly activity.


In Pictures

Rugelach dough with raspberry jam, chocolate chips, and chopped walnuts, before the rolling begins...

Apricot-filled rugelach, some rolled in powdered sugar, some sans...

Pecan tassies, the perfect two-bite treat...

Thursday, February 28, 2008

The Lori Longbotham Brownie


Look at what cookbook author Lori Longbotham has gone and done. She made me write a stupid poem. Fortunately, a little corniness never hurt anyone. Just in case, sorry if this hurts...


Marni's Ode to the Lori Longbotham Brownie

Glorious Lori Longbotham, my friend.
Thanks for adding padding to my rear end.

Your brownies are heaven. They're buttery and dense.
With just a quarter cup flour, the chocolate's intense.

Everything I've made from your cookbook is great.
(though slows down my basal metabolic rate) :-(

I've still got a long way to go till I'm done
Trying all of your recipes, then repeat, rerun.

But for now, a brownie is all that I need.
Ahh, the simple sweet life I lead.

Uh oh, the brownie's putting me in cardiac arrest!
And before this gets too out of hand, I'll put the corniness to rest.


Katharine Hepburn's Brownies
Recipe by the fabulous Lori Longbotham in Luscious Chocolate Desserts
Makes 9 large brownies.

1/2 cup (1 stick) unsalted butter
2 ounces unsweetened chocolate, chopped
1 cup sugar
2 large eggs, lightly beaten
1/2 teaspoon pure vanilla extract
1/4 cup all-purpose flour
1/4 teaspoon salt
1 cup walnuts, chopped

Position a rack in the middle of the oven and preheat the oven to 325 degrees F. Butter and flour an 8-inch square baking pan.

Melt the butter and chocolate in a heatproof bowl set over a saucepan of about 1 1/2 inches of nearly simmering water, whisking until smooth. Remove the bowl from the heat, add the sugar, eggs, and vanilla, and whisk until well blended. Whisk in the flour and salt just until well blended. Stir in the walnuts. Transfer the batter to the prepared pan.

Bake for 40 minutes, or until a wooden pick inserted in the center comes out sticky, with just a few crumbs clinging to it, but is not wet; do not overbake.

Cool completely in the pan on a wire rack. Chill if you have the time, then cut into 9 brownies.

Tuesday, February 26, 2008

The Mother of All Cupcakes


Today is my cousin Jessica's 28th birthday. Happy Birthday, Jess! Translate that to: Another excuse to bake! W00t! (please tell me you know that very 21st century word...it was named 2007's Word of the Year by Merriam-Webster Online)

My mom recently gave me a giant cupcake pan and all kinds of fun accessories to dress up the final product. Today, it was time to premiere it. What's cool about this pan is, you've got your top and you've got your bottom. Slather a little frosting between the two parts, assemble, frost the top, and voila! The mother of all cupcakes!

A couple of tips: Be sure to grease and flour your pan well, or you might end up with a headless horseman of a cupcake, or a bottomless one. Neither is a good scenario. Also, you'll probably need to use a bread knife and cut off the rounded top of each of the two parts so you have flat surfaces. You need the spiral top to lie snug on the bottom. Finally, be sure to select a cake recipe that is sturdy enough to withstand so much weight. Having a top resting on a bottom requires a firmer cake. I had to forgo the chocolate cake I usually make for birthdays for fear it would sink when I placed the spiral top on it. I opted for a devil's food cake by Lori Longbotham. Her Luscious Chocolate Desserts cookbook is one of my all-time favorites. I am working my way through the entire thing.


Divine Devil's Food Cake
Recipe by Lori Longbotham in Luscious Chocolate Desserts
Serves 8.

Cake:
2 cups cake flour (not self-rising)
2/3 cup natural cocoa powder
1 1/4 teaspoons baking soda
1/4 teaspoon salt
1/2 cup buttermilk
1/3 cup water
3/4 cup (1 1/2 sticks) unsalted butter, at room temperature
1 3/4 cups sugar
2 large eggs
1 1/2 teaspoons pure vanilla extract

Frosting:
7 1/2 ounces bittersweet or semisweet chocolate, chopped
1/2 cup heavy (whipping) cream
3 tablespoons unsalted butter, at room temperature

Position a rack in the middle of the oven and preheat the oven to 350 degrees F. Butter two 9x2 inch round cake pans, line the bottoms with aluminum foil, and butter the foil.

To make the cake: Sift together the flour, cocoa powder, baking soda, and salt into a large bowl. Stir together the buttermilk and water in a small bowl.

Beat the butter with an electric mixer on medium-high speed in a large bowl until light and fluffy. Add the sugar and beat for 3 minutes, or until light and fluffy. Add the eggs one at a time, beating well after each addition. Beat in the vanilla. Reduce the speed to low and add the cocoa mixture alternately with the buttermilk mixture in 3 batches, beating just until well blended. Transfer the batter to the pans and smooth the tops with a rubber spatula.

Bake for 35 minutes, or until a wooden pick inserted into the center comes out clean. Cool the cakes in the pans on wire racks for 5 minutes. Carefully invert onto the racks, turn right-side up, and let cool completely. Remove the foil.

To make the frosting: Melt the chocolate with the cream in a heatproof medium deep bowl set over a saucepan of about 1 1/2 inches of nearly simmering water, whisking until smooth. Add the butter and whisk until smooth. Let cool to room temperature, then refrigerate, covered, for 15 minutes.

Beat the frosting with an electric mixer on medium-high speed for about 8 minutes, until thick enough to spread.

To assemble the cake: Place 1 cake layer on a serving plate. Spread about 1 cup of the frosting evenly over the layer. Top with the remaining cake layer and frost the top and sides with the remaining frosting. Refrigerate for at least 1 hour, until the frosting sets.

Serve cut into wedges.


Thursday, February 14, 2008

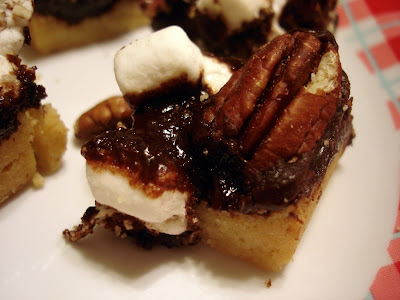
Hugs and Kisses and Heavenly Hash Bars


From one sweet tooth to another, Happy Valentine's Day!

And in honor of such a chocolatastic holiday, I had to make something. Not that I needed another baked good in my kitchen right now, but these just looked scrumptious and Vday wouldn't be complete without something made especially for it. What I made was Heavenly Hash Bars. Isn't that a great name? I saw them on the King Arthur Flour blog and we flirted for awhile as I studied the recipe, contemplating the amount of energy required and the amount of energy I was willing to expend. Fast forward two hours and I've tasted them and fallen in love. They are not hard to make. The bottom is a shortbread crust, and then you make a ganache out of heavy cream and dark chocolate to spread on the crust, and then you sprinkle marshmallows and toasted pecans on top.

I really really love these bars. Growing up watching Pee Wee's Playhouse, I remember Pee Wee regularly retorting "Well if you love it so much, why don't you marry it." That Pee Wee is a smart guy. The Heavenly Hash Bars and I are going to elope tonight. I can't think of a more romantic Valentine's Day!


Heavenly Hash Bars

Crust
1 cup (2 sticks, 8 ounces) unsalted butter
1 teaspoon salt
3/4 cup (5 1/4 ounces) sugar
2 teaspoons vanilla extract
2 1/3 cups (9 3/4 ounces) King Arthur Unbleached All-Purpose Flour


Topping
3 cups (18 ounces) semisweet chocolate chips or chopped dark chocolate
3/4 cup (6 ounces) heavy cream
1 cup (3 3/4 ounces) toasted diced pecans
3 cups (half a 10.5-ounce package) mini marshmallows

Preheat the oven to 300°F. Lightly grease a 9" x 13" pan, or line with parchment and grease the parchment.

To make the crust: In a medium-sized bowl, beat together the butter, salt, sugar, and vanilla, then beat in the flour. The dough will seem very dry, and won’t seem to want to become cohesive at first. Just keep beating, and it’ll eventually come together.

Press the dough into the prepared pan, smoothing the surface with your fingers or a mini rolling pin (pastry roller). The dough will feel stiff, but just keep pressing on it until you’ve covered the bottom of the pan. Prick the dough all over with a fork; this will keep it from bubbling up as it bakes.

Bake the crust for 35 to 40 minutes, until it’s golden brown around the edges and beginning to brown on the top. Remove it from the oven, and loosen the edges with a heat-resistant plastic knife or a table knife. Make the topping while the shortbread begins to cool.


To make the topping: Place the chocolate and cream in a microwave-safe bowl, or in a saucepan. Heat in the microwave, or over low heat on a burner, till the cre
am is steaming and barely beginning to form bubbles. Remove from the heat, and stir. The chocolate will gradually form a lump in the center of the bowl, then will start to expand as it absorbs the cream. Eventually the chocolate and cream will become one; keep stirring till it’s very smooth. If all the chocolate doesn’t seem melted, reheat very briefly, and keep stirring.

Spread the warm chocolate atop the cookie crust. Sprinkle with the marshmallows, then the pecans. Immediately use a knife, or a baker’s bench knife, to cut the bars into squares. You’ll find it useful to run the knife under hot water and wipe it off every several cuts, to keep drag to a minimum. The reason you’re cutting these bars immediately (admittedly,
a somewhat messy proposition), is that if you wait till they’re cool the bottom crust is more difficult to cut.

Cover the pan, and place the bars in the refrigerator for about an hour, to set the chocolate. Remove from the fridge, and use a spatula to transfer the bars from the pan to a serving plate.
Yield: 2 dozen bars.


Source: King Arthur Flour Company, Inc.


Sunday, February 10, 2008

Valentine's Day Care Package from The Parents

First of all, I give this care package an A+. Thank you, Mom and Dad. You have covered all the bases; this is a very well-thought-out variety!

Let's take a look inside...


Item 1: See's Candies
By tradition, I have always had See's Candies on Valentine's Day. So it's important that a little Bourdeaux get thrown in the mix every year. This heart-shaped box is adorable.

~~~~~

Item 2: Rocky Road from Lula's Chocolates
But my mom's palate has become more and more discriminating about chocolate in the last few years and she knows too well that there is life outside See's. So that explains the inclusion of Lula's, a fantastic chocolate company, based in Monterey. This particular Lula's product is Dark Aloha Rocky Road, described on the label as handmade artisan marshmallows, Hawaiian house-roasted macadamia nuts, and premium dark chocolate. Yum!

~~~~~

Item 3: The Adult Brownie from Andronico's
Moving on, the care package also includes two goodies from local Bay Area spots. The Adult Brownie is from Andronico's Market, a high end grocery store in cities around the Bay. The brownie is not just sold there, it's actually made by them. And you won't believe how chocolaty it is! I am very excited since I am so rarely near an Andronico's! You'll have a lot of fun on The Adult Brownie website, too.

~~~~~

Item 4: Heart Cookie from Sugar Butter Flour Bakery
Sugar Butter Flour is an extraordinary bakery that recently opened in Sunnyvale. I urge you to visit if you're ever up there. The bakers come from very impressive backgrounds, but resumes aside, the food really speaks for itself. Just about every time I am in town, I have to make a stop at "SBF." Until my next trip, this heart cookie will tide me over.

~~~~~

Thanks to my parents, I think I'll be good to go on the chocolate front for the next week. Don't forget, you still have four days before Valentine's Day to go on a treasure hunt of your own for an assortment of chocolate. The important thing is that you have something sweet to eat, though that's true 365 days a year.

Tuesday, February 5, 2008

Having a Cow over Yogurt

I had a cow a couple of days ago, all because of some yogurt.

This first sentence could go so many ugly ways. No, I didn't take a spoonful and then read the one month old expiration date. No, I didn't take a spoonful and then realize it was garlic-flavored. No, I didn't take a spoonful and then spot a gnat with wings flapping. No, I didn't take a spoonful and then read the receipt that said I was mischarged by two decimal places ($120.00 yogurt is pretty expensive).

Yes, I took a spoonful and then read the nutritional info on the back of the container. That's when I had my cow.

I blame it on a combination of trust and naivete. I put way too much faith in Trader Joe's because they make me happy so often. I also made the silly assumption that, "Hey, it's yogurt, how bad can it be for ya?" Well, read this:


16 grams of fat! 10 saturated! Holy moly! I mean, holy cow! I mean, I'm having a cow!


I will not be buying this yogurt again. I am perfectly happy with Yoplait or Dannon light. I'll save my saturated fat for more worthy causes: chocolate. Or dinner at The French Laundry.

Saturday, February 2, 2008

Carrot Ginger Bread

Today, I looked through my fridge for inspiration, found a bag of neglected carrots, and decided to put an end to that! I went to my cookbook collection, pulled a bread-only cookbook, and found the perfect recipe: Carrot Ginger Bread. Maybe I subconsciously figured groundhogs eat carrots so in honor of Groundhog Day, I needed to make this bread. Mostly, though, it just sounded really good and I had the ingredients on hand.

The cookbook I used is called Breads from Betsy's Kitchen. I love it. It doesn't have all the glossy glamour of a James Beard Award winner; instead, it's a very homey, down-to-earth spiral bound cookbook with recipe after recipe of fun, adventurous flavored breads. While flipping through it for a carrot recipe, I also paused on a couple of other tempting recipes: Honey Curry Bread, Semolina Olive Bread, Rosemary Raisin Bread, Sundried Tomato and Caramelized Onion Bread, Sesame Cheddar Bread, and Maple Wheat Berry Bread.

Betsy says this Carrot Ginger Bread would make a great chicken salad sandwich. I might just have to take her up on that. Sounds fabulous!!!

Carrot Ginger Bread
Recipe by Betsy Oppenneer in Breads from Betsy's Kitchen
Makes 2 loaves.

2 scant tablespoons or 2 (1/4-oz.) packages active dry yeast
1/2 cup warm water (about 110 degrees)
1 1/2 cups warm milk (about 110 degrees)
2 tablespoons honey
2 tablespoons soft butter
2 teaspoons salt
2 cups peeled and finely shredded carrots
1 tablespoon ground ginger
5 1/2 to 6 1/2 cups unbleached flour

1. In a large bowl, stir yeast into water to soften. Add milk, honey, butter, salt, carrots, ginger and 3 cups flour. Beat vigorously for two minutes.

2. Gradually add flour 1/4 cup at a time, until the dough begins to pull away from the side of the bowl.

3. Turn dough out onto a floured work surface and knead, adding flour as necessary, until you have a smooth, elastic dough.

4. Put dough into an oiled bowl. Turn to coat the entire ball of dough with oil. Cover with a tightly woven towel and let rise until doubled, about one hour.

5. Turn dough out onto a lightly oiled work surface and divide in half. Shape each half into a loaf and place into well-greased loaf pans. Cover with a tightly woven towel and let rise until almost doubled, about 45 minutes.

6. About 10 minutes before baking, preheat oven to 375 degrees.

7. Bake for 25 minutes or until the internal temperature of the loaves reaches 190 degrees.

8. Immediately remove bread from pans and cool on a rack.


Related Posts with Thumbnails