Friday, May 13, 2011

Exotic Spice Cookies with Ginger, Cardamom and Rose Water, AKA The Cookies I Chose Over Lakers Playoff Tickets


Yes, it's true, these are the cookies that will make grown men cry. Not because they are so damn good (and believe me, they are), but because they are here today, a physical, tangible thing I can hold in my hand and send to my stomach, at the expense of Lakers playoff tickets. Grown men, cry away.

Allow me to explain.

I suddenly felt the urge to bake with rose water this week.

I'll never forget the day I bought the rose water. It was about a year ago I was offered last minute free tickets to a Lakers playoff game, and being the rebellious, bake-crazy girl I am, I turned down the tickets so that I could go shopping for interesting baking ingredients at a store called Surfas in Culver City. I had never been to Surfas, but I had heard about it and always wanted to go. I had been told by foodie friends that it was a foodie mecca, a wonderland of restaurant supplies and exotic ingredients and every color of the rainbow in decorating sugars.

Much to the chagrin of my friends who all would have dreamed of being my plus one at the game, not to mention the name calling I got from them, I declined the tickets and instead spent my afternoon purchasing rose water, some parchment cake pan liners, and some colorful coarse decorating sugars. Call me what you will (though please be gentle), I had a great day. And then the rose water sat in my cabinet, unused, all this time! Until now. I searched on Google for a recipe that called for rose water, and found a cookie that also required cardamom, one of my absolute favorite spices.


Well, let me tell you, I made the cookie dough, tasted a little nibble, and then stood there frozen, in shock, in awe, unable to move, in love with this cookie dough. So much so, that I wasn't sure I should bake it up into cookies. I mean, if it ain't broke, don't fix it right? The cookie dough is so perfect, why take a risk and bake it into cookies. What if the baked version isn't as good as the raw dough? What a dilemma! And get this, there is no chocolate in the recipe! What the heck! I know, something is clearly wrong with me. First, I skip Lakers playoff tickets to go grocery shopping, and then I make a non-chocolate cookie dough that's so out of this world I contemplate not baking it. Huh.


The moral of the story is: Listen to the voice inside your head. Do what you want to do. Don't listen to others. Then own your decision, never look back, and make no regrets.

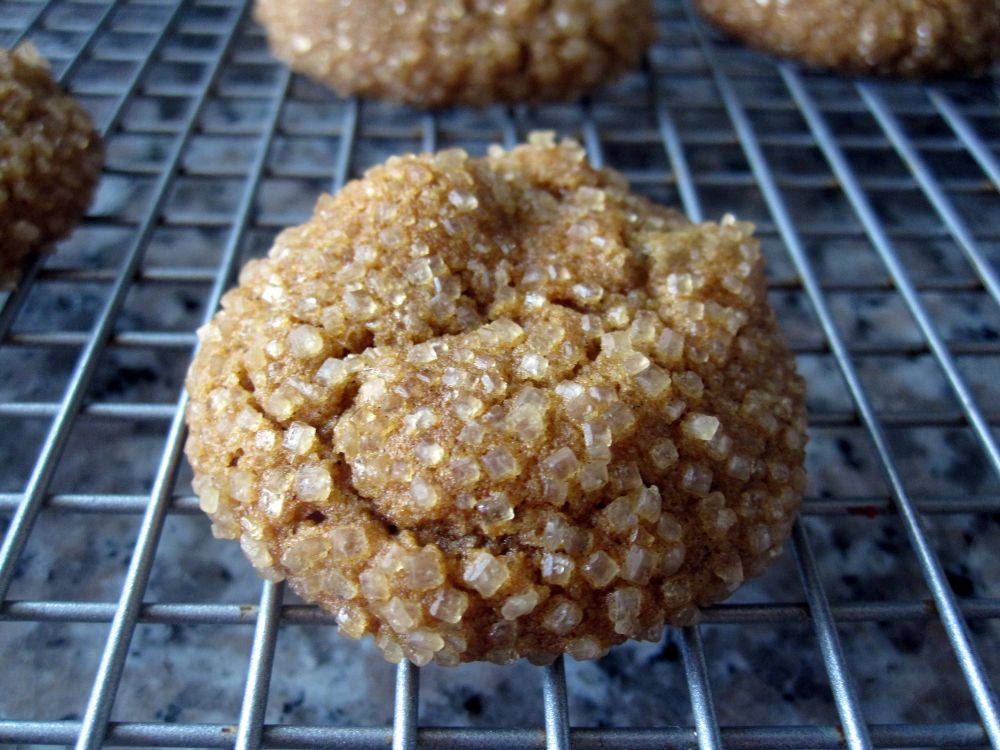
And by the way, yes, I took the risk, baked the dough into cookies, and have zero regrets. Thank goodness! Because if I had made a disgusting cookie with the rose water I purchased instead of attending the basketball game, I would have felt like a fool. These cookies are chewy, full of spicy flavor, and perfect in every way. Please, indulge yourself and make them. I feel like until you do, you're going to think Happy Go Marni has lost her mind. Not that she cares what you think. ;)


Exotic Spice Cookies with Ginger, Cardamom and Rose Water
Adapted from a recipe by Camilla Saulsbury, Nacogdoches, TX, that was featured in the Food Network show Ultimate Recipe Showdown, "Episode: Cookies"
Makes 2 1/2 dozen cookies

2 1/4 cups all-purpose flour
2 1/4 teaspoons ground ginger
2 teaspoons baking soda
3/4 teaspoon ground cardamom (I'd do 1 teaspoon because I love this spice)
3/4 teaspoon ground cinnamon
1/2 teaspoon ground coriander, optional (I skipped this)
1/4 teaspoon freshly ground black pepper, optional (I skipped this)
3/4 teaspoon salt
3/4 cup chopped crystallized ginger (even uncrystallized ginger works fine - and sold at Trader Joe's)
1 cup packed dark brown sugar
1/4 cup (1/2 stick) unsalted butter, room temperature
1/2 cup vegetable shortening, room temperature
1 large egg
1/4 cup honey
1 teaspoon rose water (feel free to add more; 1 teaspoon is VERY mild)
3/4 cup turbinado (raw) sugar, for rolling (Trader Joe's sells this!)

In a medium-sized bowl, whisk the dry ingredients together: flour, ground ginger, baking soda, cardamom, cinnamon, coriander (if using), pepper (if using) and salt. Stir in the crystallized ginger and then set the bowl aside.

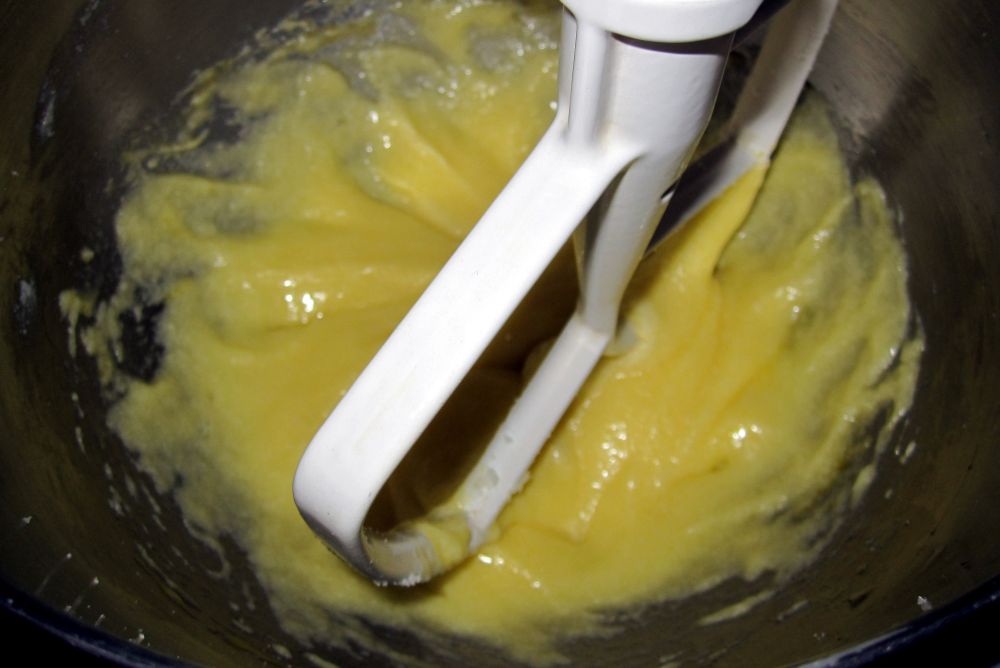
In the bowl of a stand mixer or large bowl with electric hand mixer, beat together the brown sugar, butter and shortening until fluffy. Be careful not to overbeat. Beat in the egg, honey, and rose water. Remove the bowl from the mixer and use a wooden spoon to stir in the dry ingredients. Mix just until blended. Cover and refrigerate at least 1 hour or overnight.

Preheat oven to 350 degrees F. Line two cookie sheets with parchment, silicone baking mats, or spray lightly with nonstick cooking spray. Pour a thick layer of turbinado sugar into a small bowl. Wet your hands under the sink, shake them off but don't dry them, and then form 1 1/4-inch balls of dough. Then roll the balls in the turbinado sugar to coat completely. Place the balls about 2 inches apart. They won't flatten out that much (which is why they remain so chewy!).

Bake cookies until slightly cracked and set on top but still soft to touch, and very light golden-colored, about 9 to 11 minutes. For my oven, 9 minutes was the perfect amount of time. Leave the cookies on the sheets for one minute to cool, then use a spatula to transfer to wire racks to cool completely.


Step-by-Step in Pictures
Whisk the dry ingredients together...

Add the crystallized ginger and stir to combine...

Set aside...

Combine the butter, shortening, and dark brown sugar...

Beat until smooth...
Blend in the egg, rose water, and honey...
Remove from the mixer and stir in the dry ingredients...

Cover with plastic wrap and chill in fridge at least an hour or overnight...

After the dough is chilled, remove from fridge and set up your work station with a bowl of turbinado sugar...
Roll balls of dough in the turbinado sugar and place evenly apart on a baking sheet...
Bake at 350 degrees F for 9-11 minutes, then let cool...

Enjoy!

Monday, May 2, 2011

Seeing Double: Double Chocolate Banana Bread


I love banana bread with chocolate chips. But what's one ingredient that could make it even better? Cocoa powder! That's the key here and it makes this bread double chocolaty!


Instead of making two large 9-inch loaves, I distributed the batter among 3 smaller loaf pans. Then, when the loaves were done baking and cooling, I immediately froze a few of them, knowing I alone could not eat that whole recipe before the bread spoiled! Ok, I probably could have eaten all of the loaves, but I wouldn't have been happy about it a week later.


When the bread has been sitting out for a few days and it's not as fresh as on day 1, it makes amazing toast. Try it with a little orange marmalade or even simply a light spread of butter. How about some peanut butter? Everyone knows chocolate, bananas, and peanut butter were meant for each other. Mmm.


Double Chocolate Banana Bread
Recipe adapted from The Ghirardelli Chocolate Cookbook
Makes two 9-inch loaves

3/4 cup (1 1/2 sticks) unsalted butter, at room temperature
2 cups granulated white sugar
4 large eggs
1/2 cup whole milk
4 large ripe bananas, mashed
3 1/2 cups all-purpose flour
1/2 cup unsweetened cocoa powder mixed with 1/2 cup sugar
1 tablespoon plus 2 teaspoons baking powder
1 teaspoon salt
2 cups semi-sweet chocolate chips

Preheat the oven to 350 degrees F. Lightly grease two 9 by 5-inch loaf pans or three or four smaller loaf pans. You can mix and match sizes; just be mindful of the baking time as smaller loaf pans need less baking time.

In a large bowl, cream the butter and sugar with an electric mixer on medium speed until fluffy. Beat in the eggs, one at a time. Add the milk and bananas, beating until well blended.

In a separate bowl, whisk together the flour, unsweetened cocoa-sugar mixture, baking powder, and salt. Gradually, add the dry ingredients to the creamed mixture. Mix on low just until combined; be careful not to overmix! Gently stir in the chocolate chips (with a spoon, not the mixer). Pour the batter into the prepared pans.

Bake for 60 to 75 minutes (less time for smaller loaf pans), until golden brown and a tester inserted into the center comes out clean. Set the pans on a rack to cool for 15 minutes, and then turn the loaves out of the pans to cool completely. To freeze, wrap tightly in plastic wrap and then place in freezer bags.


Step-by-Step in Pictures
Combine dry ingredients with cocoa and 1/2 cup sugar...

Set aside...
Cream the butter and sugar together...

Add the eggs, one at a time...

Beat in the milk...

Beat in the bananas...

Stir in the dry ingredients/cocoa-sugar mixture...
Stir in the chocolate chips...

Spread the batter evenly into the pans...

Bake at 350 degrees F for 60 to 75 minutes...

Slice and serve...

Saturday, April 23, 2011

My Mom's Favorite Ooey Gooey Pecan Bars for Passover


I got to my parents' house Thursday night and the first thing my mom says to me (after the big bear hug, of course) is, "Marni, you have to try these pecan bars." She all but stuffed one into my mouth. It wasn't exactly hard to give in and try one, but it was noteworthy that she was so eager. I mean, I'd just stepped off a plane and all she could think about was feeding me this bar.

Her alacrity was justified. One bite, actually, one look at these bars, and I knew I'd be sleeping happy (and waking up and going to the gym - but it would be worth it).


Just when I thought there'd be no new baking revelations this Passover, my mom drops this on me. Kaboom! Kerpow! And now I am a changed woman. Forever. Can a Passover Pecan Bar do that to a person? Yes, and I can't wait for you to try this. In fact, I urge you to use your leftover Passover ingredients after Passover is over and make this to bring to a picnic, or a work party, or whatever. No one will know it has matzah meal in it, but if they ask what's in it, tell them the truth. It will shock them.

Unfortunately, because my mom had already made these by the time I arrived, I wasn't there to take step-by-step photos. So these few finished product photos will have to do. I think you'll survive!


Ooey Gooey Pecan Bars for Passover
Adapted from a recipe by Marcy Goldman in A Treasury of Jewish Holiday Baking

Crust
1/2 cup matzah meal
1 cup matzah cake meal
1/2 cup ground toasted pecans
1 cup brown sugar
1/4 teaspoon salt
1/2 teaspoon ground cinnamon
1 cup (2 sticks) unsalted butter or margarine
1 egg yolk

Gooey Pecan Filling
4 eggs, lightly beaten
2 tablespoons unsalted butter or margarine, melted
1 1/3 cups brown sugar
Pinch of salt
1/2 cup Passover maple table syrup
1 teaspoon lemon juice
1 tablespoon Passover vanilla sugar (or Passover vanilla extract)
1/2 cup chopped pecans

Preheat the oven to 350 degrees F. Lightly grease a baking pan. My mom used a 9x13-inch and highly recommends it! You can also use an 8x11 (smaller pan) and the bars will be taller, even gooier, and more like the pecan pie you're used to around Thanksgiving.

For the crust, in a food processor or large bowl, stir together the matzah meal, cake meal, pecans, brown sugar, salt, and cinnamon. Add the butter and pulse in the food processor or use a pastry blender to cut the butter up into small morsels so that the crust mixture is crumbly. Add the egg yolk and stir to incorporate. Use your fingers to squish the mixture together and then press it into the prepared baking pan. Bake for 20 to 25 minutes. You'll know the crust is done when the edges are beginning to brown, but are not too dark. Cool on a wire rack for 15 minutes.

For the filling, in a large bowl, combine all of the ingredients and whisk to incorporate. Pour this filling onto the cooled crust and return to the oven for 20 to 25 minutes. Cool completely on a wire rack, then place in the fridge to chill further so that the filling sets. Cut into squares. A little goes a long way because these are so gooey and indulgent, so even bite-size pieces would work well.

Makes 3 to 4 dozen heavenly bars.

Thursday, April 21, 2011

Brace Yourselves! These Kids Know How to Bake a Cake

Nothing like a good music video by children to teach you proper cake-baking technique! Ok, technique? Well, not exactly. But they do encourage you to follow the recipe in the cookbook carefully. And I can't argue with that.

So watch the video and pay attention! Quiz later. And don't forget to sing along. Lyrics below the video.


Lyrics to "Cooking by the Book"
by LazyTown


I'll pile on the candy,
It's such a pretty sight
It makes the food taste dandy
But my tummy hurts all night

I'll put in some ingredients
But keep the rest for me
I'm not just disobedient
I'm careful, can't you see?

It's a piece of cake to bake a pretty cake
If the way is hazy,
You gotta do the cooking by the book
You know you can't be lazy
Never use a messy recipe,
The cake will end up crazy
If you do the cooking by the book,
Then you'll have a cake
We gotta have it made,
You know that I love cake
Finally, it's time to make a cake

Making food is just like science,
With tools that blend and baste
And every fun appliance
Gives the food a different taste

It's a piece of cake to bake a pretty cake
If the way is hazy,
You gotta do the cooking by the book
You know you can't be lazy
Never use a messy recipe,
The cake will end up crazy
If you do the cooking by the book,
Then you'll have a cake
We gotta have it made,
You know that I love cake
Finally, it's time to make a cake
We gotta have it made,
You know that I love cake
Finally, it's time to make a -
'You gotta do the cooking by the book!'
Cake!

Wednesday, April 20, 2011

Caramel Matzah Crunch Ice Cream: A Passover Dream Come True


Oh yes I did. I just put two of my favorite things (and I know they are also favorites for many of you!) together and it's all kosher-for-Passover!

You can call me a hero. Start celebrating a Happy Go Marni Day in your city. Post cardboard cut outs of me on your lawn. Write me onto the next presidential ballot. I just made Passover dessert more than simply tolerable! Hip Hip Hooray!


Made-from-scratch vanilla bean ice cream gets a Passover-themed flavor enhancement with the addition of tiny pieces of caramel matzah crunch, that chocolate caramel-covered matzah candy that the world can't live without on Passover. A-mazing! Both of these things are things I've blogged about separately before. So all they needed was a little love and marriage.


I knew I wanted to make ice cream for Passover, but I thought it would be more special if it had a distinctly Passover feel to it. I can't toss in regular candy pieces because of the corn syrup or other no-no ingredients. But caramel matzah crunch is something I make annually regardless, and broken up into tiny pieces, they resemble toffee bits! Sort of like Skor or Heath Bar bits.

The result is an ice cream that feels special for the holiday, but if you don't finish the batch by the end of Passover, it's perfectly delicious to continue consuming post-Passover. And you can't say that's true for a lot of other leftover desserts you might have when Passover ends. I see you through the computer screen, nodding in agreement. Try this!


Caramel Matzah Crunch Ice Cream
This recipe is my (very) successful attempt to marry Caramel Matzah Crunch by Marcy Goldman and Philadelphia-Style Vanilla Ice Cream by David Lebovitz
Makes about 1 1/2 quarts

3 cups heavy cream, or 2 cups heavy cream and 1 cup whole milk (honestly, 1% will work fine)
3/4 cup sugar
Pinch of salt
1 vanilla bean, split in half lengthwise
3/4 teaspoon Passover vanilla extract
Approximately 1 1/2 cups Caramel Matzah Crunch, broken up into little 1/2-inch pieces (see recipe below)

Pour 1 cup of the cream into a medium saucepan and add the sugar and salt. Scrape the seeds from the vanilla bean into the saucepan and add the pod to the pot. Warm over medium heat, stirring, until the sugar is dissolved.

Remove from the heat and add the remaining 2 cups cream (or the remaining 1 cup cream and the milk) and the Passover vanilla extract.

Chill the mixture thoroughly in the refrigerator overnight. When ready to churn, remove the vanilla bean, rinsing and reserving it for another use. I recommend straining the mixture into a new bowl because there might be tiny pieces of bark from the vanilla pod that you don't want in the ice cream. Then churn the mixture in your ice cream maker according to the manufacturer's instructions.

During the last 3-5 minutes of churning, when the mixture is pretty thick and almost of perfect consistency for soft serve ice cream, pour in the caramel matzah crunch bits and let the ice cream maker incorporate all the pieces. Transfer the ice cream to freezer containers and freeze for a few hours before serving to allow the ice cream to firm up a bit.


Caramel Matzah Crunch
4-6 unsalted matzahs
1 cup (2 sticks) unsalted butter or unsalted Passover margarine
1 cup firmly packed brown sugar
3/4 cup coarsely chopped chocolate chips or semi-sweet chocolate

Preheat the oven to 375°F. Line a large (or two smaller) cookie sheet completely with foil. Cover the bottom of the sheet with baking parchment — on top of the foil. This is very important since the mixture becomes sticky during baking.

Line the bottom of the cookie sheet evenly with the matzahs, cutting extra pieces, as required, to fit any spaces.

In a 3-quart, heavy-bottomed saucepan, combine the butter or margarine and the brown sugar. Cook over medium heat, stirring constantly, until the mixture comes to a boil (about 2 to 4 minutes). Boil for 3 minutes, stirring constantly. Remove from the heat and pour over the matzah, covering completely.

Place the baking sheet in the oven and immediately reduce the heat to 350°. Bake for 15 minutes, checking every few minutes to make sure the mixture is not burning (if it seems to be browning too quickly, remove the pan from the oven, lower the heat to 325°, and replace the pan).

Remove from the oven and sprinkle immediately with the chopped chocolate or chips. Let stand for 5 minutes, then spread the melted chocolate over the matzah. Chill, still in the pan, in the freezer until set. Break into squares or odd shapes.


Step-by-Step in Pictures
Note: Additional photos can be found on my original posts for Caramel Matzah Crunch and Philadelphia Style Vanilla Ice Cream.

After the ice cream mixture has chilled in the fridge overnight, remove it from the fridge...

Strain the mixture into a new bowl to catch the vanilla pod and any tiny pieces of vanilla bark...

Pour into the ice cream maker...

When the ice cream is almost done, and thick but still moving easily in the machine, pour in the Caramel Matzah Crunch bits...

Churn with the candy bits for about 3 minutes, until fully incorporated...

Transfer to a freezer container and place in freezer to allow the ice cream to firm up...

Scoop and serve! You are in for a real Passover treat!

Tuesday, April 19, 2011

Passover Brownies That'll Fool Anyone: Mwahahahaha!


Abracadabra, hocus pocus, make me a Passover brownie that will fool anyone!

I chanted this spell as I put these Passover brownies in the oven, and apparently I'm quite a good witch. My magic worked! These brownies are, yes, technically kosher-for-Passover, but you would never ever know. I'd bet money on it in Vegas. Even the most discriminating palates and Michelin-rated chefs would have no idea. I am that confident I could fool anyone. There is 1/3 of a cup of matzah cake meal in place of 1/2 a cup of flour in an already certified, tested, heavenly brownie. And because they're so easy to make, it would be a shame, a tragedy, and at the very least, pretty lame, for you to make a Passover brownie mix instead. Please don't.

Bippity Boppity Boo!


Kosher-for-Passover Ice Bath Brownies
Adapted from a recipe by Alice Medrich in Cookies and Brownies
Makes 16 brownies

8 tablespoons (1 stick) unsalted butter
4 ounces unsweetened chocolate
1 1/4 cups sugar
1 teaspoon Passover vanilla extract
1/4 teaspoon salt
2 large eggs
1/3 cup matzah cake meal
2/3 cup walnut or pecan pieces, toasted (optional)

Preheat oven to 400 degrees. Position a rack in the lower third of the oven. Line an 8x8 metal pan with foil and drape extra foil over the edges so you can lift the brownies out later for cutting on a cutting board.

Melt the butter and chocolate in a saucepan over medium-low heat, stirring frequently until the mixture is melted and smooth. Be very careful not to burn the mixture. If you think you're not the careful type, use a double boiler or heatproof bowl set on top of a pan of gently simmering water. It's a lot harder to burn chocolate and butter when using a double boiler.

Remove the saucepan from the heat. Stir in sugar, vanilla, and salt. Add eggs, one at a time, stirring in each until it is well incorporated. Beat in the matzah cake meal until the mixture comes away from the sides and looks smooth and glossy, about 1 minute. Stir in nuts, if using. Pour the brownie batter into the foil-lined pan. Bake for 15-20 minutes, until brownies just begin to pull away from the sides of the pan. The surface of the brownies will look dry but a toothpick inserted in the center will still be quite gooey. That's a good thing!

While the brownies are baking, prepare the ice bath. Fill a roasting pan or large baking pan (a standard 9 x 13" pan works perfectly) with ice cubes and water about 3/4-inch deep.

When brownies are ready, take the pan out of the oven and immediately place in the ice bath. Careful not to splash water from the ice bath onto the brownies! Cool the brownies completely in the ice bath.

When cool, remove the pan from the ice bath and lift the foil edges up and out of the pan and place the foil on the cutting board. Cut the brownies into squares to serve.

Store in an airtight container. Because these are fudgy, they will taste delicious for at least 3 days, and if you're lucky, up to 5 days!


Step-by-Step in Pictures
Melt the chocolate and butter together in a saucepan...

Remove from the heat and stir in sugar, salt, and vanilla until sugar is dissolved...

Add the two eggs, one at a time...

Add matzah cake meal...

Stir just until combined...

Stir in the nuts, if using...

Spread evenly into the prepared pan...

Bake for about 15 minutes at 400 degrees F...

When done baking, immediately place in an ice bath to cool...

Cut into squares and enjoy!

Monday, April 18, 2011

Video Cake Tour: Beth's Birthday Cake

Presenting my first ever Happy Go Marni Cake Tour! Because for some of you, it may be the closest you come to being inside my kitchen. Now if only we had smell-o-vision.


Read the full post about this cake here.
Related Posts with Thumbnails