Tuesday, March 23, 2010

James Beard Foundation Recognizes Jewish Delis!


This is my little shout-out to Jewish delis! Yahooooo! The James Beard Foundation Awards (which, for those who don't know, is like the Academy Awards in all categories of food) just announced its nominations for 2010 and various food-related books and TV shows and radio shows and people are being written up and congratulated all over the Internet. Some more often than others, maybe because they're trendy or familiar. The LA food scene is celebrating nominations of several Los Angeles chefs and writers. You can view all nominations by downloading this pdf.

But honestly, what excited me most when I read the nominations, was the JBF Awards nomination for Save the Deli by David Sax. I remember when this book first came out and I was thrilled that someone would dedicate his life, at least temporarily, to researching delis across America and even the world. Sounds like a tough (read: awesome) job, but someone's got to do it! And we're talking about a guy who's totally and utterly obsessed with delis. There could be no better person for the job. He has traveled to Montreal, Paris, London, even Poland, to find the best pastrami on rye. He visited the classics in the states, from Katz's in New York, to Langer's in LA, to Corky and Lenny's in Cleveland (which, by the way, is fabulous. You must try their corned beef on latke sandwich!).

House-cured pastrami from The Kitchen Table Restaurant in Mountain View, CA

David Sax is calling attention to Jewish delis in a big way. If it weren't for his efforts, I wouldn't have even known that there's a decline in deli and they need our help. I'm ready to open the phone lines! Sax's mission statement on his blog is great. Here's the intro:
Save the Deli is a space dedicated to the preservation of the Jewish delicatessen, a hallowed temple of salted and cured meats. The past half century has seen the deli’s numbers decline greatly, in New York, across the USA, in Canada, and Europe. Those that remain are endangered and in need of our support. Though the challenge is arduous, and the deli’s foes are many, we will persevere.
Take a look at this trailer Sax put together for the release of his book last year. It just makes you love him a little more!


When I visited the Amazon listing for the book, I found a letter written by Sax to Amazon customers. It's hilarious and worth a read. Here's one of my favorite excerpts, which will make you realize how much you need to own the book:
Do you know what it's like to be blown away by kishke? It's akin to a religious moment; your mouth is so in love with this crackling fat-stuffed sausage that it floods your brain with endorphins. It's a watershed event. I'd love for you to experience that.

So David Sax, if you're reading this, I just want to give you a big hug and congrats. You are keeping deli on the map. I hope you nab the JBF Award when they announce the winners May 2nd, but the nomination is already a fantastic start! Here's to pastrami on rye for generations to come.

Monday, March 22, 2010

Deep, Dark Fudge Confection Cake


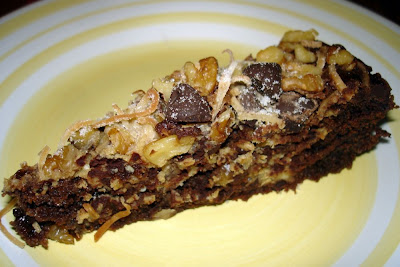
This cake is chock full of the good stuff. It's got cheesecake in it, lots of chocolate throughout, and a yummy sprinkling of coconut, chocolate chips, nuts, and sugar on top. This neat thing happens where both the cheesecake and the topping are placed on the top surface of the batter during assembly, but sink into the cake during baking; the result is that every bite has everything!

Whatever the technology is behind that sinking effect (is it just gravity or is there magic at work?), it's certainly not complicated. This is a cake that's fancy without the trouble. A winning combination! I served it at a dinner party and there was a roomful of smiles. It's great alongside vanilla ice cream but you could also brave it alone. It's chocolaty, but it's not Death by Chocolate (though that would be a-okay, too). Baking mastermind Marcy Goldman has done it again!


Deep, Dark Fudge Confection Cake
Recipe by Marcy Goldman and Yvan Huneault in The Best of BetterBaking.com

Cream Cheese Part
4 ounces cream cheese at room temperature
1/4 cup sugar
2 tablespoons all-purpose flour
1 egg
1 cup miniature semisweet chocolate chips

Chocolate-Coconut Part
1/2 cup chocolate chips
1/2 cup finely chopped walnuts
1 tablespoon sugar
3 tablespoons unsweetened shredded coconut

Batter
1/4 cup unsweetened cocoa powder
1 1/2 cups all-purpose flour
1 cup firmly packed brown sugar
1 teaspoon baking powder
1/2 teaspoon baking soda
1/8 teaspoon salt
1 cup warm brewed coffee
1/3 cup vegetable oil
2 tablespoons distilled white vinegar

Confectioners' sugar for dusting (optional)

Preheat the oven to 350 degrees F. Line a 9-inch springform pan or a 9-inch round cake pan with a round of parchment paper. Spray the pan and paper with nonstick cooking spray. Line a baking sheet with parchment paper. Set aside.

For the cream cheese part, in the bowl of an electric mixer fitted with a paddle attachment, combine all the ingredients and beat on the lowest speed until smooth.

For the chocolate-coconut part, stir all the ingredients together in a small bowl and set aside.

For the batter, combine the cocoa, flour, brown sugar, baking powder, baking soda, and salt in a medium bowl. Whisk to blend. Make a well in the center and whisk in the coffee, oil, and vinegar. Blend well to make a smooth batter.

Spoon the batter into the prepared pan, and then spoon on the cream cheese mixture, depositing it in dollops over the surface. It does not have to be even. Sprinkle the chocolate-coconut part over the top. The two mixtures will sink into the cake during baking.

Place the pan on the prepared baking sheet. Bake for 25 to 35 minutes, or until the cake springs back when gently touched. This cake is quite moist due to the cream cheese part, but it should be set in the center. Let cool in the pan on a wire rack for at least 45 minutes, then unmold onto the wire rack and let cool completely. (The cake is a little fragile until it sets up.) Dust with confectioners' sugar, if desired.


Step-by-Step in Pictures

For the cream cheese part, combine all ingredients...

For the chocolate-coconut part, stir all ingredients together...

For the batter, combine all dry ingredients, then create a well in the center and whisk in the coffee, oil, and vinegar...

Blend well to make a smooth batter...
Spoon the batter into the prepared pan, then dollop the cream cheese part on top...

Finally, top with the chocolate-coconut part...

Bake at 350 degrees for 25 to 35 minutes...

Let cool on wire rack...

Slice and serve!

Friday, March 19, 2010

Handel's Ice Cream, An Ohio Tradition and My Personal Favorite

My mom ordering her two scoops at the window

Handel's Ice Cream is some of the best food you'll ever eat in your life. It's mostly found in Youngstown, Ohio, and surrounding areas, but there is one West Coast location in Southern California. On a recent trip to Palm Desert, my mom and I stopped at that one California location, in Upland, about 45 minutes from Los Angeles. We couldn't miss the chance to eat here! My mom is from Youngstown and grew up eating this stuff. There's something about the creamy, soft texture of Handel's that can't be beat, and it's made on the premises. I've visited Youngstown for family reunions and we've been known to stop at Handel's 5 times in 2 days, and other crazy ratios like that. Do the math; that's a LOT of ice cream. Plus we'll get two or three scoops at a time.

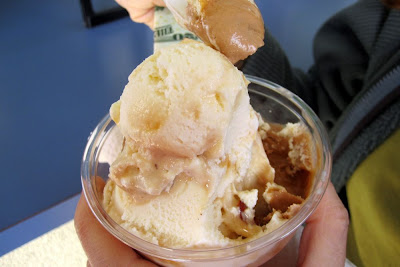
My Chocolate Chocolate Chip Cheesecake Chunk and Mocha Almond Fudge Ripple

My mom's Praline Pecan and Chocolate Malt with Caramel

We are so grateful for this one California location, even if it is not just up the road. In fact, my parents once drove down to LA from the Bay Area to visit and made a trip to Upland to get ice cream. But they didn't just eat there; they went to Albertson's across the street, bought an ice chest and dry ice, then purchased several pints of Handel's to drive all the way back up the state. Now that's true love.

The Upland, CA, location

Handel's ice cream shops always have a window where you order from the street, and then the server gets your scoop from one of the many freezer bins inside the shop. All seating is outside. The servers let you taste samples galore and they don't skimp on scoop sizes. Plus, they're just really friendly people.

At the outdoor ordering window

Handel's was invented in 1945 by Alice Handel in Youngstown, Ohio, and today is headquartered in Canfield, Ohio. USA Today, Chocolatier Magazine, and Travelchannel.com all named Handel's one of the best ice creams in America, and National Geographic named it #1! I feel like a proud mother.

Inside the shop, where only employees go,
the ice cream girl scoops our ice cream from freezer bins


If you don't live near one of the Handel's locations, you can have it shipped, though there's a hefty price tag for the care required to mail ice cream. I think I heard somewhere that Bill Cosby gets it shipped. If I had the budget for $90 pints of ice cream, I'd do it, too.

The classic Handel's blue bench!

Handel's offers dozens of flavors and they are often flavors you've never seen anywhere else. Some of my absolute favorites are Banana Cream Pie, Chocolate Malt with Caramel, Buckeye, Chocolate Chocolate Chip Cheesecake Chunk, Graham Central Station, Coconut Creme Pie, Spouse Like a House, and Heavenly Hash.

The flavor menu

When my mom and I were at the Upland location for this most recent Handel's experience, we tried to stuff our faces full of scoops. We each ordered two scoops to start. My mom got Chocolate Malt with Caramel and Praline Pecan. I got Chocolate Chocolate Chip Cheesecake Chunk and Mocha Almond Fudge Ripple. We sat in our car to eat since there is no indoor seating and it was cold and rainy outside. When we had both licked our bowls clean, there was this funny moment of silence and then we turned to each other, lifted an eyebrow, and non-verbally communicated to each other, "Well, can you fit another scoop or two into your tummy?" We both were so stuffed we didn't end up going back for more, and we were pretty disappointed in our low threshold.

But there's another family reunion in Youngstown, Ohio, coming up in May. So I'm going to need to organize another trip to the Upland location to work on increasing my tolerance level for several scoops in a short period of time to be ready for Youngstown! There's no such thing as moderation in this plan! Ice cream overload or bust! Come to think of it, both!


The Details
Upland, CA location
373 South Mountain Ave.
Upland, CA 91786
(909) 946-9077

To find a Midwest location, check the Handel's website.

Tuesday, March 16, 2010

Texas Barbecue Put the Baking on Hold

I just spent the last 5 days eating Texas BBQ at SXSW Interactive in Austin. Soooooo yummy. But now it's time to rededicate myself to my sweet tooth and say buh-bye to my carnivorous side. And I think I'm going to eat only vegetables for the next MONTH!

Thursday, March 11, 2010

Almost-Like-a-Bakery Traditional Hamantaschen


For Purim this year, I made chocolate-peanut butter hamantaschen, which you saw in my last recipe post, but I also made these more traditional ones by Marcy Goldman. That's because Purim wouldn't be complete without a little poppyseed filling and jam filling. Plus, since part of the fun of making these cookies is giving them away to family and friends as mishloach manot care packages, I wouldn't want my grandfathers on either side to miss out on the flavors they grew up with as little kiddos in Youngstown, Ohio, and New York.


Two years ago I blogged about traditional hamantaschen by Carole Walter. They were delicious and I will absolutely be making those again. But this year, I wanted to try a new recipe and so naturally I found myself sitting on the carpet in front of my cookbook bookcase studying Marcy Goldman's Jewish baking book. She had more than one option for traditional versions, but I was drawn to the title of this one, "Almost-Like-a-Bakery." They were true to their name and turned out yummy!


Almost-Like-a-Bakery Traditional Hamantaschen
Recipe by Marcy Goldman in A Treasury of Jewish Holiday Baking
Makes 4 to 6 dozen pastries

1/2 cup vegetable shortening
1/2 cup (1 stick) unsalted butter or unsalted margarine
1 1/4 cups sugar
3 eggs
1/4 cup orange juice or milk
1 1/2 teaspoons vanilla extract
Approximately 4 cups all-purpose flour
1/2 teaspoon salt
2 1/2 teaspoons baking powder
Golden egg wash (see recipe below)
Fillings: chocolate hazelnut paste, cherry, apricot, prune, or poppy
Regular or coarse sugar (optional)

In a mixing bowl, cream the shortening, butter, and sugar together. Add the eggs and blend until smooth. (If the mixture is hard to blend or seems curdled, add a bit of the flour to bind it.)

Stir in the orange juice or milk and the vanilla. Fold in the flour, salt, and baking powder and mix to make a firm but soft dough. Transfer the dough to a lightly floured work surface and pat the dough into a smooth mass. Cover and let it rest for 10 minutes.

Preheat the oven to 350 degrees F. Line 2 large baking sheets with parchment paper.

Divide the dough into 2 or 3 flattened discs and work with one portion at a time.

Roll out the dough on a lightly floured board to a thickness of 1/8 inch. Use a 3-inch cookie cutter and cut as many rounds as you can. Brush the rounds with egg wash. Fill with a generous teaspoonful of the desired filling. Draw 3 sides together into the center. You should now have a 3-cornered or triangular pastry. Repeat this process with the remaining dough and filling. Brush the pastries with additional egg wash. If desired, sprinkle with regular or coarse sugar, and bake in the center of the preheated oven until golden brown (18 to 25 minutes). Cool on the baking sheets.

If you prefer, this dough can be made ahead and refrigerated, wrapped in plastic, for up to 2 days, or frozen (either as a disc of dough or as already formed and filled pastries, for a couple of months). If refrigerating, allow the dough to warm up before rolling out. For frozen pastries, bake without defrosting.

Golden Egg Wash
1 egg plus 1 egg yolk
1-2 tablespoons milk or water
Pinch of sugar

In a small bowl, whisk together all the ingredients. Use a pastry brush to glaze or brush on prepared, unbaked hamantaschen.


Step-by-Step in Pictures

Cream the shortening, butter, and sugar together...

Add the eggs, milk (or orange juice), and vanilla...

Fold in the dry ingredients until the dough comes together. Then let rest before shaping or wrap up and chill...

To shape, cut circles out of the dough, then brush the rounds with egg glaze and fill with poppyseed filling or jam...

Fold the sides up to form triangle cookies. Poppyseed filling here...

Apricot-jam filled with egg glaze and rainbow coarse sugar, ready to go in the oven...

Bake at 350 degrees for 18 to 25 minutes, then you're done!

Tuesday, March 9, 2010

New Blog Design for Happy Go Marni!

Notice anything different today?????

It's the new and improved Happy Go Marni!

I had been wanting for ages to change up the look of my blog because I was using a template from Blogger and it did not feel Marni-enough or personal. Good thing I have talented friends, because my wonderful, amazing, can't-say-enough-good-things-about-him friend Hillel Smith very generously offered his time and creativity to redesign my blog!

I think the new look really speaks to the theme and content of this blog. It's bright and cheerful in color and mood, and it doesn't overpower or darken the food photos; on the contrary, it warms everything up! Even the logo at the top has my curly brown hair. What's not to love! And I wouldn't expect anything less from Hillel; you should visit his site and see some of the amazing work he's produced over the years.

Hillel and me

I will be introducing you to Hillel's amazing artistic abilities more in an upcoming post, but for now, since we wouldn't want an elephant in the room, I have to address the fact that no, you are not on the wrong blog, it's just new and improved and, well, Happier Go Marni!

Monday, March 1, 2010

Chocolate-Peanut Butter Hamantashen


I know I've said before that I'm a fan of cookbook author Marlene Sorosky. But what I haven't told you is that I own every single one of her cookbooks now. Last weekend, I searched online for the missing ones from my collection, and ordered all of them in one giant credit card blow. I was tired of staring at the void in my cookbook bookcases, knowing that some of her books were not there. I had had enough! Some people collect vintage Barbie dolls, some collect stamps or coins, I collect cookbooks. It's not about having every single cookbook that was ever written. But it is about having every single cookbook by my favorite authors. Over time, I'll complete my Beatrice Ojakangas, Lou Pappas, Carole Walter, Beth Hensperger, Marcy Goldman, Lori Longbotham, and David Lebovitz collections, and a few others.

My Marlene Sorosky collection

This recipe immediately stood out to me because it's not your conventional hamantashen (which I do really like, too). It's a chocolate dough, and a winning combination of peanut butter-strawberry filling to go with that chocolate. It looks really neat to include in your mishloach manot care package to give your friends and family on Purim along with more traditional hamantashen, fruit, and snacks. Since I'm going through a fancy salts phase/obsession and newly purchased Maldon sea salt, I sprinkled a few flakes on the just-out-of-the-oven cookies to finish the look. You certainly don't need to, but my taste buds were very happy with the result!


Chocolate-Peanut Butter Hamantashen
Recipe by Marlene Sorosky in Fast & Festive Meals for the Jewish Holidays

Chocolate Dough

6 tablespoons butter or margarine, at room temperature
1 cup powdered sugar
1 large egg
1 teaspoon vanilla extract
2 ounces unsweetened chocolate, chopped, melted, and cooled slightly
1 1/2 cups all-purpose flour
1/2 teaspoon baking soda
1/4 teaspoon salt

Peanut Butter Filling

Scant 3/4 cup creamy peanut butter
1/2 cup strawberry jam or preserves
3 Tablespoons whole or low-fat milk
Strawberry jam for topping (optional)

Place rack in upper third of oven and preheat to 350 degrees. Grease or spray 2 heavy-duty or cushioned baking sheets.

To Make Dough:
In mixing bowl with electric mixer, cream butter and powdered sugar on medium-high speed until very light and fluffy, about 2 minutes. Mix in egg and vanilla until well blended. Mix in melted chocolate. Add flour, baking soda, and salt, and mix on low speed until incorporated. Mix on medium speed 1 minute. Shape into a flat disk and wrap in plastic wrap. Refrigerate until cold enough to roll. (Dough may be refrigerated up to 2 days. Leave at room temperature until soft enough to roll but still very cold.)

To Make Filling: In a medium bowl, stir peanut butter and jam together. Stir in milk.

To Shape Hamantashen: Divide dough in half; cover 1 portion with plastic wrap. Roll other half between 2 sheets of wax paper into an 11-inch circle, about 1/8 inch thick. Using a 3-inch round cutter, cut out circles. (A clean, empty tuna can with both ends removed makes an ideal cutter.) Spoon 1 1/2 teaspoons filling in the center of each circle. Press 3 edges together to make a triangle, leaving a small opening in the center for the filling to show. Place 1 inch apart on prepared baking sheets. Reroll scraps, cut out, and fill. Repeat with remaining dough.

To Bake:
If not baking on cushioned baking sheets, double-pan by placing 1 baking sheet on top of another. Bake for 10 to 12 minutes, or until tops are firm. The cookies will firm up slightly as they cool. If you like them soft, bake the minimum time; for crisper cookies, bake longer. If baking 2 sheets in one oven, rotate positions halfway through the baking time. If desired, top each with a small dollop of jam and return to oven for 1 minute to set. Cool 2 minutes and remove to racks. (Hamantashen may be stored, airtight, for several days or frozen.)

Makes: about 24 hamantashen


Step-by-Step in Pictures

In a mixing bowl, cream butter and powdered sugar...

Mix in egg and vanilla...

Mix in melted chocolate...

Add flour, baking soda, and salt...

Wrap the dough in plastic and refrigerate...

To make the filling, stir together peanut butter and strawberry jam...

Add milk to the filling...

Stir filling until all ingredients are incorporated...

Roll out the chocolate dough and cut circles...

Spoon a dollop of peanut butter filling in the center of each round...

Shape into triangles and place on cookie tray...

Bake cookies for 10-12 minutes at 350 degrees...

When the cookies are done, take them out of the oven and drop a tiny bit of strawberry jam on top of each one, then return to the oven for 1 minute...

Enjoy!
Related Posts with Thumbnails