Saturday, February 7, 2009

Aztec "Hot" Chocolate Ice Cream


I don't know what it is about people these days, but it seems like for all the progress and advancement we've been making in other areas over the decades (women's rights, civil rights, um, Obama!!!), still many of my friends would think I'm crazy for suggesting spicy chocolate. What the heck. This is not 1950 and pepper and chocolate are no longer exotic. In fact, spicy chocolate has been around for over a thousand years, outdating most of you! I could make vanilla, chocolate, or strawberry ice cream every time, but where's the fun in that? (Though having said that, I have some amazing versions of those plain janes I'll be sharing with you soon).

This David Lebovitz ice cream is out of this world, and the chile powder in the recipe gives it a nice kick without being overwhelming or fire-extinguisher-requiring. And because it doesn't call for egg yolks, it's an easier ice cream to make than the custard method kinds. I'm adding it to my regular repertoire and my friends are just going to have to deal with it.

A Word About Ice Cream Cookbooks
If there is a single ice cream cookbook I would recommend to everyone, it is David Lebovitz's The Perfect Scoop. I own 6 or 7 ice cream cookbooks, and have dozens more cookbooks that have ice cream recipes within them. Many of the authors are fabulous, famous, even celebrity chefs. But I've never been more confident of an ice cream turning out than in The Perfect Scoop. I can guarantee you your ice cream will be perfect, as Lebovitz boldly claims in his title.


Aztec "Hot" Chocolate Ice Cream
Recipe by David Lebovitz in The Perfect Scoop

2 1/4 cups heavy cream
6 tablespoons unsweetened Dutch-process cocoa powder
3/4 cup sugar
3 ounces semisweet or bittersweet chocolate, chopped
1 1/4 cups whole milk
1 teaspoon vanilla extract
Pinch of salt
1 1/4 teaspoons ground cinnamon
2 to 3 teaspoons chile powder (see Note from Lebovitz below)
2 tablespoons brandy

Whisk together the cream, cocoa powder, and sugar in a large saucepan. Heat the mixture, whisking frequently, until it comes to a full, rolling boil (it will start to foam up). Remove from the heat and add the chocolate, then whisk until it is completely melted. Stir in the milk, vanilla salt, cinnamon, chile powder, and brandy. Pour the mixture into a blender and blend for 30 seconds, until very smooth.

Chill the mixture thoroughly in the refrigerator, then freeze it in your ice cream maker according to the manufacturer's instructions.

Note from Lebovitz: I like the taste of smoky ancho or chipotle chile powder, available in Mexican markets. They can vary in intensity, so if you're unsure of the strength of your chile powder, add the smaller amount and let it sit for awhile, then see if you like it before adding more. The subtle warmth can heat up as it stands.


Step-by-Step in Pictures

Sunday, February 1, 2009

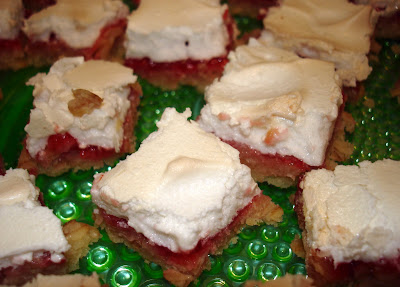
Stately Strawberry Bars


The name of these bars has been changed. Not to protect the innocent, but because otherwise I'd be lying. They used to be called Royal Raspberry Bars. But with only the most amazing homemade strawberry jam on hand (Thank you, Mom, for going through a canning phase recently!), these bars quickly took new form.

It was the funniest conversation when I was talking with my mom about a new name. What means "royal" but works as an alliteration with "strawberry"? A couple of ridiculous ideas were blurted - sexy, splendid, sparkling, swell, stuffy, symphonic (Symphonic Strawberry Bars? Pitiful.) - until we landed on "stately." And there was no contest.

Stately Strawberry Bars
Recipe from The Best of Sunset Cookies
Makes 24 bars

1 1/4 cups rolled oats
1 1/4 cups all-purpose flour
3/4 cup sweetened flaked dried coconut
1/4 cup plus 2/3 cup sugar
1/2 teaspoon salt
3/4 cup (3/8 lb.) butter, melted
3/4 cup strawberry jam
3 large egg whites
1/4 teaspoon cream of tartar

1. In a bowl, mix oats, flour, coconut, 1/4 cup sugar, and the salt. Add melted butter and stir until well blended. Press dough evenly into the bottom of a 9x13-inch baking pan.

2. Bake in a 325 degree F oven until edges begin to brown, 15 to 18 minutes. Let cool about 5 minutes, then spread jam evenly over warm crust.

3. In a large bowl, with an electric mixer on high speed, beat egg whites and cream of tartar until thick and foamy. Gradually add remaining 2/3 cup sugar and continue to beat until mixture holds soft, shiny peaks. With a spatula, spread meringue evenly over jam.

4. Bake until meringue is lightly browned, about 20 minutes. Let cool 5 minutes, then cut into 24 bars. Let cool completely in pan.


Step-by-Step in Pictures

Combine oats, flour, coconut, sugar, and salt. Then add melted butter.
Mix well.
Press into pan.
Bake the crust.
Spread strawberry jam over the warm crust.

Whip up the egg whites with the cream of tartar.

Dollop the meringue onto the jam so it is evenly distributed.
Spread the dollops smoothly across the top.
Take a spoon and lift up in random places on the meringue to create peaks.
Bake the bars.

Cross section.
How royal! I mean stately! ;)

Wednesday, January 28, 2009

It's a Rachel (Bar) Kind of Day

Rachel and me

I've just got something on my mind. And hey, it's remotely about baking!

Remember my friend Rachel? She's still troopering along, half done with chemo now! I'm so proud of her.

Remember that outstanding Rachel Bar (a peanut butter cookie drenched in ganache) named after her? Rachel made those bars with her mom a few days after I wrote the post, and called me very excited as they were cooling on the kitchen counter. That call made my day; she has no idea just how much.

The Rachel Bar

Remember the fundraising efforts for the Leukemia & Lymphoma Society, started as a way to boost Rachel's spirits? Oh, and by the way, it's not too late to donate. Well, we've already raised over $9,300, a truly remarkable amount.

Last question of the day. Remember I said I'd be running a half-marathon in Rachel's honor? In fact, my exact words were:
In Rachel's honor, I will be running (well, more accurately jogging, walking, and panting) in the Carlsbad Half-Marathon on January 25 as part of Team Rachey.
Well, the race was this past Sunday and I'm happy to report that I made it across the finish line in one piece! In fact, panting I was not! It was my first half-marathon and not being a runner before a few months ago, I was just a little bit nervous the days leading up. But in mile 11, when I thought my legs were going to crumble beneath me, I was reminded of Rachel's strength, and suddenly two more miles became possible. Right after the race, my friend and I got to talk to Rachel on the phone, and hearing her happy voice made it all worth it. Half-marathon half-shmarathon!

Team Rachey

Now go make some more Rachel Bars.

Wednesday, January 21, 2009

Northern-Maple Nut Pie


My family goes nuts over maple-flavored anything. You should see my mom's eyes bug out when she spots a pie like this on a restaurant menu; she can hardly contain herself. It's as if for an instant she forgot she loved chocolate.

I was looking at various maple recipes to see where the maple flavor comes from. Some recipes simply use brown sugar, which is CHEATING!!! Some call for maple sugar, which I don't have on hand (and can get kinda pricey). Others, like this one, call for maple syrup. And come on, who doesn't have that! This pie is really simple to make and has a strong, amazing maple presence in it. But please don't use Aunt Jemima. That doesn't count!

Northern-Maple Nut Pie
Recipe by Marilyn M. Moore in The Wooden Spoon Dessert Book

The flavor of this pie comes from pure maple syrup, cooked down from the sap of northern maple trees. They say the further north the trees are grown, the better flavored the syrup.


3 large eggs
1/3 cup granulated sugar
1/8 teaspoon salt
3 tablespoons melted unsalted butter
1 cup pure maple syrup
1 1/4 cups coarsely chopped walnuts or pecans

Preheat the oven to 425 degrees F. Line a 9-inch pie pan with your favorite pie dough. Trim and flute the edge. Place the pastry-lined pan in the refrigerator to chill while preparing the filling.

In a mixing bowl beat the eggs. Add, in this order, beating well after each addition, the sugar, salt, butter, and maple syrup.

Remove the pie shell from the refrigerator. Place the chopped nuts in the shell.

Stir the filling once more and gently pour over the nuts. Bake at 425 degrees F for 15 minutes. Reduce the heat to 350 degrees F and bake an additional 20 to 25 minutes. Do not overbake. The filling should be just slightly soft in the very center. It will continue to firm after removal from the oven. Cool on a wire rack. Serve slightly warm or at room temperature. Refrigerate leftovers.

Makes 8 to 10 servings.


Step-by-Step in Pictures


Monday, January 12, 2009

Buttermilk Bars


This is one of those recipes I never would have chosen on my own because the name doesn't sound like anything special. It was my mom who saw it in a cookbook and said, "Wow, these sound good." Leave it to your mom to teach you a good lesson: Don't judge a recipe by its title. I read the ingredients and yep, these sounded good! And off I went to make them...

They're moist, almost like cake but a little spongier, and very sweet. Sweet enough that I didn't feel the need to prepare the glaze. And now I'm thinking I need to return to Peery's cookbook and spend more time studying the recipes. She has my vote.

Buttermilk Bars
Recipe by Susan Mahnke Peery in The Wellesley Cookie Exchange Cookbook

1 1/4 cups sugar
3/4 cup brown sugar, firmly packed
2 cups flour
1/2 cup butter, softened
1/2 cup shredded coconut
1/2 cup chopped nuts
1 egg, beaten
1/2 teaspoon salt
1 teaspoon cinnamon
1 teaspoon baking soda
1 cup buttermilk
1 teaspoon vanilla

Combine sugar, brown sugar, flour, and butter in a bowl and mix with a pastry blender until mixture is in coarse crumbs. Take out 2 cups of the mixture and reserve the rest.

To the 2 cups add coconut and chopped nuts, and pat this mixture into a greased 9x13" pan.

To the reserved mixture, add the egg, salt, cinnamon, baking soda, buttermilk, and vanilla, and mix well. Pour over the crumb mixture in the pan.

Bake at 350 degrees F for 45 minutes (Marni's Note: I only needed about 30 minutes). Remove to rack and cool.

Drizzle with a thin confectioners' sugar glaze made from 1 1/2 cups confectioners' sugar and enough milk or cream to reach proper consistency. Makes about 48.


Step-by-Step in Pictures

Combine the ingredients for the bottom crust layer...

A pastry blender is handy here, or your bare hands...
Press into the bottom of the pan...
Combine the ingredients for the top buttermilk layer (which uses part of the original crust mixture)...
Blend well...
Pour the buttermilk mixture over the crust layer...
Bake at 350 degrees F. Check to see if done after 30 minutes...
Mmmm...

Monday, January 5, 2009

Chocolate Pistachio Cookies


I love the way these cookies look. And they're really easy to make and taste yummy. I suppose you have to like pistachios, but that's not too hard to do. Perhaps these are the new bake sale cookie. Thumbprints and peanut blossoms are SO yesterday.

Note: I actually have nothing against thumbprints and peanut blossoms. One day I may even post a thumbprint or peanut blossom recipe. If you were momentarily insulted, just remember that sometimes I'm a bit of a drama queen. :-P

Chocolate Pistachio Cookies
Recipe from Santa's Favorite Cookies December 2004 issue
Makes about 3 1/2 dozen cookies

2 cups shelled pistachio or macadamia nuts, finely chopped, divided
1 3/4 cups all-purpose flour
1/4 cup unsweetened cocoa powder
3/4 teaspoon baking soda
1/2 teaspoon salt
3/4 cup plus 1 tablespoon unsalted butter, divided
1 cup granulated sugar
3/4 cup firmly packed brown sugar
2 eggs
3 squares (1 ounce each) unsweetened chocolate, melted
1/2 teaspoon vanilla extract
1/8 teaspoon almond extract
1 1/2 squares (1 ounce each) unsweetened chocolate
2 tablespoons confectioners' sugar

1. Preheat oven to 375 degrees F. Lightly spray baking sheets with oil; set aside. Reserve 3 tablespoons pistachios for garnish.
2. In medium bowl, combine flour, cocoa powder, baking soda and salt; set aside.
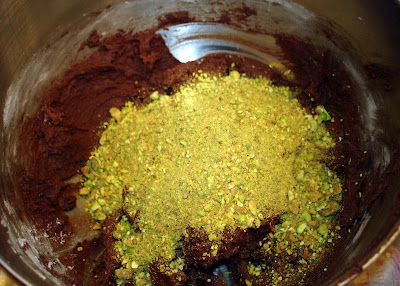
3. In large bowl, with electric mixer, beat 3/4 cup butter, granulated sugar and brown sugar until light and fluffy, about 5 minutes. Beat in eggs, one at a time, beating 30 seconds after each addition. Beat in melted chocolate and extracts. Beat in flour mixture just until blended. Stir in pistachios.
4. On prepared baking sheets, drop dough by rounded tablespoonfuls, 1 inch apart. Bake one sheet at a time 8 minutes or until tops are puffed and dry but still soft when touched. Do not overbake. On wire rack, cool 5 minutes; remove from sheets and cool completely.
5. For icing, in microwave-safe bowl, melt 1 1/2 squares chocolate with remaining 1 tablespoon butter at high (full power) 1 minute or until chocolate is melted; stir until smooth. Stir in confectioners' sugar. Lightly spread 1/4 teaspoon icing on each cooking, then sprinkle with reserved pistachios. Let stand 20 minutes before serving.


Step-by-Step in Pictures

Thursday, December 25, 2008

The Most Awesome Christmas Cupcakes Ever!


These are the most creative, fun Christmas-themed cupcakes I have ever seen. I happened upon this flickr account by accident, but sometimes that's the best way! Hayley the Caker, you hereby win my first annual Most Awesome Christmas Cupcake Award.

Happy Holidays, Everyone!
Related Posts with Thumbnails