Monday, September 8, 2008

Zucchini, Ricotta, and Sun-Dried Tomato Cheesecake


I served this savory cheesecake with a dinner of salmon and artichokes. It was a great addition to the meal. It looks neat, baked in a springform pan to resemble its sweeter cheesecake counterpart, and it's full of colorful vegetables and herbs. I found the recipe on a great food blog, 101 Cookbooks, but had to modify it slightly to work with ingredients I had on hand. For the sun-dried tomatoes, which I added to the recipe, I only had the really dried kind that needed replumping. To do that, I just poured very hot water over the tomatoes, and left them to "grow" for about 10 minutes.

Zucchini, Ricotta, and Sun-Dried Tomato Cheesecake
Adapted from 101 Cookbooks
Serves 8

2 cups zucchini, unpeeled & grated
1 teaspoon fine grain sea salt
2 1/2 cups ricotta cheese
1/2 cup Parmesan cheese, grated
3/4 cup sun-dried tomatoes
2 green onions, chopped
2 cloves garlic, chopped
1 tablespoon dried dill
zest of one lemon
3 large eggs, well beaten
1/3 cup goat cheese, crumbled

Preheat oven to 325 degrees F. Grease a 9-inch springform pan.

In a strainer, toss the shredded zucchini with the salt and let sit for ten minutes. Then aggressively squeeze and press out as much moisture as you can. Set aside.

In the meantime, combine the ricotta cheese, Parmesan cheese, sun-dried tomatoes, green onions, garlic, dill and lemon zest in a medium bowl. Stir in the eggs and continue mixing until well combined. Now stir in the shredded zucchini. Fill the springform pan with the ricotta mixture and place on a baking sheet. Place in the oven and bake for 60 minutes. Now sprinkle with the goat cheese and return to the oven for another 20 - 30 minutes or until the goat cheese is melted and the cake barely jiggles in the center (it will set up more as it cools). Place in the broiler for 2 minutes or until a golden color.

Remove from the oven and let cool five minutes, then release the cake from its pan. Cool completely; serve at room temperature.


Step-by-Step in Pictures

Drain the zucchini of water...

Reconstitute the sun-dried tomatoes by placing them in boiling water...

Combine all the ingredients...

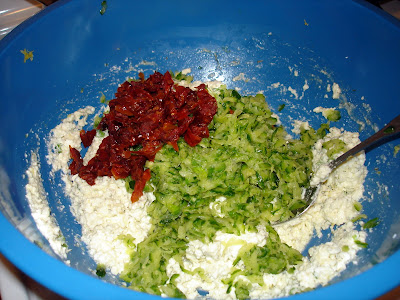
Here's what your final mixture looks like...

Spread the mixture into a springform pan...

Bake...

Sprinkle goat cheese on top and place back in the oven. Then broil for the last few minutes.
Remove the sides of the springform pan...

Thursday, September 4, 2008

Krispy Kreme Bacon Cheddar Cheeseburger


Maybe I have a thing for exotic burgers, or maybe it's my love of donuts, or maybe it's my fascination with odd sounding dishes that I can't even eat on account of the unkosher animal in them (oink oink) that I then refashion so I can eat, but whatever the reason, the Krispy Kreme Bacon Cheddar Cheeseburger definitely got my heart a-racin'. Someone posted the above pic to Flickr, and then it was featured in the NY Times.

Turns out there is an official name for this burger - The Luther Burger. According to Wikipedia...
A Luther Burger is a hamburger, specifically a bacon cheeseburger, which employs a glazed donut in place of the bun. According to legend, the burger was named for, and a favourite (and possibly invention) of the late singer-songwriter and record producer, Luther Vandross.
And there you have it, a savory use for a donut. I think dinner tonight is going to be a turkey sandwich on chocolate cake. Obviously, there's nothing wrong with that!

Tuesday, August 26, 2008

Surprise Meringues


Here's a recipe that's been in my family for many decades. My mom's mom used to make it, and now my mom and I make it. It's extremely simple to prepare, with very few ingredients and very few steps.

You do need to be familiar with how to beat egg whites. I always use my KitchenAid standmixer with the whisk attachment, though a glass bowl is probably the best material for beating egg whites. Just stay away from using a plastic or melamine bowl since it's much harder to get grease off those materials and grease will destroy your egg whites. Speaking of grease, fats in general will ruin the egg whites, so be sure you don't have ANY yolk in the bowl. You'll also need to watch the mixture as you beat it because if you're not careful and you overmix it, your peaks will come and go and then they're unsalvageable. Epicurious has a useful video on how to do this.

Surprise Meringues are great year round, but they are also ideal for Passover since, first of all, it's not a bad idea to have an egg white dessert to go with your otherwise fattening feast, and of course, secondly, there's no flour. The recipe doubles easily, and that's usually what I do since it's pretty normal to go through one batch of these in a night (er, hour).

Maybe you've had meringues before from a bakery, or at someone else's house. I'm going to make a cocky statement and say unequivocably you haven't had a good meringue until you've had this one. It's chewy and gooey, not a crispy crumbly dry mess like most meringues.


Surprise Meringues
Recipe from my bubbe

2 egg whites
1/8 teaspoon salt
1/8 teaspoon cream of tartar
1 teaspoon vanilla
3/4 cup sugar
1 small package chocolate chips
1/4 cup chopped nuts, optional

Beat egg whites, salt, cream of tartar, vanilla to soft peaks. Add sugar gradually and beat till stiff. Fold in chips and nuts, if desired. Cover baking sheet with parchment or a silpat. Drop by rounded teaspoonfuls. Bake at 300 degrees F for 20-25 minutes. Makes 2 dozen cookies.


Friday, August 22, 2008

Pork-n-Beans Cake Minus the Pork


Just the other day, I read a really great, really fun blog post on Bakers' Banter, which is King Arthur Flour's baking blog. The post was titled, "Culinary Oxymorons, or the 'Ewwwwww!' Quotient." It talked about some pretty strange food combinations, unlikely pairs such as Velveeta Fudge and Pork-n-Beans Cake. And as you read that last sentence over again to take it all in, yes, those are two very real desserts. In fact, there are photos of melted Velveeta mixed with chocolate in that post. It's disturbing and intriguing all at the same time and I don't think I'd venture down the Velveeta baking path. But the pork-n-beans cake, now that's something I needed to consider. There was nothing gross about it to me; instead, it made a lot of sense why a can of baked beans could taste good and cook well in a cake.

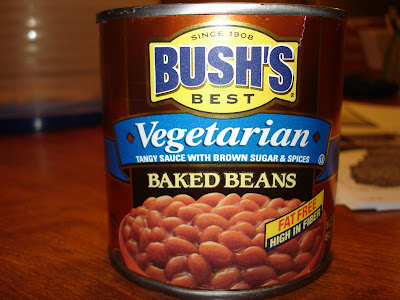
I had to adapt the recipe for a couple of reasons. Seeing as I don't eat pork, I opted for a can of Bush's Vegetarian Baked Beans. And shocker of all shockers, I actually ran out of vegetable oil halfway through (so unlike me!), so I had to find an alternative. My own version of this truly spectacular cake is below, inspired by the photographed recipe card on the Bakers' Banter blog post.


The Review. It's a simple quick bread, full of flavor from the spices in the baked beans, and incredibly moist. It has a beautiful orange-brown hue, and a sweetness from two cups of sugar and baked beans in the batter, but also from the cinnamon sugar I liberally sprinkled on top. I am so excited to have discovered this recipe. It makes a traditional quick bread a lot more fun. You'll be serving this to guests, and only after they take their first bite will you then play the annoying hostess game of "Can you guess what unlikely ingredient flavors this cake?" As you ask, your guests' eyes will bug out with horror, fearing the worst. But hopefully once you tell them the answer, not even a can of baked beans in a cake could scare them away from the amazing yumminess of this dessert. I look forward to trying this recipe with a variety of brands of baked beans, as well as flavors. What would happen if I used barbecue baked beans? Ooooh, or maple baked beans? Maybe that'll be round two.


Pork-n-Beans Cake Minus the Pork
[or you can just call it Baked Beans Cake]
Adapted from a recipe card on Bakers' Banter
Makes two loaves

2 cups white sugar
1 can (15 or 16 oz.) baked beans
1/2 cup vegetable oil
6 tablespoons melted butter or margarine
3 eggs
2 cups all-purpose flour
1 teaspoon ground cinnamon
1/2 teaspoon baking powder
1/2 teaspoon baking soda
3/4 teaspoon salt
1 cup raisins, optional
1 teaspoon vanilla extract
Cinnamon and sugar mixture for sprinkling

Preheat oven to 325 degrees F. Grease and flour two (8x4-inch) loaf pans. In a large bowl, mix together sugar, beans, oil, melted butter or margarine, and eggs until smooth (the beans should be slightly mashed, but not pureed); set aside. In a separate bowl, combine flour, cinnamon, baking powder, baking soda, and salt. Add to bean mixture, stirring just until combined. Stir in raisins, if using them, and vanilla. Divide batter into prepared loaf pans. Sprinkle the tops liberally with a cinnamon sugar mixture. Place pans on a baking sheet.

Bake for 50 to 55 minutes (it took me exactly 54 minutes) or until a tester inserted in the center of the cake comes out clean. Cool completely on wire racks before removing from pans.

Step-by-Step in Pictures

In go the sugar, oil, butter, and yes, beans...

Add the eggs...
Blend...

In a separate bowl, combine dry ingredients...
Add dry ingredients to bean mixture...

Blend. This is the cake batter!
Grease and flour two 8x4-inch loaf pans...
Fill the two pans equally with batter...
Sprinkle lots and lots of cinnamon sugar on top...
Bake for about 50 minutes at 325 degrees F...
Voila! Baked Bean Cake!

You can see tiny specks of baked bean in the crumb. They add visual and gustatory interest!

Thursday, August 21, 2008

Warm Chocolate, Cinnamon, and Coffee Tart


I was attracted to this recipe for a variety of reasons. First, it's a Joanne Weir recipe, which inherently means good. Then, the title indicated the use of three of my favorite ingredients. And finally, upon reading the full list of ingredients, I was especially intrigued by the pine nuts. Pine nuts in a dessert? Okay! Plus, I got to pull out my bottle of Kahlua, and you know how that goes. Once it's out for baking purposes, why not have a little on the rocks, too.

This recipe is very very easy. The pastry, made in a food processor, comes together quickly and does not require rolling out; you just press it into the tart pan. If I can nitpick for a moment, I did have to use three large-ish dishes for the filling: a double boiler, a saucepan, and a mixing bowl. Oh the horror!

Warm Chocolate, Cinnamon, and Coffee Tart
Recipe from Weir Cooking in the City by Joanne Weir
Get the recipe at Leite's Culinaria


Tuesday, August 19, 2008

Why You Need a Microplane

The short answer is: Because Gourmet Magazine says so.

Long Answer: At the very least, you should know what a microplane is. Avoid embarrassing yourself at a dinner party and get familiar. But let's put aside the issue of protecting your fragile reputation. A microplane is a very handy kitchen tool. It grates or peels your fruits, vegetables, cheeses, roots, etc... all with ease! It's easy to clean and store. I swear by it when a recipe calls for the zest of a lemon, or grated fresh ginger, or even shaved chocolate. You can get one for under $15.


But what's really interesting to me is that Gourmet Magazine would have you think the microplane has gone mainstream. I was reading the old Thanksgiving 2007 issue the other day, and I found a recipe with an ingredients list that called for something to be grated on a microplane. Gourmet just assumes you know what it is as they go about their business of sharing the recipe. They don't pause for a second to help you poor unfortunate (naive, ignorant, uneducated) souls who aren't familiar with the term. Or maybe they figure it's fine to say microplane in the ingredients list because you'll look it up in the dictionary. And speaking of the dictionary, it's not officially added, though it does have an entry in Wikipedia and it's been reviewed all over the internet including on non-food sites, to rave reviews.

It's basically the Kleenex of graters, the only one with a household name. I mean, who asks for a face tissue when you could ask for Kleenex instead?

Sunday, August 17, 2008

Zebra Cake


I'm going to admit, you do NOT make this cake for the taste. But don't let that scare you away; you MUST make this cake. I'd be very curious to try this recipe again swapping out the cup of oil for a cup of butter. The oil taste was a little too much for me. But one look at the way this cake turned out visually, and I'm sold. Maybe not all cakes are meant to be eaten?

The process for making the zebra pattern was tricky, asking for some skill and a whole lot of patience. I had a bowl of chocolate batter and a bowl of vanilla batter side by side. Each time I added one of the batters to the baking pan, in a concentric circle design, I had to be super careful not to drip any batter into the pan or I might ruin the design. That is not such an easy thing to do. But if you power through it, the wow factor is there, and it is there when staring at the cake from the outside, and also during the dramatic moment when all eyes are on you cutting into the cake for the first time to reveal the zebra stripe cross section.

I've seen zebra cake recipes, in almost identical versions, all over the internet. I thought, "How hard could it be?" Well, it's as easy as I could have dreamed it...until it's time to put the batter in the baking pan. I dare you to give this a whirl.


Zebra Cake
Recipe adapted from Baking Bites and Open Source Food
Serves 10

4 large eggs
1 cup sugar
1 cup milk
1 cup vegetable oil
1 teaspoon vanilla extract
2 cups all-purpose flour
1 tablespoon baking powder
1/4 teaspoon salt
3 tablespoons cocoa powder

Preheat oven to 350 degrees F. Line a 9-inch round cake pan with parchment paper and lightly grease the bottom and sides of the pan.

In a large bowl, mix together eggs and sugar until mixture is light and creamy and the sugar has mostly been dissolved. Stir in milk, vegetable oil, and vanilla.

In a medium bowl, whisk together flour, baking powder and salt. Pour into wet ingredients and whisk to combine. Measure out just over two cups of vanilla batter and place it back in the medium bowl. Sift cocoa powder over the bowl and whisk until fully incorporated.

Put about 3 tablespoons of vanilla batter into the center of the pan and let it spread slightly on its own. Put about 3 tablespoons of chocolate batter in the center of the vanilla. It will push out the other batter and, as it sits for a moment, will also spread itself. Alternating spoonfuls of the two batters, repeat the technique until all the batter has been used up. Feel free to use more than 3 tablespoons at a time. Be careful not to drip batter across the pan as you put one of the two kinds into the center; it will affect your design.

Bake for 38-42 minutes, until the cake is light gold and a tester inserted into the center of the cake comes out clean.

Let the cake cool in the pan for 10-15 minutes, then turn out the cake and remove the parchment paper. Reinvert on to a wire rack and let cool before slicing.


Step-by-Step in Pictures


Animal vs. Cake: A Study in Stripes
I can't even tell the difference! Which is the animal? ;)


Related Posts with Thumbnails