Friday, April 15, 2011

Mastering Wilton Cake Decorating by Practicing on My Sister's Birthday Cake

The cake I made for my sister's birthday,
using skills I just learned in the Wilton workshop!


A few weeks ago I was invited to a Wilton cake decorating workshop. Wilton is the brand of cake decorating supplies and resources I grew up with. Every birthday cake of my childhood (and that of my sister and brother) was a cake my mom made, guided by the Wilton yearbook of decorating ideas. I used to watch my mom stay up really late the night before my birthday party, creating amazing, beautiful, glorious, creative cakes. It's one of my happiest memories.

Practicing my piping skills in the workshop

So getting the invite to this Wilton workshop was pretty thrilling. Of course I said yes. And I spent 6 hours learning from the absolute masters of the art. Sandy Folsom is the Director of The Wilton School and watching her pipe buttercream out of a pastry bag onto a practice board to demonstrate proper technique, upside down no less (!!!), was one of the most amazing things to witness. She made piping look effortless.

Director of the Wilton School Sandy Folsom
demonstrating piping skills upside down!


Let me tell you right now, it is not effortless! It's a lot of work, a steady hand, knowing which angle to hold the bag relative to the cake surface, how much pressure to squeeze around the pastry bag, consistency, and the list goes on. There are so many instructions. In piping a rosette, you start at the 9 o'clock mark and squeeze clock-wise until the 6 o'clock mark, then gradually release so it fades to nothing by the time you return to 9 o'clock. Whew! So much to think about!

I even learned how to make fondant flowers

Six hours is hardly enough time to master a skill. But getting an overview of the basic skills required to decorate a cake was a blast, and extremely helpful. Nancy Siler, the VP of Consumer Affairs, was there to introduce us to all the new Wilton products and work the room, helping attendees with proper hand position and technique.

I met really interesting people in the workshop, mostly food stylists, a few bloggers, and even journalists. Shout-out to Hilary of Nosh With Me, a blog I've been following for years. How thrilling to meet the person behind the blog you read. Bloggers have offline lives, too, ya know! Hong of Ravenous Couple sat in front of me and I was constantly impressed with his handiwork. Food stylist Alice Hart sat behind me and kept tweezers/pincers in her pocket, because as a food stylist, you never know when you're going to need to adjust something without using your fingers. Right? So fascinating! Chef Jamie Gwen, who hosts a radio show on KFWB News Talk 980, was also in the class, and I worked with her (and Alice Hart) on a group decorating project.

Some of the group cake decorating projects during the workshop
(my team was the yellow cake in the center)


One of the neatest effects I learned at this workshop was the basketweave, a technique that makes your cake look like a basket. It's very impressive-looking, but the way you create it is not all that difficult, just tedious. I was very excited to try this at home, and with my sister's birthday coming up just days later, I decided to go for it!

I made my grandmother's chocolate birthday cake and frosted it with homemade buttercream. I then covered the entire perimeter with my first ever on-my-own, no-hand-holding-from-master-Wilton-cake-decorators basketweave! I piped roses and other flowers on the top and hanging off the edge onto the basket, and wrote a birthday message to my sister in the center.

The cake took two days. I baked the layers on a Monday, froze them so they'd be easier to frost, and then spent all of that Wednesday evening making buttercream frosting from scratch and decorating the cake. I'm really pleased with how it turned out. I'm proud of my first effort doing basketweave. And most rewarding of all, my sister loved it.

Presenting the cake to my sister (who's 5 months pregnant!)

Thanks to Wilton for giving me happy memories as a kid and still today. The workshop was incredible. I think I'd make a great postergirl for Wilton. Heck, between my mom and me, we own so many Wilton products we could open up a shop! As for my skills, I have a lot of practice to do before I reach mastery level. Maybe this will be the Year of the Cake. More roses, rosettes, and basketweaves until I drop! I'll name my autobiography From Basketweave to Basketcase. Ha! Could be a bestseller.


More Photos of the Birthday Cake I Made For My Sister


Sunday, April 10, 2011

My Award-Winning Lucky Charms Ice Cream


My friends Brittany and Bryan invited me to a BYOIC party. BYOIC as in bring-your-own-ice-cream party. It was Bryan's 31st birthday, and that calls for an ice cream-themed party! Duh! They mentioned in the invite that there'd be prizes for the best flavors. Well, I had no idea what others were bringing. What if they brought the same flavor I brought! (Gosh, have I always been this competitive?) So I decided to invent a flavor to make from scratch, and the weirder the better.

Presenting: Lucky Charms Ice Cream. Because why not? The cereal is sugary and delicious. And you know how when you eat a bowl of cereal, there's typically a little bit of milk at the bottom of the bowl after you've already eaten the last of the cereal bits? And that milk takes on the flavor of the cereal? That flavored milk is what I wanted for this ice cream!


So next up was figuring out how to recreate that flavor. What I decided to do was steep two cups of Lucky Charms in a hot mixture of cream, milk, sugar, and salt, then strain out the soggy cereal (because who likes soggy cereal?), and then when the ice cream was churning in the ice cream maker and almost done, toss in fresh Lucky Charms marshmallows, which I had handpicked out of the cereal box.


It worked! I can't believe it! It worked! The ice cream really does taste like Lucky Charms! And it's not gross at all! It's quite delicious! And it's light green in color because during the steeping process, the colors from the marshmallows sort of melted into the mixture and green was the prominent color.
The amazing, exhaustive toppings bar
prepared by Brittany and Bryan


I brought the ice cream to the party Saturday night, having only churned it a few hours earlier. It could have used a day to firm up in the freezer, but I ran out of time. So when people tasted the ice cream, it was VERY soft serve. Still, they got the idea. And at voting time, it won second place! Out of what must have been 20 flavors! It lost only to a homemade chocolate strawberry ice cream my friends Alison and Dan brought. Can't complain there. :-) And my prize? Baskin Robbins gift certificates. How apropos.

Lucky Charms Ice Cream, my award-winning invention. Who would have thought?


Lucky Charms Ice Cream
Recipe by Happy Go Marni
Makes about 1 1/2 quarts

2 cups heavy cream
1 cup milk (whole milk is preferable but I used 1% because it's all I had and it worked fine)
3/4 cup sugar
Pinch of salt
3/4 teaspoon vanilla extract
2 cups Lucky Charms cereal (cereal bits and marshmallows combined)
1 1/2 cups Lucky Charms marshmallows (separate them out of the box)

In a saucepan, heat 1 cup cream and the milk, sugar, and salt until very hot. Remove from heat, add the 2 cups of Lucky Charms cereal, cover with a lid, and allow the cereal to steep and flavor the mixture for at least 25 minutes, up to an hour.

Place a strainer over a heat-proof bowl and pour the mixture through to strain out the soggy cereal. Remove the strainer. Add the remaining 1 cup cream and the vanilla. Stir. Cover the bowl with plastic wrap and place in fridge to chill overnight.

Churn ice cream in your ice cream maker. When the mixture has thickened significantly and is almost done (about 3 minutes before done), toss in the 1 1/2 cups Lucky Charms marshmallows. As soon as they appear incorporated into the ice cream, turn off the machine and transfer to a container to freeze so the ice cream can firm up a bit. Serve and enjoy!


Step-by-Step in Pictures
Heat 1 cup cream, the milk, sugar, and salt in a saucepan...

Once the milk mixture is hot, remove from the stove, pour in two cups of Lucky Charms, and cover to steep for 25 minutes to an hour...

When the Lucky Charms are done steeping, they'll look like this...

Strain the Lucky Charms out of the mixture over a heat-proof bowl...

Add the remaining cup of cream and the vanilla...

Stir, then cover with plastic wrap and refrigerate overnight...

Handpick marshmallows out of the cereal box to prepare for folding into the ice cream at the end...

Pour the ice cream mixture into the ice cream maker...

Let the ice cream get pretty thick, about 20 minutes...

Toss in the marshmallows when the thickness of the ice cream is just about ready...

Continue churning with the marshmallows until they are fully incorporated, 2-3 minutes...

Transfer to a container to store in the freezer...

Scoop up and enjoy!

Monday, April 4, 2011

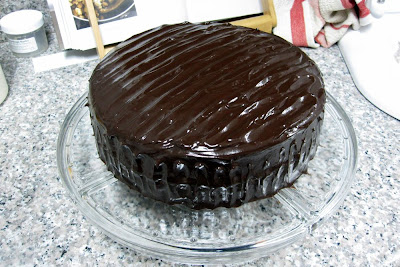
Banana Chocolate Chip Layer Cake with Mocha Frosting


This is not your conventional birthday cake. But it is totally a great birthday cake! Imagine making banana bread in round cake pans instead of a loaf pan. That's essentially what this is. And it's made me rethink all quick breads. What if any loaf could be turned into a layer cake. So much more exciting. And so much more room for frosting. ;)

Pumpkin bread, zucchini bread, lemon poppy seed. Oooh, some of those might go well with a cream cheese frosting, perhaps flavored with orange or lemon zest. This quick breads-turned-layer cakes thing could possibly be a dangerous discovery. I don't have time in my life right now to start a new obsession. Someone needs to write a cookbook on the topic. I should get royalties.


This banana chocolate chip layer cake is everything you want it to be and more. Actually, if we really want to talk about "and more," try changing the frosting to peanut butter, because we all know that bananas, peanut butter, and chocolate go perfectly together. But even as is, I am so happy to have discovered this recipe and I will be making it again for sure.

Not only were the texture and taste great, but from a difficulty level, this cake is easier than other layer cakes. When the two layers bake, they pull away from the edges so nicely and plop right out of their pans without any trouble. They're a little denser than other cakes and therefore less fragile when handling. Sturdier. Forgiving. And when you've made delicate cakes that crumbled when removed from the pan, or broke into four giant chunks in your hand during assembly (and broke your heart!), a forgiving cake is something to be thankful for. Ain't that the truth!


Banana Chocolate Chip Layer Cake with Mocha Frosting
Adapted from a recipe by David Lebovitz in Ready for Dessert

Cake
2 1/2 cups all-purpose flour
1 1/2 teaspoons ground cinnamon
1 1/2 teaspoons baking powder
3/4 teaspoon baking soda
1/2 teaspoon salt
1 cup unsalted butter, at room temperature
1 1/2 cups sugar
1 teaspoon vanilla extract
1 tablespoon instant espresso or coffee powder (you can skip this to avoid caffeine)
2 large eggs, at room temperature
6 tablespoons buttermilk, yogurt, or sour cream, at room temperature
2 cups banana puree (3 to 4 very ripe bananas)
1 1/4 cups mini chocolate chips

Mocha Frosting
10 ounces bittersweet or semisweet chocolate, coarsely chopped
1/2 cup strong brewed coffee or espresso (or water if you don't want caffeine)
10 tablespoons unsalted or salted butter, cut into pieces, at room temperature

Preheat the oven to 350 degrees F. Grease the bottom and sides of two 9-inch round cake pans, then place round parchment papers on the bottom.

In a medium bowl, sift together the dry ingredients: flour, cinnamon, baking powder, baking soda, and salt. Set aside.

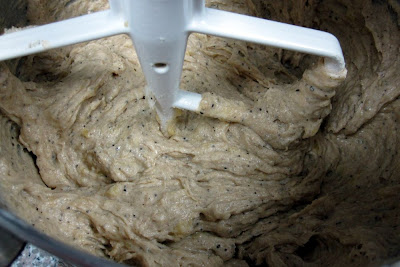
In a stand mixer, beat the butter and sugar together on medium speed until light and fluffy in texture, about 3 minutes. Add the vanilla and coffee powder. Add the two eggs, beating well after each addition. Beat in half of the dry ingredients, then add the buttermilk (or other dairy option) and the banana puree. Then beat in the remaining dry ingredients. Stir in the mini chocolate chips just until combined, using a spoon or spatula, not the mixer. You don't want a tough cake, so as soon as the chocolate chips are dispersed, put down the spoon!

Spread the batter evenly among the two prepared cake pans. Bake for about 40 minutes until the tops of the cakes are golden brown and the sides pull away from the edges. I recommend checking the cakes at 30 minutes in case your oven is fast (like mine!). Cool at least 15 minutes in the pans on cooling racks before using a sharp knife to cut around the edges, then inverting onto the racks to finish cooling. Remove the parchment from the bottoms.

To make the frosting, melt the chocolate with the coffee in a medium saucepan or in the microwave, taking care not to burn the chocolate. Stir occasionally. The consistency should be perfectly smooth. Remove from the heat and add in the 10 tablespoons butter, whisking until completely melted and combined.

To assemble the cake, place one of the cake layers upside down on your serving plate. Slide pieces of wax paper or parchment paper under the edges of the cake to protect your serving plate from unruly frosting. Spread about 3/4 cup frosting over the cake. Place the second cake layer on top of the first, standing right side up. Use the remaining frosting to cover the top and sides of the cake.


Step-by-Step in Pictures
Sift the dry ingredients together; set aside...

Beat the butter and sugar together...

Add the vanilla and coffee powder...

Add the eggs, one at a time...

Add half the dry ingredients...

Add the buttermilk and banana puree...

Add the remaining dry ingredients...

Stir in the mini chocolate chips...

Spread evenly in two prepared cake pans...

Bake at 350 degrees F for about 40 minutes...

To make the frosting, melt the chocolate with the coffee...

Remove from the heat and stir in the butter until completely melted and smooth...

Spread about 3/4 cup of cooled frosting onto the first cake layer...

Place the second layer on top of the first...

Frost the outside of the cake with the remaining frosting...

Decorate with the back of a spoon if desired...

Slice and serve!
Related Posts with Thumbnails