Wednesday, August 25, 2010

Fresh Peach Pie with a Lattice Top


I went to the Hollywood Farmer's Market this past weekend. Mostly, I was there for the cookbook sale hosted by the Culinary Historians of Southern California. And of course I bought 5 cookbooks. But that's a story for another day.

Since I was at the farmer's market, I might as well get a bunch of veggies, too. Then it dawned on me, with all the beautiful fruit stands, I should make a fruit pie. My first choice was an apple pie, but I was very stubborn and only willing to make the apple pie out of Gravenstein apples, like my mom does, but of course there were none at this market. So I quickly moved onto a different fruit. Peach.


A lady at one of the stands had what appeared to be only 5 peaches left. What! So early in the day? It was only around 10am. The market would be open for another three hours! Anyways, they were a tiny bit bruised in places because they were so ripe. With the bruises, she said she'd sell them to me for 50 cents a pound. Usually they'd be $3 a pound there. Sold! So I bought a few more peaches at another stand for $2.75/lb., which is still kind of pricey for peaches, but I didn't mind since I had saved so much on the first 5. Now I had enough peaches for a pie! Home I went, skipping and humming the whole way, excited to make a pie.


I sat on my living room floor in front of a cookbook bookcase, trying to figure out where to go to find a great peach pie recipe. My cookbook collection is enormous; this was a daunting task. But when I saw the photo of the peach pie in the Williams-Sonoma Essentials of Baking cookbook, I knew it was the one. I wanted to make a pie that looked exactly like that!

Of the entire process making the pie, from homemade crust, to preparing the peach filling, to placing the lattice on the top, the hardest and most time consuming part for me was getting the skin off the peaches. I often took the peaches out of the boiling water too soon when the skin was not easy enough to peel off. The task itself wasn't so complicated, I just wasn't giving it the patience it deserved. Other than that, it's really not that hard to make a peach pie! And a lattice top, while impressive looking, is easy as pie! :)


Lattice-Top Peach Pie
Adapted from a recipe by Cathy Burgett, Elinor Klivans, and Lou Seibert Pappas in Williams-Sonoma Essentials of Baking
Makes one 9-inch pie

1 Recipe Flaky Pie Pastry for Lattice Crust (see below)

For the filling
6-8 peaches (3 lb)
5 tablespoons sugar, divided
2 teaspoons fresh lemon juice, strained
3 tablespoons quick-cooking tapioca
1 tablespoon all-purpose flour

For the topping
1 large egg beaten with 1 tablespoon heavy (double) cream
2 teaspoons sugar

Prepare the Flaky Pie Pastry and refrigerate to chill as directed. Note: Do not bake the crust yet! The peach filling will be spread over the unbaked pie crust.

To make the filling, begin with the following technique to remove the skin from the peaches. Bring a large saucepan three-fourths full of water to a boil. Immerse 3 peaches at a time in the water until the skin appears to puff up and separate from the meat of the peach. It took me anywhere from one minute to several minutes per peach. Sometimes I had to put a peach back in the boiling water to give it more time. Remove the peaches from the water and allow to cool enough so you can handle them. Remove the peel with your fingers or a small sharp knife, then cut each peach in half. Remove the pit and then cut the peach lengthwise into 1/2-inch slices.

In a large bowl, combine these peach slices with 4 tablespoons of the sugar, the lemon juice, and the tapioca. Gently stir to combine but take care not to mash the peaches. Set aside.

Position a rack in the lower third of the oven and preheat the oven to 400 degrees F. Roll out the larger of the two disks of dough so that it will completely cover the bottom and sides of a 9-inch pie pan. Sprinkle the flour and remaining 1 tablespoon sugar over the bottom crust. Spoon in the peach filling and spread evenly. Roll out the smaller dough disk, then cut parallel lines in the dough to create lattice strips. Place half the strips in one direction on the pie, spacing out evenly, then place the other half of the strips in the other direction, using the lattice technique of going over and under. Gently brush the lattice with the egg mixture, then sprinkle the entire top of the pie with sugar.

Bake the pie until the edges are just starting to brown, about 15 minutes. Reduce the oven temperature to 350 degrees and continue baking for 38-45 minutes until the crust is a light golden brown and the peach filling is bubbling through the lattice. Let cool completely on a wire rack before cutting into it.


Flaky Pie Pastry for Lattice Crust Pie
1/2 cup cold unsalted butter
4 tablespoons cold vegetable shortening
2 cups all-purpose flour
4 teaspoons sugar, optional
1/4 teaspoon salt
4-6 tablespoons ice water

You can make this dough by hand in a bowl with a pastry blender or two knives, but I prefer using a food processor. Makes the process so quick! A stand mixer will work, too.

Combine the flour, sugar, and salt in the food processor (or a bowl). Pulse a few times to mix. Add the cold butter and shortening pieces and pulse 8-10 times until the mixture forms large, coarse crumbs the size of large peas. Add the ice water a little at a time and pulse 10-12 times just until the dough begins to come together. It should not form a ball yet.

Transfer the dough to your dough board (that's been sprinkled with flour). Divide the dough into 2 portions, one twice as large as the other (in other words, imagine dividing the dough into three pieces and then combine two of them into one disk). Shape the larger portion into a 6-inch disk and the smaller one into a 3-inch disk. Wrap each disk tightly in plastic wrap and refrigerate until well chilled, about 1 hour or for up to overnight.


Step-by-Step in Pictures
In a food processor, combine the flour, sugar, and salt, then pulse together with the cold butter and shortening...

Allow the dough to come together, though it does not need to form a tight ball...

Divide the dough into two disks; one disk should be twice as large as the other, then wrap in plastic wrap and chill in the fridge for at least one hour...

To make the filling, first briefly boil the peaches so the skins will peel off easily...

Peel off the skins. Have patience!

Slice the peaches into 1/2-inch slices and place in a bowl with sugar, lemon juice, and tapioca...

Stir to combine and then set aside...

Roll out the larger disk of dough into a circle large enough to cover a 9-inch pie pan...

Transfer the rolled out dough to the pie pan and crimp the edges with your thumb and index finger...

Sprinkle the bottom of the crust with flour and sugar...

Spoon the peach filling onto the crust...

Roll out the smaller disk of dough and cut into strips for the lattice top...

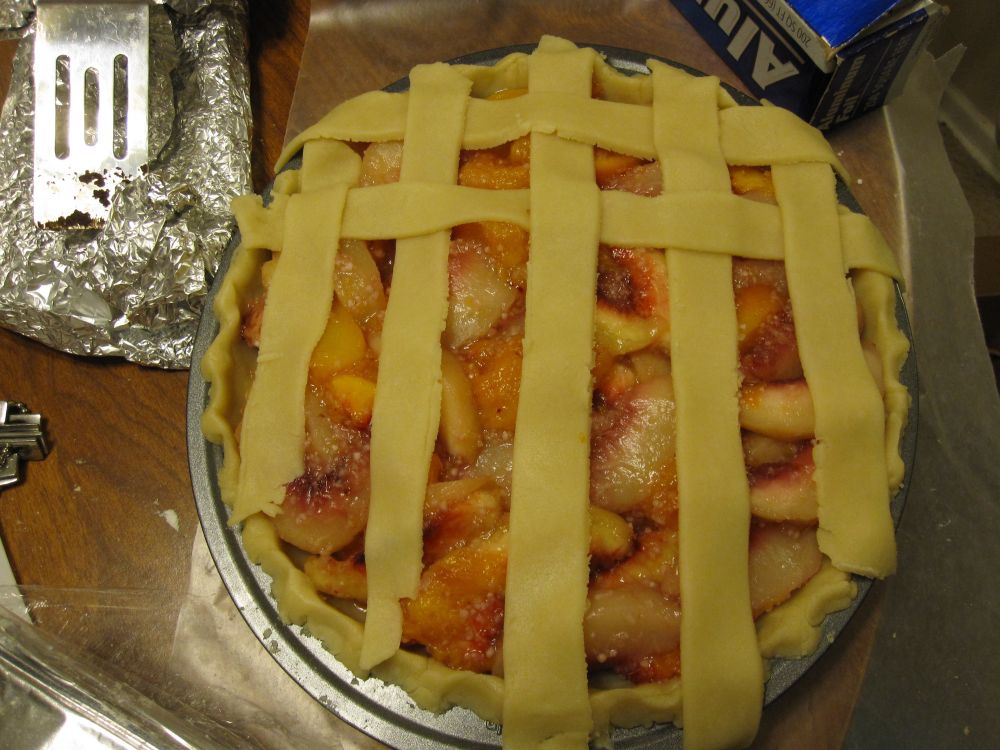
Place half the strips on the pie, spacing evenly...

With the remaining strips, one strip at a time, carefully lay them perpendicular to the strips that are already on the pie, lifting the original ones so that you create an over-under pattern...

Trim any excess dough hanging over the edge of the pie dish, then tuck the lattice strip ends into the pie edge (I use kitchen shears for the trimming)...

Prepare the egg wash by combining heavy cream with an egg...

Brush the top of the lattice with the egg wash...

Then sprinkle the entire top of the pie with sugar...

Bake at 400 degrees for the first 15 minutes, then reduce the temperature to 350 and continue baking for about another 40 minutes...

Let cool completely, then slice and serve!

Monday, August 23, 2010

Maple Walnut Cookies


On one of my trips up to the Bay Area (which if you know me is a very frequent trip), one of many things I watched my mom bake was this recipe for Maple Walnut Cookies. The kitchen smelled great from the intense aroma of maple, and my mom was having a blast shaping each cookie on the baking sheet, first as a ball, then sticking a walnut on top and pressing it down to flatten the cookie. Her "having a blast" is actually putting it mildly (and I'm sure if I haven't already, I'm about to embarrass her). Her giddiness at seeing the walnut press down the cookie suggested she had either spiked whatever beverage she was drinking (highly unlikely if you know my mom) or it was late enough at night that the giggles had overcome her (totally likely...and it's genetic...she definitely passed the giggle gene on to her kids).

She even called me over to experience the fun of pressing a walnut into the cookie. And when I came over to her "work station" to shape a cookie on her baking sheet, sure enough, she was right; it was a lot of fun! If anyone ever asks, "What is it about baking you like so much?," I'd have to say moments like these are some of the best. Watching my mom get excited about something as simple as pressing a walnut into a cookie says a mouthful. :) We truly love baking.


Maple Walnut Cookies

Adapted from a recipe by Kristine Kidd in the Williams-Sonoma Kitchen Library: Cookies and Biscotti
Makes 3 - 4 dozen

1 cup walnuts
3/4 cup firmly packed golden brown sugar, divided
1 cup unsalted butter, at room temperature
1 1/2 teaspoons maple extract (sometimes called maple essence)
1/4 teaspoon salt
2 cups all-purpose flour
about 3 to 4 dozen walnut halves

Preheat the oven to 350 degrees.

In a food processor or a blender, coarsely process the 1 cup of walnuts. Add 1/4 cup of the brown sugar and process finely; set a side.

In a large bowl, combine the butter, the remaining 1/2 cup brown sugar, maple extract, and salt. Using an electric mixer set on high speed, beat until light and fluffy. Reduce the speed to low, add the flour and the nut mixture and mix until just incorporated.

From the bowl of cookie dough, grab enough dough to form into a 1-inch ball using the palms of your hands. Continue until all of the dough is used. Place the dough balls about 1 1/2 inches apart on an ungreased cookie sheet. Press a walnut half onto the top of each.

Bake the cookies until brown around the edges, about 20 minutes. My oven cooks fast so my cookies were done in less than 20 minutes. Perhaps check at around 15 minutes. Either way, this is a more crunchy, less chewy cookie. Transfer the cookies to a wire rack to cool. Store in an airtight container at room temperature for up to 5 days or freeze right away to enjoy later.


Step-by-Step in Pictures
Roll the dough into 1-inch balls and place on cookie sheet...

Press a walnut half onto the top of each ball...
Bake at 350 degrees for 15-20 minutes...

Let cool on a wire rack, then enjoy!

Tuesday, August 10, 2010

Fudge Brownies with Mint Chips and a Don't Overmix, Don't Overbake Mini-Lecture


Brownies! I have made so many versions. And probably more than once have I found the recipe that is the recipe to destroy (mwahahahaha) all other recipes (ahem, Tartine Brownies, how I love thee!). Yet here I am again, baking up a batch of some new variety. Because it's just plain fun to try new recipes! It never gets old. Or I'm easily amused.

The key to making these fudge brownies fudgy is twofold, actually. Don't overmix, and don't overbake! I must sound like a broken record at this point. In so many of my blog posts, I warn that overmixing or overbaking will ruin an otherwise perfectly good recipe. But it can't be stressed enough. It makes all the difference. Heed my advice or succumb to dry, rock-hard baking disgustingness. Your choice.

I added green mint chips for a more festive, colorful brownie. Chopped up peanut butter cups would be another yummy addition. I was excited to see brown sugar in the recipe because many brownie recipes use white sugar, and I'm a huge fan of brown sugar baked goods. Linda Collister is a great baker, and so I look forward to trying more recipes out of her Chocolate cookbook.


Fudge Brownies
Adapted from a recipe by Linda Collister in Chocolate
Makes 16

1 1/4 sticks (1/2 cup plus 2 tablespoons) sweet butter
4 large eggs, beaten
1 3/4 cups light brown sugar
1 teaspoon real vanilla extract
a good pinch of salt
3/4 cup unsweetened cocoa
1 cup minus 1 tablespoon all-purpose flour
3 1/2 oz. walnut or pecan pieces, chopped white or bittersweet chocolate, or a combination

Line a 9-inch square pan with foil so that there's an overhang on all sides (for pulling the foil up later).

Melt the butter in a sauce pan or the microwave and set aside to cool.

Resist the temptation to use a mixer. With a bowl and wooden spoon, gently beat the eggs with the sugar, just until combined. Add the cooled butter and the vanilla and stir to combine. Then sift the dry ingredients directly into the batter (salt, cocoa, and flour). Stir just until combined (hardly at all). The more you stir, the more cake-like and less fudge-like your brownies will be...so beware of overmixing!

If using nuts, chocolate, or any other mix-in (I added mint chips), gently fold those in now. Pour the batter into the prepared pan and use a spatula or the back of a spoon to smooth the top.

Bake at 325 degrees for about 35 to 40 minutes or until a toothpick comes out clean. I prefer to slightly underbake mine for more goo and less cakiness so I watch the clock and check my brownies a good 10 minutes before they're supposed to be done.

Put the pan on a damp cloth to cool completely.

Lift the brownies out of the pan using the handy dandy foil lining that you have hanging over the edges of the pan. Place on a cutting board, and then cut into squares.

Store in an airtight container and eat within 1 week or freeze for up to 1 month.


Step-by-Step in Pictures
Beat the eggs with the sugar, then add the melted (but cooled) butter and vanilla...

Sift together the salt, cocoa, and flour...
Add the dry ingredients to the bowl and stir just until combined...

Gently fold in your mix-ins (here I'm using mint and semi-sweet chocolate chips)...

Pour into the prepared pan and smooth the top...

Bake at 325 degrees F for 35-40 minutes...

Let cool completely before lifting the foil up to remove the brownies...

Sunday, August 1, 2010

Chocolate Chocolate Chip Cookies and Bonus Limerick!


The Chocolate Chocolate Chip Cookie Limerick
by Marni

There once was a double chocolate cookie
With more flavor than Jersey Shore's Snooki.
Don't make the mistake
To think you can wait.
Lock them up or be exposed as a rookie!


The texture of these cookies could not be more perfect. And I've had plenty of cookies in my lifetime. Hundreds, for sure. Thousands? They are incredibly chewy, and have a glossy surface that makes them look special. If you read the list of ingredients, you might be going "whoa" to the quantity of chocolate. Nobody said Chocolate Chocolate Chip Cookies would be light on the chocolate. These really take that name to heart. 20 ounces of chocolate is a lot, no doubt. But please, don't skimp or think you can manage without an ounce or two. You're just not doing the cookie justice, then. Go for it. All the way!

It's funny how sometimes I make really gourmet, exotic, fancy shmancy treats that require more skill and more ingredients and serve them to friends and not everyone eats them. Then I make these simple Carole Walter cookies with simple flavor - chocolate chocolate, and it yields 80 little cookies, and magically, all 80 cookies disappear with just 12 people in the room. True story. I remember that afternoon well. Hmmmmm. Must be a great cookie!


Chocolate Chocolate Chip Cookies
Adapted from a recipe by Carole Walter in Great Cookies
Makes approximately 4 dozen 3-inch cookies (but I like to make them smaller, yielding about 80)

8 ounces fine-quality bittersweet or semisweet chocolate, such as Lindt Bittersweet, coarsely chopped
1 cup all-purpose flour, spooned in and leveled
2 tablespoons strained Dutch-processed cocoa powder
1 teaspoon baking powder
1/4 teaspoon salt
1/2 cup (1 stick) unsalted butter, slightly firm
3/4 cup granulated sugar
1/2 cup lightly packed very fresh dark brown sugar
2 large eggs
2 tablespoons hot water
1 1/2 teaspoons pure vanilla extract
12 ounces fine-quality bittersweet or semisweet chocolate, such as Lindt Bittersweet, cut into 1/4 to 1/2-inch chunks, or 2 cups (a 12-ounce bag) semisweet chocolate chips

To make the dough
Melt the 8 ounces bittersweet chocolate in a double boiler (or in the microwave, though be careful not to burn the chocolate). Keep warm.

Sift the dry ingredients in a bowl (flour, cocoa, baking powder, salt), and set aside.

In an electric mixer, beat the butter on medium-low speed until smooth and creamy. Should only take about a minute. Mix in the granulated sugar, then add the brown sugar. Blend until light in color, about 2 or 3 minutes. Beat in the eggs until well-combined. Blend in the melted chocolate (that's still warm), then add the hot water and vanilla.

Set the mixer speed to low and blend in the dry ingredients, adding half at a time, but just until combined. Do not overmix! Take the bowl out of the mixer and gently fold in the chocolate chunks. Cover the bowl and chill in the fridge for about an hour.

To bake the cookies
Position the shelves in the upper and lower thirds of the oven. Preheat the oven to 350 degrees F. Grease the cookie sheets or line with silicone baking mats or parchment paper.

Drop spoonfuls of dough, about 1 1/2-inches in size, onto the cookie sheets, and space them out about 3 inches apart since they will spread a fair amount during baking. Bake for 10 to 11 minutes. I prefer chewy and slightly undercooked so I check for doneness even before 10 minutes are up. Even so, at 10 minutes, the cookies will look underdone and you just have to have faith and take them out and let them firm up as they cool. Also, since you have two cookie sheets baking at once, you should swap the two sheets halfway through baking and turn them around so they will bake evenly. Remove the cookie sheets from the oven and let stand on a trivet for just 2 minutes, then use a thin metal spatula to loosen from the cookie sheets. About 10 minutes later, transfer the cookies to a cooling rack to cool completely. You are going to die and go to heaven when you taste these!

To store, place in an airtight container between layers of wax paper. They'll taste yummy for about 5 days. If you know up front that you can't eat the whole batch in 5 days, store in an airtight container in the freezer immediately after they've cooled.

Nutty Note: Carole Walter advises that if you want to add walnuts, reduce the amount of bittersweet chocolate chunks to 8 ounces or 1 1/3 cups chocolate chips and use 1 1/2 cups coarsely chopped walnuts.


Step-by-Step in Pictures
Sift together the dry ingredients (flour, cocoa, baking powder, and salt) and set aside...

Beat the butter until smooth, then add the two sugars...
Beat in the eggs...

Add the melted chocolate...

Then add the hot water and vanilla...

Mix in the flour in two parts, then fold in the chocolate chips...

Chill for about an hour...

Then drop spoonfuls of dough onto the prepared cookie sheets...

Bake at 350 degrees F for about 10 minutes, then let cool completely...

Enjoy!
Related Posts with Thumbnails