Monday, November 2, 2009

Sweet Vanilla Challah and a Super Cool Round Braid Method


This vanilla challah is my mom's favorite challah recipe and I love it, too. It's a great one to add chocolate chips to, so I did that for two of the three loaves. Come on, vanilla + chocolate in egg bread? Heaven!!!

This is the challah recipe we served at my sister's August wedding. For the wedding, we shaped the challah into rolls to serve in bread baskets for each table. Perhaps you recall from a previous blog post that my mom and cousin Rachael spent an entire day making hundreds and hundreds of rolls. Yup, they were these Beth Hensperger babies! Hensperger is a bread mastermind, and maybe we're a little biased because she's also a Northern California local. Her book The Bread Bible really is just that to so many people.


The round braid shape featured in this blog post (which is not from Beth Hensperger's recipe) is perfect for Rosh Hashanah, but it's fun and special to do any time of year. And it's so easy! When I first saw step-by-step photos on the Orthodox Union website, I thought I'd never figure it out. But once it connected for me, I laughed at myself for ever calling it impossible. Hopefully my photo demonstrations show the steps easily enough, but I promise you, if you spend a few extra minutes, you will figure it out and be so happy you did!


Sweet Vanilla Challah
Recipe by Beth Hensperger in The Bread Bible

1 tablespoon active dry yeast
1/2 cup sugar
1 tablespoon salt
6 1/2 to 7 cups unbleached all-purpose flour or bread flour
1 3/4 cups hot water
4 large eggs, at room temp, lightly beaten
1/2 cup vegetable oil
1 1/2 tablespoons pure vanilla extract

Vanilla egg glaze
1 large egg yolk
1 teaspoon pure vanilla extract
1/2 teaspoon sugar

In a large bowl or mixer, combine the yeast, sugar, salt, and 2 cups of flour. Add the hot water, eggs, oil, and vanilla. Beat hard until smooth, about 3 minutes. Scrape down the sides of the bowl occasionally. Add remaining flour, 1/2 cup at a time, switching to a wooden spoon when necessary if making by hand. Continue beating until the dough is too stiff to stir.

Turn dough out onto a lightly floured work surface with the plastic pastry scraper and knead until soft and springy and a layer of blisters shows under the skin, about 4 min. Dust with flour only 1 tablespoon at a time as needed to prevent sticking. The dough needs to be slightly firm for free-form loaves.

If kneading by machine, switch from the paddle to the dough hook and knead for 3 to 4 minutes, or until the dough is smooth and springy and springs back when pressed. If desired, transfer the dough to a floured surface and knead briefly by hand.

Place dough in a greased deep container. Turn the dough once to coat the top and cover with plastic wrap. Let rise at room temperature until doubled in bulk, 1 1/2 to 2 hours.

Grease or parchment-line 1 or 2 baking sheets or the springform pans. Gently deflate the dough. Turn the dough out onto a lightly floured work surface. Divide the dough into 2 equal portions. Roll each portion out into a smooth, thick strip about 30 inches long, with 1 end 2 to 3 inches wider than the other. Roll to lengthen and taper the thinner end. With the wide end on the work surface, lift the tapered end and wind the rest of the dough around the corner section 2 or 3 times, forming a compact coil. Pinch the end and tuck it under. Place the coils, with the swirl pattern facing up, on the baking sheets or in the springform pans. Cover loosely with plastic wrap and let rise until almost doubled in bulk, 30 to 40 minutes. Because of the eggs, this loaf does not need to double completely; it will rise enough in the oven.

Twenty minutes before baking, preheat the oven to 350 degrees. To make the vanilla egg glaze, in a small bowl, whisk together the egg yolk, vanilla, and sugar. Beat until well blended. Gently brush the dough surfaces with a thick layer of the glaze. Place the baking sheet or pans on a rack in the center of the oven and bake 40 to 45 minutes, or until a deep golden brown and the loaves sound hollow when tapped with your finger. Carefully lift the turbans off the baking sheets with a spatula and transfer to cooling racks. If using the springform pans, release the sides and then carefully remove the turbans from the pan bases. Cool completely before slicing.


Step-by-Step in Pictures

Combine the yeast, sugar, salt, 2 cups of flour, and then the hot water, eggs, oil, and vanilla...

Add enough flour to create a dough that comes together and pulls away from the bowl (but don't add too much flour; you can always add more when kneading)...

I kneaded chocolate chips into some of the dough...
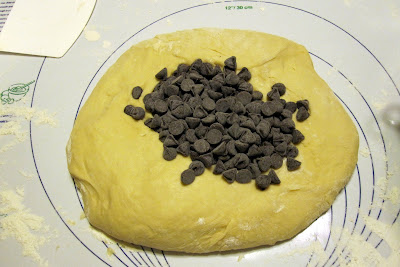
Here it is kneaded with chocolate chips. Place the dough in a bowl and cover. Let it rise until doubled...

Here's the plain dough after it's doubled in size. Time to shape into a loaf!

Divide into four strands...

Create a pinwheel out of the four strands, carefully overlapping like a lattice...

Notice there are two strands on each side that work like pairs (and there are four pairs). Take the strand that is "the under," not "the over," and cross it over its pair so that if it was facing down before, now it is facing right (a new direction). It now belongs to a strand from a different pair.

Continue crossing strands over their pairs, alternating clockwise and counterclockwise for each cycle.

Your design is done when the strands can't reach to do another cycle...

Pinch the ends together and them pull them up to the center of the design, then flip the entire dough over so that the underside becomes the top of the challah when baking...

Here's the dough flipped over and ready for its second rising...

Now let's try the exact same process with the chocolate dough!

Divide the dough into four portions...

Roll the four portions into strands...

Create the lattice...

Cross "the under" strand over its pair so it now joins a strand in a different pair. Finish the cycle, then alternate between clockwise and counterclockwise until you can't do anymore cycles...

Pinch the ends together, bring them up and together, then flip the entire dough over and place on a baking sheet...
Here are the two chocolate chip challahs I shaped and then let rise until almost doubled...

When the challahs are almost doubled in size, prepare the vanilla egg glaze by combining the egg yolk, vanilla, and sugar...

Here's your vanilla egg glaze....

Brush the vanilla egg glaze over the loaves...

Bake for 40 to 45 minutes in a 350 degree F oven. Alternate the trays and turn them front to back. If they start to get dark but aren't done baking, cover with foil until they're baked through...

Tap the underside of the challah and listen for a hollow sound and a feeling of doneness...

Look how big they got because of the eggs in the dough!

Beautiful!

Served at a meal!

Friday, October 23, 2009

Strawberry-Chocolate Cobbler


This recipe is so amazing I made it two weeks in a row. It calls for 2 cups of whole grain pastry flour, which I don't have, but I used 1 cup all-purpose flour and 1 cup cake flour as a substitute and it worked beautifully. It's quick to put together and tastes incredible. I like that the cobbler part has a chewy bready texture and a rich chocolate flavor. The strawberries keep it refreshing.


One of many nice things about living in California is having strawberries available year-round. My relatives in Ohio are probably lifting their angry fists at me and cursing. They have a few weeks a year of strawberries. That is just not sufficient for my strawberry-loving self! I want to be able to make this cobbler in the cold of winter (Ha! That's funny to say since I live in sunny Los Angeles)!

Jesse CoolJesse Cool, the baker/chef extraordinaire who invented this cobbler recipe, is a name I grew up with in Northern California. My mom made her recipes or talked about her often. She has a well known, delicious restaurant in Menlo Park called the Flea Street Cafe, and more recently she took over the cafe at Stanford University's Cantor Arts Center. Her style is very much about using organic, locally grown, in-season ingredients and promoting sustainable cuisine. My mom has adopted that same philosophy, even joining a CSA, and I'm doing my best to, also (though I'm not quite as disciplined as Jesse or my mom yet). Sorry, it has to be said: Jesse Cool is très cool!


Strawberry-Chocolate Cobbler
Recipe by Jesse Ziff Cool in Your Organic Kitchen: The Essential Guide to Selecting and Cooking Organic Foods

1/2 cup unsalted butter
1/3 cup unsweetened cocoa powder
1 cup sugar
2 cups whole grain pastry flour
2 teaspoons baking powder
1 teaspoon ground cinnamon
1 cup milk
1 pint strawberries, hulled and sliced

Preheat the oven to 350 degrees F.

Place the butter, cocoa, and 1/4 cup of the sugar in a 3-quart glass baking dish (or whatever dish you want). Place in the oven for 3 to 5 minutes to melt the butter. Remove from the oven and stir until well-blended.

Meanwhile, in a medium bowl, combine the flour, baking powder, cinnamon, and the remaining 3/4 cup sugar. Add the milk and stir until the mixture is smooth. Spoon onto the melted butter mixture, but do not stir.

Sprinkle with the strawberries. Bake for 45 to 55 minutes, or until a wooden pick inserted in the center comes out clean.

Let stand for 15 minutes before serving.

Makes 6 servings.


Step-by-Step in Pictures

Melt the butter, cocoa, and 1/4 cup sugar in the baking dish by placing in the preheated oven...

Don't let the chocolate burn; instead, take the dish out before the butter has fully melted and stir by hand until all incorporated...


Add milk to the dry ingredient mixture of flour, baking powder, cinnamon, and remaining sugar...

It will be thick and goopy at first but stir until smooth...

Spoon the batter onto the melted butter/cocoa/sugar mixture...

Hull and slice a pint of strawberries...
Sprinkle the strawberries on top of the batter...

Bake at 350 degrees F for 45-55 minutes...

Let the cobbler cool for 15 minutes before serving...

Serve it up and try not to eat the whole cobbler in one night...

Monday, October 12, 2009

Orange Candy Corn Bars


Halloween is just a few weeks away so as you're planning your monster mash or ghoulish bash or haunted house party, consider making this adorable candy corn-looking cake! Surprisingly easy, super festive and colorful, and tastes yummy. It's basically a butter cake with grated orange peel folded in.

I had this recipe marked to make last year for Halloween and never got around to it, so this is very exciting! 2009 brings it! The candy corn "look" simply comes from food coloring. There's only one batter to make, and part of it becomes the yellow base and the other part becomes orange for the second layer. Then you whip up some buttercream frosting to finish the cake off with a white topping. Just like a candy corn! And fortunately no, there are not chopped up bits of candy corn in the batter. That might look neat, but it also might make me gag. Let's keep the candy corn to the garnish; it's a fun addition, and it's easy to pick off! ;)


Orange Candy Corn Bars
Recipe from Pillsbury's Fall Baking recipe booklet, September 2008

Bars
3/4 cup butter or margarine, melted, cooled slightly
1 3/4 cups granulated sugar
1 tablespoon grated orange peel
4 eggs
1 3/4 cups all-purpose flour
1 teaspoon baking powder
4 drops yellow food color
3 drops red food color

Frosting
1/2 cup butter, softened (do not use margarine)
1 3/4 cups powdered sugar
1 to 2 tablespoons milk
1 teaspoon vanilla
1/8 teaspoon salt

Decoration
1/3 cup candy corn (32 candies)

1. Heat oven to 325 degrees F. Line bottom and sides of 9-inch square pan with foil, extending foil 2 inches on 2 opposite sides of pan; spray foil with cooking spray.

2. In medium bowl, beat melted 3/4 cup butter, the granulated sugar and orange peel with wooden spoon until blended. Beat in eggs, one at a time. Stir in flour and baking powder just until mixed. Stir in yellow food color until well mixed. Spread 1 1/2 cups yellow batter in pan. Place pan in freezer about 15 minutes or until batter is slightly firm to the touch.

3. Meanwhile, add red food color to remaining cake batter in bowl until well mixed. Spread over chilled yellow batter.

4. Bake 47 to 53 minutes or until toothpick inserted in center comes out clea. Cool completely, about 45 minutes.

5. In medium bowl, beat 1/2 cup softened butter with electric mixer on medium speed until light and fluffy. Beat in powdered sugar until well blended. Beat in milk, vanilla and salt until smooth and spreadable. Spread frosting over bars. To serve, remove bars from pan, using foil to lift. Remove foil. Cut into 4 rows by 4 rows; cut each square diagonally in half. Top each triangle with 1 candy corn.

Note: If you want really bright colors, use paste food colors instead of liquid food colors. Just decrease the amount to about half of the liquid food color specified.


Step-by-Step in Pictures

Line a pan with foil, then grease it...

Grate an orange...

Combine melted butter, sugar, and orange peel...

Beat in the eggs and add flour and baking powder. It will thicken to this...

Add yellow food coloring...

After spreading part of the yellow batter into the pan, add red food dye to the remaining yellow batter to make orange...

Spread the orange layer over the chilled yellow layer...

Bake for 47 to 53 minutes at 325 degrees F...

Test for doneness with a toothpick...

To make the frosting, whip up the butter (I used a combination of shortening and margarine to make this pareve)...

Beat in the powdered sugar, milk (I used water), vanilla, and salt...

When the cake has cooled completely, spread the frosting on top...

Here's the finished cake! To serve, pull the foil up and out, set the cake on a cutting board, and cut into triangles. Then place one candy corn as garnish on each piece.

Perfect!

Cute, right?

Friday, October 9, 2009

Facing My Fear of Silicone Bakeware

Wilton's silicone bundt pan -
just like the one I so bravely used


Last night, for the first time ever, I baked a cake in a silicone bundt pan. GASP! Yup, I faced one of my biggest baking fears, bit the bullet, and used a flimsy, flexible, hard-to-keep-lint-out-because-it-sticks-to-the-pan red Wilton silicone pan.

Here's how it started.
I went to a friend's to bake a cake and even brought my conventional metal, fail-proof pan with me. It's heavy-duty, and I've used it enough times to know it does my cakes justice.

But when my friend presented me with her silicone alternative, all feelings of safeness and ease were chucked out the window and a sinking feeling overwhelmed me. Should I use the pan I brought that I know works? Or should I try this wobbly thingamabobber some people swear by but I have yet to trust?

While never having tried it myself, I'm not unfamiliar with silicone bakeware. Between testimonials from friends and plenty of reading on the Internet and in cookbooks, I have valid concerns about the adequacy of said bakeware and what it does to the integrity of my cakes.

Here are just a few things I've heard about silicone bakeware that have freaked me out (NOTE: These are rumors and should not be taken as fact):
  • It's actually more difficult to remove the cake from the pan and you can't use a knife to cut the cake away because you'll tear the material
  • Since it's a thinner material than metal, it burns the cake and you have to watch the cooking time carefully
  • It doesn't produce crusts or edges on your baked goods
  • It's difficult to wash and dry
  • Lint sticks to it
  • It's a challenge to take the cake out of the oven because it's not sturdy. As you're lifting the pan out, you might tear the cake as it wobbles around because it hasn't cooled and set yet.
So now that you see what's been going through my mind, you can appreciate my queasiness when my friend presented me with her silicone bundt pan. At the same time, I was extremely curious to try it and break the ice already. What if it turned out to be earth-shattering, life-changing, and produced amazing cakes? I decided it was worth the risk.

I do have one confession to make.
As with plenty of scary things in life, baby steps are useful and make it easier to handle the challenge you're facing. So instead of diving right in and embracing the silicone pan for all its alleged goodness, I took the supposedly unnecessary measure of greasing and flouring the pan. Please don't mock me!

The Result

My cake baked evenly in the pan, so that's relief #1. It also didn't stick to the pan one bit: relief #2 (though if you recall my confession, I may have tampered with the test a little). But on the downside, when I inserted a toothpick in the center and it needed about 10 more minutes to bake, it already looked done on the outside. I think it ended up overcooking the outside a little, just as I feared. The solution to that is to cover the cake with foil partway through baking so the outside doesn't burn while you give the inside a chance to finish baking. So while that downside is annoying, it's not a deal-breaker.

I think the biggest problem I have with the pan is its flimsiness. As suspected, it wobbled when I took it out of the oven, even as I took extreme care to keep it still. The super hot cake is in a very fragile state immediately out of the oven, and its structure continues to set during the cooling. I almost broke the cake in half as I lifted it out of the oven because the silicone pan it was in was not supporting its still-setting delicate state.

If I use this pan again, I will absolutely place the pan on a cookie sheet and bake it like that. Not only does using a cookie sheet make it easy to lift the cake out of the oven, but the double thickness of having two pans will help prevent burning on the bottom of the cake. But the key here is if. If I will use this pan again. The fact that every time I use it it's going to give me butterflies is not good! But then again, last night's cake worked out, so maybe I'm panicking over nothing? At least now I can cross "using silicone bakeware" off the list of things to do before I die. Phew!

Have you ever used silicone bakeware? Are you a fan of it? Any disaster stories? Do tell!

Thursday, October 8, 2009

Aunt Bertha's Spinach Kugel


I love kugel. It's a very traditional Ashkenazi Jewish side dish but it comes in so many varieties that it's hard to generalize what it is. Let me try: a (usually) noodle pudding or casserole, made either dairy or non-dairy. Sometimes, it doesn't have noodles at all, but it's still baked in a casserole dish and is sort of "scoopable." I've had some that are really sweet and can practically pass for dessert, and I've had others that are completely savory. If I'm serving one at dinner, I'll typically serve it warm, but kugel is perfectly acceptable to eat at room temperature. My ancestors used to prepare and eat kugel, even when they lived in Eastern Europe centuries ago, and it's really neat that such a tradition continues today.

This spinach kugel is a dairy kugel, though it can be made pareve to serve with meat if you swap out the milk with Mocha Mix and the butter with margarine. The secret to the flavor is using a packet of onion soup mix (Lipton's makes one).


The recipe comes from Bertha Froomkin, who was my bubbe's best friend, and so close to my mom's family growing up that my mom called her "Aunt" Bertha. My mom's mom's (my bubbe's) first name was also Bertha. And in fact, both of their maiden names were Berman. So they were both Bertha Berman. And the story gets better. When Bertha Berman Froomkin went into labor in Youngstown, Ohio, to give birth to her son Michael, my own bubbe, Bertha Berman Aron went into labor in Youngstown, Ohio, with my mom Joyce ready to be born. Bertha and Bertha shared a hospital room and had their kids one day apart! I guess they were true BFFs, attached at the hip even during childbirth!

Aunt Bertha in 1968, visiting my mom's family in Los Altos, CA,
just after they relocated from Youngstown, Ohio


Spinach Kugel
Recipe from "Aunt" Bertha Froomkin

2 (10-oz.) packages frozen chopped spinach, defrosted and drained well
1 lb. medium egg noodles, cooked and slightly cooled
2 cups milk, or if making pareve, can use Mocha Mix
6 eggs, beaten
1 - 2 packages onion soup
1/2 lb. melted butter or margarine

Combine cooked noodles with the rest of the ingredients. Spray or grease a 3-quart pan and place noodle mixture in it. Bake at 350 degrees F for about 45 minutes. Yum.


Step-by-Step in Pictures

Boil the noodles till soft...

Add the milk and melted butter...

Add the 6 eggs (I used Egg Beaters)...

Add the onion soup mix (the recipe says 1 or 2 packets; I used one)...

Thaw the frozen spinach and squeeze the water out of it...

Add the spinach to the noodle mixture...

Combine everything...

Spread the kugel mixture in the pan...

Bake at 350 degrees F for about 45 minutes (I cooked mine longer because I prefer very crispy noodles on top)...

Wednesday, October 7, 2009

Cookie Comedy


Poor Cookie Monster!!!!!
Related Posts with Thumbnails