Monday, August 31, 2009

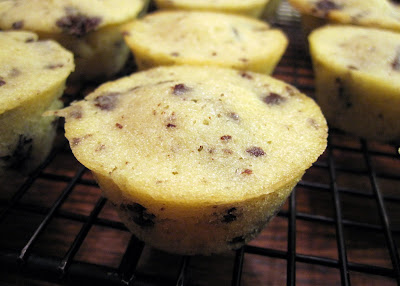
Chocolate Chunk Vanilla Muffins


I absolutely love these muffins. I made them for the morning of my sister's wedding one week ago. All the bridesmaids would be over, getting themselves beautiful, and my mom and I thought it would be fun to have a little spread of yummy treats. So these muffins were prepared, along with banana chocolate chip cake, individual cups of yogurt, fresh fruit, trail mix, and mimosas. It was lovely!

I wouldn't normally make something called vanilla muffins because it sounds too plain. Sorta like how I never make yellow cake because chocolate cake is always going to be better. :-) But something about Carole Walter's recipe lured me in. Plus, I got to add fancy Valrhona dark chocolate chunks into the batter. These muffins are perfect in both texture and taste. Never question Carole Walter!


Chocolate Chunk Vanilla Muffins
Recipe by Carole Walter in Great Coffee Cakes, Sticky Buns, Muffins, and More

1 1/2 cups all-purpose flour, spooned in and leveled
3/4 teaspoon baking powder
1/2 teaspoon salt
1/4 teaspoon baking soda
1/2 cup (1 stick) unsalted butter, slightly firm
2 teaspoons pure vanilla extract
1 cup granulated sugar
2 large eggs
1/2 cup sour cream
1 (3.5 ounce) bar fine-quality bittersweet chocolate, such as Lindt, cut into 1/4-inch dice
3 to 4 tablespoons sparking sugar, optional

1. Position the rack in the lower third of the oven. Heat the oven to 375 degrees F. Line a muffin pan with paper or foil cupcake liners.

2. In a large bowl, thoroughly whisk together the flour, baking powder, salt, and baking soda. Set aside.

3. Cut the butter into 1-inch pieces and place in the bowl of an electric mixer fitted with the paddle attachment. Add the vanilla and mix on medium speed until smooth and lightened in color, about 1 minute.

4. Add the granulated sugar in four additions and mix for 1 minute longer. Scrape down the side of the bowl. Blend in the eggs, one at a time, and mix for another minute.

5. Reduce the mixer speed to low and add the flour mixture alternately with the sour cream, dividing the dry ingredients into two parts, starting and ending with the flour. Mix just until blended after each addition. When the bowl is removed from the mixer, fold in the chocolate chunks using an oversize rubber spatula.

6. Portion the batter into the prepared pan using a no.16 ice cream scoop (1/4-cup capacity). Sprinkle the top of each muffin with about 1/4 teaspoon of the sparking sugar.

7. Bake for 23 to 25 minutes, or until the muffins are golden brown and the tops are springy to the touch. To ensure even baking, toward the end of baking time, rotate the pans top to bottom and front to back. Remove from the oven and place on a rack to cool.

Storage: Store at room temperature, tightly wrapped in aluminum foil, for up to 3 days. These muffins may be frozen.


Step-by-Step in Pictures

Combine the dry ingredients, then set aside...

Mix the butter and vanilla until smooth and light in color...
Add the sugar and then the eggs...
Add the dry ingredients alternately with the sour cream, ending with dry...

Chop the chocolate with a sharp knife...
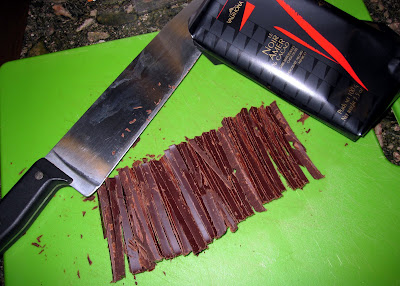
You want 1/4-inch chunks...

Fold the chocolate chunks into the batter...

Stop folding as soon as the chocolate is combined...

Distribute evenly in muffin tins...

Bake at 375 degrees F for 23-25 minutes (10-13 minutes if making mini muffins)...

Yum!

Tuesday, August 18, 2009

My Mom, Pastry Chef in the Making

My mom on her very first day apprenticing, about a year ago.
She doesn't look nervous at all!


This coming Sunday, my sister Beth gets married to the love of her life Evan in Woodside, California. My mom has been the main wedding planner and since I know a lot of the nitty gritty details, I cannot wait to see how it all comes together on the big day. It just so happens that my mom retired a little over a year ago from a successful career in physical therapy and later therapy services management. Not waiting long to jump right into her next adventure, she joined the baking team at an amazing bakery in Sunnyvale called Sugar Butter Flour and began apprenticing. She was already an incredible baker, but things are a little different in a commercial kitchen. One time she told me she had to crack 112 eggs! And just yesterday she made 41 cakes. Imagine multiplying a recipe by 16. Be careful to carry the 1 and do your math right!

Well, I just have to share with you something very special she is doing for Beth's wedding. Over the weekend, she and my cousin Rachael spent the day in the bakery kitchen and made about 500 challah rolls to be served with the dinner, and then yesterday my mom baked cake layers that will become the wedding cake. Hopefully, I will get around to posting some of those photos. Having my mom, and cousin, too, personally prepare some of the wedding food is one of the most unique contributions I can think of.

So this is my shout-out to my mom. I am so proud of you for taking on an apprenticeship at a fine baking establishment and putting your education to use for Beth's wedding! You never cease to amaze me.

And thank you, Rachael, for your help with the challah rolls!

Wednesday, July 29, 2009

The Search for the Best Brownie on Earth is Over


I have been on a quest for years to find the best brownie. May sound silly, but I bet every home baker has that same quest without even realizing it. In other words, you make a brownie recipe, decide, eh, could be better, and choose a different recipe next time. Sounds familiar, right? Why would you make the same recipe again if you don't think it's perfect? It's not like brownie recipes are hard to come by. And since I am a baker, my test kitchen is particularly frequently in use. I say all that to say, I've tried a LOT of brownie recipes in my lifetime. Similar to that all-American classic chocolate chip cookie, finding the perfect brownie is a momentous occasion. It's a very big deal. It means no more searching for recipes to test. It means bragging rights that you've discovered the best there is. And it also means a new standard for brownies you didn't know existed but now that you know, you'll be a far pickier eater moving forward.


I am about to reveal to you what I believe is unequivocally, hands down the best brownie, bar none (pun intended! ha!). I suppose you could be grateful to me for all the time I'm saving you, but somehow, I don't think you'll be able to call this the best without first having tried a dozen so-so recipes. I challenge you to go through your cookbooks, make some of the brownies out of them, and then come back to this blog post and make this recipe. Your thank you will be a lot more sincere.

It's worth pointing out, too, that this is a very subjective topic. I must have some chutzpah to call this the best brownie. Who do I think I am? Some people prefer their brownies fudgy, some chewy, some cakey, some dark chocolate, some not so dark, some rich, some less chocolaty, and of course there are those who fight over the edge pieces because they enjoy the crisp sides with the softer center. So to clarify my calling this the Best Brownie on Earth, that is a true statement for me and probably others who like rich, dark, chocolaty, fudgy brownies.

But I admit, making such a bold claim puts it all on the line for me. You might try out this recipe, completely disagree with my superlative of a title, hate the brownie, never trust my judgment again, and never return to Happy Go Marni. I hope that's not the case, in fact, I'm confident after one bite you'll love me forever, but I'm willing to take that risk. Yes, this is the recipe on which I've decided to gamble away my credibility.

The recipe comes from the Tartine cookbook. Tartine is an amazing bakery in San Francisco. Funnily enough, my dad, who has had the Tartine brownie both made in my kitchen and made at the bakery, thinks mine is better (which is saying a lot!). That's probably because the brownie recipe in the Tartine cookbook is not exactly the same as what they sell in the bakery. That, or I do a better job at following their recipe than even they do. Ok, or maybe it's because he's my biased dad. :-)

You'll notice that the recipe calls for a ton of chocolate...and by a ton, I mean a pound. That's right, a whole pound for one 9x13-inch pan. Don't skimp and think you can skip a few ounces. And please don't waste your time on cheap grocery store brands. The chocolate you choose for the recipe ends up defining the brownie. Last time I made these, I spent about $15 on Valrhona chocolate. Only the best for dear old Dad!

Whenever I visit my parents in the Bay Area, I try to whip up a batch to give them. Living near SF, they can have the bakery's version whenever they want, but it's not every day they get the cookbook version specially delivered from L.A.

So without further ado, here's the recipe to this earth-shattering, life-changing brownie. I hope you love it as much as I do.

Updated: I really must give credit where credit is due. A huge shout out and thank you to my Uncle Gary and Aunt Francie who gave me the Tartine cookbook as a birthday present a few years ago. Muah! You two have made my life a whole lot sweeter!


The Best Brownie on Earth
Recipe by Elisabeth Prueitt and Chad Robertson in Tartine

3/4 cup unsalted butter
1 pound bittersweet chocolate, coarsely chopped
3/4 cup + 2 tablespoons all-purpose flour
5 large eggs
2 cups light brown sugar, lightly packed
1/2 teaspoon salt
1 teaspoon vanilla extract

Topping (optional)
2 cups nuts such as walnut or pecan halves

Preheat the oven to 350 degrees F. Butter a 9x13-inch glass baking dish.

In a small saucepan, melt the butter over low heat. Remove from the heat and add the chocolate. If the heat from the butter does not fully melt the chocolate, put the pan back over the heat for 10 seconds and stir until melted. Set aside to cool.

Sift the flour into a small mixing bowl. Set aside. In a medium mixing bowl, combine the eggs, sugar, salt, and vanilla. Using a mixer fitted with the whisk attachment, beat on high speed until the mixture thickens and becomes pale in color and falls from the beater in a wide ribbon that folds back on itself and slowly dissolves on the surface, 4 to 5 minutes. Alternatively, use a mixing bowl and a whisk to beat the ingredients until the mixture falls from the whisk in a wide ribbon. Using a rubber spatula, fold the cooled chocolate into the egg mixture. Add the flour and fold it in quickly but gently with the rubber spatula so that you don't deflate the air that's been incorporated into the eggs.

Pour the batter into the prepared dish and smooth the top with the spatula. If you are using nuts, evenly distribute them across the batter. Bake until the top looks slightly cracked and feels soft to the touch, about 25 minutes. Let cool completely on a wire rack.

Using a sharp knife, cut into 12 squares, or size desired. The brownies will keep in an airtight container in a cool place for up to 1 week.

Kitchen Notes: You can't use a cake tester to judge doneness for these brownies. Becaues the batter has a high percentage of chocolate, the tester comes out wet even if the brownies are done.


Step-by-Step in Pictures

Melt the butter...

Break up a pound of bittersweet chocolate...

Melt the chocolate with the butter...

In a mixer, beat the eggs with the sugar, salt, and vanilla...

Sift the flour and set aside...

Pour the cooled chocolate mixture into the egg/sugar mixture...

Combine...

Gently fold in the flour...

Batter is ready for the oven!

Notice I left a quarter of the pan nut-less for my anti-nut sister...

Best brownie on Planet Earth!

Sunday, July 26, 2009

The Recipe for Blogger Prom 2009: Lots of Cheese and Hard Work

Ericka of City Elf and me

It was about 2 months ago that I received an email from Caroline of Caroline on Crack and Esther of e*star LA, two fun, well known Los Angeles bloggers, asking me to join them on a quest to create an unforgettable Blogger Prom on Wednesday, July 22, 2009. I agreed, still not exactly sure what Blogger Prom even was! They recruited a couple of other wonderful bloggers, and the 8 of us became the Blogger Prom Committee...
The entire Blogger Prom Committee
L to R: Caroline, Natalie, Tara, Marni, Esther, H.C., Lindsay, Maya


Our mission was to organize an event that would bring together Los Angeles bloggers from every genre: food, tech, lifestyle, fashion, and everything in between. These are people we follow online but often have never had the chance to meet in person. The Andaz West Hollywood, a newly renovated hotel on the Sunset Strip with amazing views of Los Angeles, agreed to open their rooftop to us for the occasion. The venue was set, but we still had a lot more work to do!

View from the rooftop of the Andaz West Hollywood Hotel

We immediately built a Blogger Prom blog and set out to create an exclusive invite list and seek sponsors. We were overwhelmed by the responses. Trying to get 200 bloggers to attend this event turned out to be so easy that we had a waitlist! And because of the golden opportunity this became for brands of all sorts, being able to show off their products to a Who's Who of influential, talkative bloggers, sponsorship was also not a challenge.

In fact, we ended up turning down companies right and left because we could have had hundreds and that would have just been messy! Still, we kept enough that there were dozens of raffle prizes - everything from a $100 gourmet chocolate assortment from Charles Chocolates (YUM!) to a 6 game assortment of Wii games by EA (fun!!) to restaurant gift certificates to tickets to the Hollywood Bowl to a $300 gift basket of booze from The Edison in Downtown and so much more. And let's not forget the beloved, coveted goody bag that every attendee would receive at the end of the evening. Raffle prize winner or not, no one went home empty-handed. The bag contained chips, booze, free food coupons, a t-shirt, lube, ear plugs, hair products, granola bars, a Goldstar poster and a lot more. A big THANK YOU to the generous sponsors.

Over-stuffed goody bags for all!

We had liquor sponsors and one of our very own Blogger Prom Committee members, Natalie of The Liquid Muse, even concocted a signature cocktail for the evening. We had an official prom photographer Claire Barrett, whose work is amazing! We required cheesy prom attire, encouraging 80s era since that's as cheesy as you can get, and we were strictly enforcing that dress code at the door. The 8 of us committee members divided up the shifts for the evening so someone was always checking people in at the door, handling the raffle, giving out goody bags, etc... And after putting so much thought into every detail of the night, it was a big success! We are so pleased with the turnout, the outfits, the venue, the food, prizes, goody bags, and most importantly, the smiles on everyone's faces. They all seemed to be having a great time. Many asked us if we'd be doing this again next year because they for sure want to be on the list. I don't know what next year has in store, but as for 2009, yeah, I think we can safely say, "Mission accomplished."

Maya of Shop Eat Sleep receives her corsage from friend Chris

I went for the poofiest sleeves I could find

My friend David with the Cheese Impresario Barrie Lynn
who matches cheese to cocktails


Cheesecake pops from Pure Cheesecakes

Silamith, the liquor rep for Martin Millers Gin and Caroline of Caroline on Crack


To read some of the Blogger Prom coverage, take a look at these links:


BlogHer, "Blogger Prom 2009 in Los Angeles"
Caroline on Crack, "Blogger Prom 2009: Backstory and Wrap-Up"
LA Weekly, "We Hit It…Blogger Prom, That Is"
Lalawag, "Bloggers Just Wanna Have Fu-un"
Food Woolf, "Getting To Know You at LA’s Blogger Prom"
Franklin Avenue, "Scenes from a Blogger Prom"
Kevin Eats, "Blogger Prom (West Hollywood, CA)"
Nadine Jolie, "Jolie, the Prom Queen"
Shop Eat Sleep, "Blogger Prom was Awesome"
When Tara Met Blog, "Blogger Prom 2009"
and for hundreds of photos, the Blogger Prom Flickr Group Pool

Friday, July 10, 2009

Plum Blueberry Upside-Down Cake


This is a good ROI cake. You put little effort in, and you get big returns. Isn't that the way all baking should be? :) I say this because it's really an easy cake to make, and yet it looks so impressive and difficult when you present it to your guests. Now that's bang for your buck!


And it's not just presentation that wins people over; it's taste. This cake is a perfect summer treat with fresh fruit from the farmer's market, and has a shocking, totally-out-of-character-for-Marni non-chocolate personality. You can swap out other fruit for the ones called for in the recipe, which gives this cat of a cake 9 lives! In fact, I did just that. In the cookbook, the title is Plum Huckleberry Upside-Down Cake, but come on folks, huckleberries aren't exactly everyday produce. So out they went and blueberries were happily invited to the party. David Lebovitz is the inventor and mastermind behind this amazing recipe and if you've been following my blog for awhile, you know that I'd practically take a bullet for the guy (does it have to hurt, though?).


Plum Blueberry Upside-Down Cake
Recipe by David Lebovitz in Room for Dessert
One 9-inch round cake or 10-inch square cake; 10-12 servings

The plum blueberry topping:
3 tablespoons butter
3/4 cup light brown sugar, firmly packed
1 cup (4 ounces) blueberries
6 to 8 medium plums (about 1 pound)

The cake:
8 tablespoons (1 stick) butter, at room temperature
3/4 cup sugar
1 teaspoon vanilla extract
2 eggs
1 1/2 cups flour
1 1/2 teaspoons baking powder
1/4 teaspoon salt
1/2 cup milk, at room temperature

Whipped cream or vanilla ice cream

1. To make the plum blueberry topping: Melt the butter in a 9-inch round cake pan or a 10-inch square cake pan, directly on the stove top, over low heat. Add the brown sugar and stir until the sugar is thoroughly moistened. Remove from the heat and cool briefly.

2. Sprinkle half of the blueberries evenly over the moistened brown sugar. Cut the plums in half, remove the pits, and cut the plum halves into 1/2-inch slices. Arrange the plum slices over the blueberries in concentric, overlapping circles, or just scatter them evenly. Strew the rest of the blueberries on top of the plum slices.

3. To make the cake: Position the oven rack in the center of the oven and preheat the oven to 350 degrees F.

4. Beat together the butter and sugar until light and fluffy, 3 to 5 minutes in a standing electric mixer. Stop the mixer once and scrape down the sides of the bowl to make sure the butter is completely incorporated. Add the vanilla.

5. Beat in the eggs, one at a time, until completely incorporated.

6. In a separate bowl, sift together the flour, baking powder, and salt. Mix half of the flour mixture into the batter. Stir the milk into the batter, add the remaining dry ingredients, and stir just until smooth; do not overmix. The batter will be quite thick.

7. Carefully spread the batter over the fruit in the cake pan, smoothing with a spatula. Bake the upside-down cake for about 1 hour, until the top is golden brown and a toothpick inserted in the center comes out clean.

8. Let the cake stand at least 20 minutes before unmolding. Run a knife around the edge of the cake to loosen it from the pan. Invert a serving plate over the cake and carefully flip over both cake and plate simultaneously. Lift off the cake pan and scrape any fruit that may have stuck to the pan back onto the cake - or enjoy it yourself. Serve with whipped cream or vanilla ice cream.

Variation: Make the topping with 6 medium apricots instead of plums, and substitute 1 cup of any kind of berries (except strawberries) for the blueberries.


Step-by-Step in Pictures

Melt the butter directly into the pan over a burner.

Add the brown sugar and stir to moisten...

Sprinkle half the blueberries on top...

Slice about 1 lb. of plums...

Place the plum slices in concentric circles, then sprinkle with the remaining blueberries...

To make the cake batter, cream the butter and sugar, then add the vanilla, eggs, and half the dry ingredients...
Add milk, and then add the remaining half of the dry ingredients...
Dollop the batter on top of the fruit in the pan...

Spread the batter evenly over the fruit, then bake at 350 degrees F for about an hour...

The top will be golden brown when done and a toothpick inserted in the center will come out clean...

Serve this beauty!
Related Posts with Thumbnails