Monday, December 22, 2008

Sugar 'n' Spice Wreath


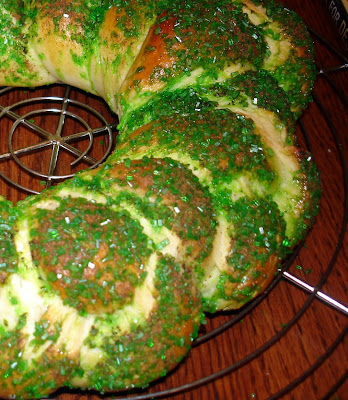
This wreath is similar to challah in that it, too, is an egg bread, gets braided, and is topped with an egg wash. But I actually found this recipe to be easier than challah (and as you probably know, challah is one of the easiest breads to make). One thing I especially love is that the wreath's first rising is only 10 minutes.

Though the recipe calls for white sugar crystals, I wanted this wreath to be more colorful for a holiday party, and so I opted for green. I could just as easily have gone with blue and white for Hanukkah. What makes this wreath a sugar 'n' spice wreath is that cinnamon, cloves, and nutmeg are tossed with the sugar crystals before they are sprinkled over the egg wash. This is a winning recipe.


Sugar 'n' Spice Wreath
Recipe adapted from Holiday Brunches (one of those grocery store checkout aisle booklets)

1/4 cup water
3 tablespoons granulated sugar
2 teaspoons bread machine or quick active dry yeast
3/4 cup sour cream
1 egg
3 cups bread flour
1 teaspoon salt
1 egg, beaten
3 tablespoons white coarse sugar crystals (decorating sugar) or granulated sugar
1/4 teaspoon ground cinnamon
1/4 teaspoon ground cloves
1/4 teaspoon ground nutmeg

1. In a mixing bowl, stir together the water, sugar, and yeast. Let stand for 10 minutes. To this mixture, add sour cream, egg, salt, and 2 cups of the flour. Slowly add the last cup of flour until a dough forms.

2. Remove dough from bowl, using lightly floured hands. Knead just until smooth, taking care not to overknead. Cover and let rest 10 minutes on lightly floured surface.

3. Grease large cookie sheet with shortening. Divide dough into thirds. Roll each third into 26-inch rope; place ropes side by side. Starting at middle, braid one end together gently and loosely; repeat with other end. Pinch ends to fasten. Shape braid into circle on cookie sheet; pinch ends together. (Note: Wreath can be covered with plastic wrap and refrigerated up to 48 hours. Before baking, remove the wreath from the refrigerator and remove plastic wrap. Cover with a kitchen towel and let rise in a warm place about 2 hours or until double.) Cover and let rise in warm place for an hour or until double. Dough is ready if indentation remains when touched.

4. Heat oven to 350 degrees F. Brush beaten egg over dough. Mix sugar crystals, cinnamon, cloves, and nutmeg; sprinkle over dough. Bake 25 to 30 minutes or until golden brown. 24 servings.


Step-by-Step in Pictures

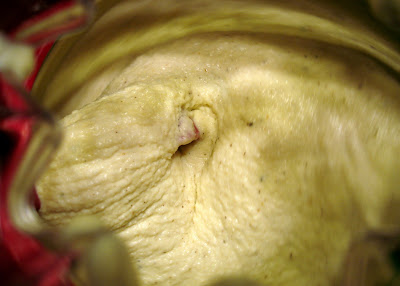
Knead the dough into a soft mass...

Divide dough into three long ropes and braid...
Shape the braid into a wreath...
Cover and let rise until doubled, about an hour...
Combine spices with sugar crystals...
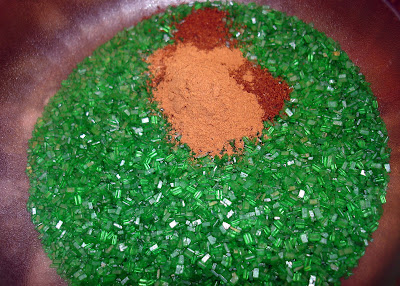
Sprinkle the sugar mixture over the egg wash...
Bake the wreath till golden and hollow sounding when tapped underneath...
Slice it up and enjoy!

Saturday, December 20, 2008

Triple-Chocolate Cake with Chocolate-Peppermint Filling


This recipe has the wow factor. In fact, it's the cover recipe for the December 2001 Bon Appetit, which says something. It's awfully rich, so a little goes a long way. But it's sooo good. I confess, it's not the fastest cake to put together (UNDERSTATEMENT), but it doesn't take a rocket scientist, either. If you like the mint-chocolate flavor combination, you'll love this cake.


Triple-Chocolate Cake with Chocolate-Peppermint Filling
Recipe from the December 2001 Bon Appetit Magazine
12 servings

Filling
8 ounces imported milk chocolate (such as Lindt), finely chopped
1/2 cup whipping cream
1 tablespoon light corn syrup
1/2 teaspoon peppermint extract

Cake
1 cup sifted all purpose flour
1/3 cup unsweetened cocoa powder
1/2 teaspoon salt
1/4 teaspoon baking powder
1/4 teaspoon baking soda
3/4 cup (1 1/2 sticks) unsalted butter, room temperature
1 cup sugar
1/3 cup (packed) dark brown sugar
2 teaspoons vanilla extract
3 large eggs
1/2 cup buttermilk
1 1/2 cups miniature semisweet chocolate chips

Chocolate Glaze
8 ounces bittersweet (not unsweetened) or semisweet chocolate, finely chopped
1/2 cup (1 stick) unsalted butter, cut into pieces
1 tablespoon light corn syrup
3/4 teaspoon peppermint extract

12 whole red-and-white-striped hard peppermint candies, chopped

Fresh mint leaves

For filling: Place chocolate in medium bowl. Bring cream and corn syrup to simmer in small saucepan. Pour hot mixture over chocolate; add extract and let stand 1 minute. Whisk until mixture is smooth. Let filling stand at room temperature while cake is baking and cooling.

For cake: Position rack in lowest third of oven and preheat to 350 degrees F. Butter 9-inch-diameter cake pan with 2-inch-high sides. Line bottom with parchment paper. Butter parchment. Dust pan with flour. Whisk first 5 ingredients in medium bowl to blend. Using electric mixer, beat butter in large bowl until light and fluffy. Gradually beat in both sugars, then vanilla. Add eggs 1 at a time, beating well after each addition. Beat in dry ingredients alternately with buttermilk in 2 additions each. Mix in chocolate chips.

Transfer batter to prepared pan. Bake cake until tester inserted into center comes out clean, about 45 minutes. Cool cake in pan on rack 5 minutes. Turn out cake onto rack. Peel off parchment. Cool completely.

Using electric mixer, beat filling until fluffy and lightened in color, about 30 seconds. Using serrated knife, cut cake horizontally in half. Place 1 layer, cut side up, on rack set over baking sheet. Spread filling over. Top with second layer, cut side down. Chill filled cake 20 minutes.

Meanwhile, prepare glaze: Stir chocolate, butter and corn syrup in heavy small saucepan over low heat until melted and smooth. Mix in extract. Cool glaze until just lukewarm but still pourable, stirring occasionally, about 20 minutes.

Pour 1/2 cup glaze over center of cake. Spread over top and sides of cake. Chill until glaze sets, about 15 minutes. Pour remaining glaze over center of cake, then spread quickly over top and sides. Chill until glaze sets, about 1 hour. (Can be made 1 day ahead. Cover with cake dome; chill. Before continuing, let stand at room temperature until softened, about 4 hours.)

Sprinkle candies around top edge of cake. Garnish with fresh mint leaves.


Step-by-Step in Pictures

Friday, December 19, 2008

Rum Balls


Consider this the beginning of a whirlwind of recipes. I am back in full force and I have found a ton of recipes I want to try over the next few DAYS. Wish me luck in my quest to achieve a ratio of baked goods to days (baked goods:days) higher than ever before.

Rum balls are first in this crazy quest. They are perfect for the holidays and make great gifts, plus they are really easy to make and don't even require baking. There are all kinds of variations on these, sometimes with bourbon or even maple syrup instead of the rum, and sometimes with instant coffee instead of cocoa, and sometimes with chocolate wafers or gingersnap cookies instead of the vanilla wafers. You could go crazy making combinations and permutations. Or you could stick with this Marni-tested and approved recipe for rum balls. Since they are made a few days ahead, the rum has time to really flavor the balls and by the time you bite into one, you'll need a designated driver for sure!


Rum Balls
Recipe by Myra Sable in Elegant Entertaining Cookbook

These you just mix, roll into balls, and store for three days before serving. Everything that goes into them is so sinfully good they don't need heat.

1/2 lb. vanilla wafers, crushed
1 cup confectioner's or icing sugar
2 tablespoons cocoa
1 cup finely chopped pecans
1/4 cup light corn syrup
1/4 cup rum

Confectioner's or icing sugar
60 pecan halves, optional

1. In a large bowl combine wafer crumbs, sugar, and cocoa. Add chopped nuts, syrup, and rum; stir until well blended and stiff.
2. Shape into 1 inch (2.5 cm) balls. Let stand 1 hour.
3. Roll each ball in confectioner's sugar to coat and press a pecan half into each ball, if desired.
4. Store in a tightly covered container in a cool, dry place. Set aside 3 days before serving to allow flavors to mellow.

Makes 5 dozen.


Step-by-Step in Pictures

Combine all the ingredients...

Should be a stiff mass...
I used surgical gloves (they come in really handy in the kitchen!) to roll the balls...
Leave the balls to sit for an hour...
Then roll each ball in powdered sugar...
And return them to the tray...
Almost like snowballs. Beautiful and festive.

Tuesday, December 9, 2008

Eggnog Ice Cream, the Cheating Method


Call me what you will. Perfectionist sounds about right. But if you read my last post on Eggnog Ice Cream, things didn't go exactly how I wanted them to go. Enter: Backup Plan Eggnog Ice Cream. I read somewhere on the internet that you could simply take a carton of eggnog and churn it. I HAD to see this for myself. So I went to Trader Joe's, purchased their brand of eggnog, and went home to try it out. Normally, I wouldn't expect a carton of anything to churn successfully into ice cream, but eggnog shares a lot of similarities with the custard method of making ice cream because it's a creamy drink made with eggs.

Low and behold, the carton of eggnog churned. Too cool!

1-Ingredient Eggnog Ice Cream
Recipe by Marni (well, really, borrowed from the internet)

1 (1-quart) carton of eggnog

Pour the entire contents of the eggnog carton into an ice cream machine and churn until thick. Scoop into a container and set in freezer to harden to your liking. Voila!


Step-by-Step in Pictures

Monday, December 8, 2008

Eggnog Ice Cream


I love eggnog. I love it straight up, or as a quick bread, bundt cake, or ice cream flavor. But it's a heart attack in a glass so I probably have it just once a year. Since I'm on an ice cream kick (just you wait, I have at least three more flavors currently in my freezer to reveal to you), I thought I'd see how hard it could possibly be to make eggnog ice cream. Answer: hard...or should I say soft, since that's what the problem was.

I spent some time sifting through recipes on the internet, comparing ingredients, measurements, and methods. I read reviews by users who had tested the recipes, too. In the end, I decided to go with Alton Brown's version, though I did add vanilla and increase the amount of nutmeg. But when I put the mixture in my ice cream machine to churn it, it never fully thickened to soft ice cream consistency like my past ice creams have. I poured the goopy attempt at ice cream into a container and threw it in the freezer; I'll eat it even if it remains eggnog soup. Fortunately, it did successfully freeze after a couple of hours.

Looking back at my method and what could have gone wrong, I can think of only one thing: maybe there is too much alcohol in this recipe. 3 ounces of bourbon! A little alcohol in ice cream can be great for making the texture smooth, but too much and it will never freeze. Or maybe I was just asleep at the wheel this time. We'll never know...

Eggnog Ice Cream
Recipe adapted from Alton Brown

4 egg yolks
1/3 cup sugar
1 pint whole milk
1 cup heavy cream
2 teaspoons freshly grated nutmeg
1 teaspoon vanilla
3 ounces bourbon

In the bowl of a stand mixer, beat together the egg yolks and sugar until the yolks lighten in color and the sugar is completely dissolved. Set aside.

In a medium saucepan, over high heat, combine the milk, heavy cream and nutmeg and bring just to a boil, stirring occasionally. Remove from the heat and gradually temper the hot mixture into the egg and sugar mixture. Then return everything to the pot and cook until the mixture reaches 160 degrees F. Remove from the heat, stir in the vanilla and bourbon, pour through a medium-holed mesh strainer into a medium mixing bowl, and set in the refrigerator. Chill the mixture in the refrigerator until it reaches a temperature of 40 degrees F, approximately 4 to 6 hours.

Once chilled, process in an ice cream maker according to the manufacturer's instructions. Serve as is for soft-serve, or place in an airtight container and put in the freezer for 2 to 4 hours for traditional ice cream.


Step-by-Step in Pictures

Make the custard and then pour the vanilla and bourbon in...

Pour the mixture through a medium-holed mesh strainer, then refrigerate overnight...

It will look like this when it's ready to churn...

Eggnog Ice Cream churning...
When it's done churning, scoop into a container and freeze...

Wednesday, December 3, 2008

Happy Go Marniversary! (and a Bittersweet Fudge Torte to celebrate)


Today is the one year blogiversary of Happy Go Marni! I can't believe it. Mostly, I can't believe I've had enough things to say to keep up a blog for so long! The year flew by. And truth be told, I have plenty left to say so the party's just getting started.

When I originally set out to do a blog, it was because I wanted to build baking into my regular routine more. I love to bake so much that I considered it as a profession and applied to a pastry arts program in San Francisco. But when I chose a different career path, I didn't want life to get too busy that I stopped baking. A blog would be the perfect way to enforce baking regularly. It's been no problem whatsoever making time (though I admit, it's come out of my sleep on occasion - but every gal knows her priorities) and I've had no problem finding tasters for my wares.

Over the year, my blog developed a style, a tone, even a logistical format. I've learned all kinds of new baking techniques in the process and made many new foodie friends. I have so much fun sifting through my archives and seeing the "projects" I took on. Sometimes I really think I must have lost my mind to have attempted some of these recipes...ahem. But now I have 12 months of documented baking adventures. Happy is an understatement.

And what better way to celebrate the one year blogiversary of Happy Go Marni than with a sickeningly rich Marlene Sorosky dark chocolate flourless torte. It's so sickening I think I finally found my personal limit. Alice Medrich would be disappointed in me. So would my chocolatier friend Chuck Siegel of Charles Chocolates. I dare you to try this and see if you can withstand such a rich cake. Just be sure to have ice water beside you.


Bittersweet Fudge Torte
Recipe by Marlene Sorosky in The Dessert Lover's Cookbook

1/2 pound (2 sticks) unsalted butter
8 ounces unsweetened chocolate, chopped
4 ounces semisweet chocolate, chopped
5 large eggs, at room temperature
1/2 cup plus 1/2 cup sugar
1/3 cup light corn syrup

1 1/2 cups whipping cream softly whipped with 4 tablespoons powdered sugar

Preheat oven to 350 degrees F. Butter 9-inch springform. Cut a circle of wax paper or parchment to fit in bottom and butter paper. Wrap outside of pan in foil to keep batter from seeping out as it bakes.

Place butter and the unsweetened and semisweet chocolate in a medium-size heavy saucepan. Stir over low heat until melted. Set aside.

Beat eggs and 1/2 cup sugar in a large bowl with electric mixer on high speed, until very light and fluffy, about 5 minutes. Meanwhile, combine corn syrup and 1/2 cup sugar in a small saucepan. Bring to a full boil over moderate heat, stirring constantly. Transfer to heatproof glass measuring cup. With mixer on medium speed, slowly pour sugar syrup in a thin, steady stream into eggs. Stir a small amount of the egg mixture into the chocolate mixture to lighten it. Then fold the chocolate back into the eggs. Pour into prepared springform pan.

Place a shallow baking pan in the 350 degree F oven. Place springform pan in baking pan and fill with about 1 inch hot water. Bake for 45 minutes or until cake tester inserted in center comes out clean. The center will not spring back. Do not overbake as cake will firm up as it cools. Remove cake from water and cool on rack for 30 minutes. Invert onto serving plate, remove paper and cool completely. If desired, the torte may be covered with plastic wrap or foil and kept at room temperature overnight, or it may be refrigerated up to 3 days. Bring to room temperature before serving.

Serve torte at room temperature. It is easiest to cut this light, fudgy-textured cake if you wipe the blade of a sharp knife clean and dip it in hot water before each slice. Spoon whipped cream over each slice.

Serves 8 to 10.

Monday, December 1, 2008

Pumpkin Chocolate Chip Cake


Thanksgiving is over, but you probably have that spare can of pumpkin lying around because you overbought for the holiday. If you are that person, or you just love pumpkin so much that naturally you would have a can lying around, make this yummy cake! The oil in it creates a crispy thin crust and keeps the crumb ultra moist.

This recipe was originally called Pumpkin Walnut Cake and I have to admit, I would have preferred to keep it that way because I love nuts in cake. But I love my sister more, and she is not so nutty about nuts. So I swapped out the walnuts with chocolate chips and everyone was smiling.


Pumpkin Chocolate Chip Cake
Adapted from a recipe in the Melting Pot cookbook of the Jewish Community Center in Amherst, Massachusetts, republished in The Chosen Appetizers and Desserts

3 cups flour, sifted
2 teaspoons baking powder
2 teaspoons baking soda
1 teaspoon salt
3 1/2 teaspoons cinnamon
4 large eggs
2 cups sugar
1 1/2 cups corn oil
1 can (1 lb.) pumpkin
1 cup chocolate chips tossed with a little flour (or stick to the original recipe of 1 cup coarsely chopped walnuts)

Sift together flour, baking powder, baking soda, salt, and cinnamon. Set aside.

In a large bowl, with mixer at high speed, beat eggs until yolks and whites are combined. Gradually add sugar until mixture is thick and lemon colored. Add oil.

With mixer at low speed, blend in dry ingredients alternately with pumpkin, beginning and ending with dry ingredients. Beat until smooth. Add chocolate chips. Pour into lightly greased tube or Bundt pan.

Bake in a 350 degree F oven for 1 hour to 1 hour 10 minutes. Cool 15 minutes.

Serves 12 to 14.


Step-by-Step in Pictures

Related Posts with Thumbnails