Showing posts with label cakes. Show all posts

Monday, October 12, 2009

Orange Candy Corn Bars


Halloween is just a few weeks away so as you're planning your monster mash or ghoulish bash or haunted house party, consider making this adorable candy corn-looking cake! Surprisingly easy, super festive and colorful, and tastes yummy. It's basically a butter cake with grated orange peel folded in.

I had this recipe marked to make last year for Halloween and never got around to it, so this is very exciting! 2009 brings it! The candy corn "look" simply comes from food coloring. There's only one batter to make, and part of it becomes the yellow base and the other part becomes orange for the second layer. Then you whip up some buttercream frosting to finish the cake off with a white topping. Just like a candy corn! And fortunately no, there are not chopped up bits of candy corn in the batter. That might look neat, but it also might make me gag. Let's keep the candy corn to the garnish; it's a fun addition, and it's easy to pick off! ;)


Orange Candy Corn Bars
Recipe from Pillsbury's Fall Baking recipe booklet, September 2008

Bars
3/4 cup butter or margarine, melted, cooled slightly
1 3/4 cups granulated sugar
1 tablespoon grated orange peel
4 eggs
1 3/4 cups all-purpose flour
1 teaspoon baking powder
4 drops yellow food color
3 drops red food color

Frosting
1/2 cup butter, softened (do not use margarine)
1 3/4 cups powdered sugar
1 to 2 tablespoons milk
1 teaspoon vanilla
1/8 teaspoon salt

Decoration
1/3 cup candy corn (32 candies)

1. Heat oven to 325 degrees F. Line bottom and sides of 9-inch square pan with foil, extending foil 2 inches on 2 opposite sides of pan; spray foil with cooking spray.

2. In medium bowl, beat melted 3/4 cup butter, the granulated sugar and orange peel with wooden spoon until blended. Beat in eggs, one at a time. Stir in flour and baking powder just until mixed. Stir in yellow food color until well mixed. Spread 1 1/2 cups yellow batter in pan. Place pan in freezer about 15 minutes or until batter is slightly firm to the touch.

3. Meanwhile, add red food color to remaining cake batter in bowl until well mixed. Spread over chilled yellow batter.

4. Bake 47 to 53 minutes or until toothpick inserted in center comes out clea. Cool completely, about 45 minutes.

5. In medium bowl, beat 1/2 cup softened butter with electric mixer on medium speed until light and fluffy. Beat in powdered sugar until well blended. Beat in milk, vanilla and salt until smooth and spreadable. Spread frosting over bars. To serve, remove bars from pan, using foil to lift. Remove foil. Cut into 4 rows by 4 rows; cut each square diagonally in half. Top each triangle with 1 candy corn.

Note: If you want really bright colors, use paste food colors instead of liquid food colors. Just decrease the amount to about half of the liquid food color specified.


Step-by-Step in Pictures

Line a pan with foil, then grease it...

Grate an orange...

Combine melted butter, sugar, and orange peel...

Beat in the eggs and add flour and baking powder. It will thicken to this...

Add yellow food coloring...

After spreading part of the yellow batter into the pan, add red food dye to the remaining yellow batter to make orange...

Spread the orange layer over the chilled yellow layer...

Bake for 47 to 53 minutes at 325 degrees F...

Test for doneness with a toothpick...

To make the frosting, whip up the butter (I used a combination of shortening and margarine to make this pareve)...

Beat in the powdered sugar, milk (I used water), vanilla, and salt...

When the cake has cooled completely, spread the frosting on top...

Here's the finished cake! To serve, pull the foil up and out, set the cake on a cutting board, and cut into triangles. Then place one candy corn as garnish on each piece.

Perfect!

Cute, right?

Friday, July 10, 2009

Plum Blueberry Upside-Down Cake


This is a good ROI cake. You put little effort in, and you get big returns. Isn't that the way all baking should be? :) I say this because it's really an easy cake to make, and yet it looks so impressive and difficult when you present it to your guests. Now that's bang for your buck!


And it's not just presentation that wins people over; it's taste. This cake is a perfect summer treat with fresh fruit from the farmer's market, and has a shocking, totally-out-of-character-for-Marni non-chocolate personality. You can swap out other fruit for the ones called for in the recipe, which gives this cat of a cake 9 lives! In fact, I did just that. In the cookbook, the title is Plum Huckleberry Upside-Down Cake, but come on folks, huckleberries aren't exactly everyday produce. So out they went and blueberries were happily invited to the party. David Lebovitz is the inventor and mastermind behind this amazing recipe and if you've been following my blog for awhile, you know that I'd practically take a bullet for the guy (does it have to hurt, though?).


Plum Blueberry Upside-Down Cake
Recipe by David Lebovitz in Room for Dessert
One 9-inch round cake or 10-inch square cake; 10-12 servings

The plum blueberry topping:
3 tablespoons butter
3/4 cup light brown sugar, firmly packed
1 cup (4 ounces) blueberries
6 to 8 medium plums (about 1 pound)

The cake:
8 tablespoons (1 stick) butter, at room temperature
3/4 cup sugar
1 teaspoon vanilla extract
2 eggs
1 1/2 cups flour
1 1/2 teaspoons baking powder
1/4 teaspoon salt
1/2 cup milk, at room temperature

Whipped cream or vanilla ice cream

1. To make the plum blueberry topping: Melt the butter in a 9-inch round cake pan or a 10-inch square cake pan, directly on the stove top, over low heat. Add the brown sugar and stir until the sugar is thoroughly moistened. Remove from the heat and cool briefly.

2. Sprinkle half of the blueberries evenly over the moistened brown sugar. Cut the plums in half, remove the pits, and cut the plum halves into 1/2-inch slices. Arrange the plum slices over the blueberries in concentric, overlapping circles, or just scatter them evenly. Strew the rest of the blueberries on top of the plum slices.

3. To make the cake: Position the oven rack in the center of the oven and preheat the oven to 350 degrees F.

4. Beat together the butter and sugar until light and fluffy, 3 to 5 minutes in a standing electric mixer. Stop the mixer once and scrape down the sides of the bowl to make sure the butter is completely incorporated. Add the vanilla.

5. Beat in the eggs, one at a time, until completely incorporated.

6. In a separate bowl, sift together the flour, baking powder, and salt. Mix half of the flour mixture into the batter. Stir the milk into the batter, add the remaining dry ingredients, and stir just until smooth; do not overmix. The batter will be quite thick.

7. Carefully spread the batter over the fruit in the cake pan, smoothing with a spatula. Bake the upside-down cake for about 1 hour, until the top is golden brown and a toothpick inserted in the center comes out clean.

8. Let the cake stand at least 20 minutes before unmolding. Run a knife around the edge of the cake to loosen it from the pan. Invert a serving plate over the cake and carefully flip over both cake and plate simultaneously. Lift off the cake pan and scrape any fruit that may have stuck to the pan back onto the cake - or enjoy it yourself. Serve with whipped cream or vanilla ice cream.

Variation: Make the topping with 6 medium apricots instead of plums, and substitute 1 cup of any kind of berries (except strawberries) for the blueberries.


Step-by-Step in Pictures

Melt the butter directly into the pan over a burner.

Add the brown sugar and stir to moisten...

Sprinkle half the blueberries on top...

Slice about 1 lb. of plums...

Place the plum slices in concentric circles, then sprinkle with the remaining blueberries...

To make the cake batter, cream the butter and sugar, then add the vanilla, eggs, and half the dry ingredients...
Add milk, and then add the remaining half of the dry ingredients...
Dollop the batter on top of the fruit in the pan...

Spread the batter evenly over the fruit, then bake at 350 degrees F for about an hour...

The top will be golden brown when done and a toothpick inserted in the center will come out clean...

Serve this beauty!

Tuesday, June 9, 2009

Joyce's Oatmeal Chocolate Chip Cake


I am in love with this oatmeal cake. I've never made it before and I had no idea how oatmealy it would turn out. But you actually can't tell there's oatmeal in it! That's because you pour boiling water over the oats before adding them to the batter, and so they become soft and soggy and un-oatmeal-like. I also changed up the recipe slightly by using chocolate chips instead of the dried fruit the recipe calls for. Chocolate makes anything better. Duh. Forgive me for skipping the Broiled Topping. It sounds delicious, and I've included the recipe in this post, but I just didn't feel the cake needed the topping and I didn't want the added calories.

I was first drawn to the recipe because of its name: Joyce's Oatmeal Cake. My mom's name is Joyce, and as she is my baking inspiration and the one who got me into this hobby in the first place, I felt it was a sign that I have to make this recipe.

The 9x13 Pan Cookbook is really fun because every single recipe uses the same pan. And it happens to be one of my favorite pans. It serves enough people and it's easy because you just pour the batter into the pan and when done, slice to serve. It's a much bigger pain to shape drop cookies individually and place them evenly apart on a cookie sheet. Low maintenance is key! Also, this cookbook, which visually is half the height of most cookbooks, is part of the Nitty Gritty Cookbooks family. I love Nitty Gritty! How much? Let me count the ways.....I own 26 Nitty Gritty cookbooks!


Joyce's Oatmeal Chocolate Chip Cake
Recipe by Barbara Karoff in The 9x13 Pan Cookbook
Serves 10-12

1 1/2 cups boiling water
1 cup quick cooking oats
1 cup brown sugar, packed
1 cup white sugar
1/2 cup butter or margarine
1 teaspoon vanilla
2 eggs, beaten
1 1/2 cups flour
1/2 teaspoon salt
1 teaspoon baking soda
1 teaspoon baking powder
1 teaspoon ground cinnamon
1 cup chopped dates or raisins (I used chocolate chips instead!)

Pour water over oats and let stand. Cream sugars with butter until fluffy. Add vanilla and egg; mix well. Combine flour, salt, soda, baking powder and cinnamon; add to creamed mixture. Stir in dates (or chocolate!). Add oatmeal and water. Batter will be quite thick. Spoon it into a buttered 9x13 pan and bake at 350 degrees F for 35 to 40 minutes or until it tests done. Cool in pan on a wire rack.

Broiled Topping
2/3 cup chopped nuts
2/3 cup flaked coconut
1 cup brown sugar, packed
2 tablespoons butter or margarine
3 tablespoons milk or cream

Combine all topping ingredients in a saucepan over low heat just to melt sugar and butter. Do not cook. Spread on baked cake and place under the broiler, about 4 inches from heat, until brown and bubbly.


Step-by-Step in Pictures

Pour boiling water over the rolled oats...

Cream the sugars with the butter until fluffy...

Combine dry ingredients in a separate bowl...

Add dry ingredients to creamed mixture...

Add chocolate chips...

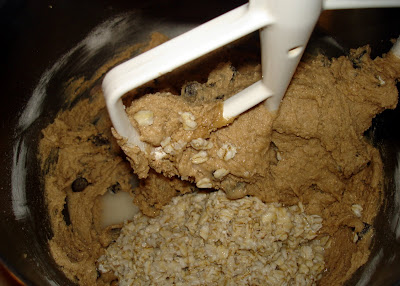
Add oatmeal and water mixture...

Pour into 9x13" pan and bake at 350 degrees F for about 35 minutes...

Test for doneness with a toothpick...

So moist. Perfect for breakfast or any time of day!

Monday, June 8, 2009

Kiss My Bundt Bakery Has Classes!


You know all about the national, if not international, cupcake craze, I'm sure. But individual-sized gourmet, creative treats are also found in the form of donuts and even mini bundt cakes! Sadly, I live 400 miles from my new obsession, Psycho Donuts in Campbell, CA. But fortunately I live just around the corner from Kiss My Bundt Bakery in Los Angeles! And these treats look, smell, and taste amazing.


Kiss My Bundt Bakery sells bundts in mini, a-little-larger-than-mini, and full size. The price is right, too, at $2.50, $4.50, and $32 respectively. Among the many flavors are:
  • 7-Up Pound Cake
  • Bailey's Irish Cream Cake
  • Chocolate Cabernet Aphrodisiac Cake
  • Chocolate Mint Cake
  • Sticky Toffee Pudding Cake
  • Strawberry Lemonade Cake
  • Red Velvet Cake
  • Peanut Butter Bundt Cake
  • Pineapple Upside Down Cake
  • Pina Colada Cake
  • and a LOT more!!!


But besides going to the bakery and purchasing a treat for now or later, Kiss My Bundt Bakery also hosts baking classes and tasting sessions! I am dying at the thought of this! Isn't it every sweet tooth's dream to go behind the glass display cases at a bakery and be able to work in the kitchen there? I want to see where the magic happens!


Currently, I am aware of four events you should check out:

Remember the scene from My Big Fat Greek Wedding that, in my opinion, reintroduced bundts to today's generation? Here ya go...


And for true bundt-a-holics, follow Kiss My Bundt Bakery on Twitter at @KissMyBundt.

The Details:
Kiss My Bundt Bakery
8104 West 3rd Street
Los Angeles, CA 90048
Cross Street: Crescent Heights Blvd.
Phone: (323) 655-0559

Saturday, December 20, 2008

Triple-Chocolate Cake with Chocolate-Peppermint Filling


This recipe has the wow factor. In fact, it's the cover recipe for the December 2001 Bon Appetit, which says something. It's awfully rich, so a little goes a long way. But it's sooo good. I confess, it's not the fastest cake to put together (UNDERSTATEMENT), but it doesn't take a rocket scientist, either. If you like the mint-chocolate flavor combination, you'll love this cake.


Triple-Chocolate Cake with Chocolate-Peppermint Filling
Recipe from the December 2001 Bon Appetit Magazine
12 servings

Filling
8 ounces imported milk chocolate (such as Lindt), finely chopped
1/2 cup whipping cream
1 tablespoon light corn syrup
1/2 teaspoon peppermint extract

Cake
1 cup sifted all purpose flour
1/3 cup unsweetened cocoa powder
1/2 teaspoon salt
1/4 teaspoon baking powder
1/4 teaspoon baking soda
3/4 cup (1 1/2 sticks) unsalted butter, room temperature
1 cup sugar
1/3 cup (packed) dark brown sugar
2 teaspoons vanilla extract
3 large eggs
1/2 cup buttermilk
1 1/2 cups miniature semisweet chocolate chips

Chocolate Glaze
8 ounces bittersweet (not unsweetened) or semisweet chocolate, finely chopped
1/2 cup (1 stick) unsalted butter, cut into pieces
1 tablespoon light corn syrup
3/4 teaspoon peppermint extract

12 whole red-and-white-striped hard peppermint candies, chopped

Fresh mint leaves

For filling: Place chocolate in medium bowl. Bring cream and corn syrup to simmer in small saucepan. Pour hot mixture over chocolate; add extract and let stand 1 minute. Whisk until mixture is smooth. Let filling stand at room temperature while cake is baking and cooling.

For cake: Position rack in lowest third of oven and preheat to 350 degrees F. Butter 9-inch-diameter cake pan with 2-inch-high sides. Line bottom with parchment paper. Butter parchment. Dust pan with flour. Whisk first 5 ingredients in medium bowl to blend. Using electric mixer, beat butter in large bowl until light and fluffy. Gradually beat in both sugars, then vanilla. Add eggs 1 at a time, beating well after each addition. Beat in dry ingredients alternately with buttermilk in 2 additions each. Mix in chocolate chips.

Transfer batter to prepared pan. Bake cake until tester inserted into center comes out clean, about 45 minutes. Cool cake in pan on rack 5 minutes. Turn out cake onto rack. Peel off parchment. Cool completely.

Using electric mixer, beat filling until fluffy and lightened in color, about 30 seconds. Using serrated knife, cut cake horizontally in half. Place 1 layer, cut side up, on rack set over baking sheet. Spread filling over. Top with second layer, cut side down. Chill filled cake 20 minutes.

Meanwhile, prepare glaze: Stir chocolate, butter and corn syrup in heavy small saucepan over low heat until melted and smooth. Mix in extract. Cool glaze until just lukewarm but still pourable, stirring occasionally, about 20 minutes.

Pour 1/2 cup glaze over center of cake. Spread over top and sides of cake. Chill until glaze sets, about 15 minutes. Pour remaining glaze over center of cake, then spread quickly over top and sides. Chill until glaze sets, about 1 hour. (Can be made 1 day ahead. Cover with cake dome; chill. Before continuing, let stand at room temperature until softened, about 4 hours.)

Sprinkle candies around top edge of cake. Garnish with fresh mint leaves.


Step-by-Step in Pictures

Related Posts with Thumbnails