Showing posts with label chocolate. Show all posts

Monday, April 4, 2011

Banana Chocolate Chip Layer Cake with Mocha Frosting


This is not your conventional birthday cake. But it is totally a great birthday cake! Imagine making banana bread in round cake pans instead of a loaf pan. That's essentially what this is. And it's made me rethink all quick breads. What if any loaf could be turned into a layer cake. So much more exciting. And so much more room for frosting. ;)

Pumpkin bread, zucchini bread, lemon poppy seed. Oooh, some of those might go well with a cream cheese frosting, perhaps flavored with orange or lemon zest. This quick breads-turned-layer cakes thing could possibly be a dangerous discovery. I don't have time in my life right now to start a new obsession. Someone needs to write a cookbook on the topic. I should get royalties.


This banana chocolate chip layer cake is everything you want it to be and more. Actually, if we really want to talk about "and more," try changing the frosting to peanut butter, because we all know that bananas, peanut butter, and chocolate go perfectly together. But even as is, I am so happy to have discovered this recipe and I will be making it again for sure.

Not only were the texture and taste great, but from a difficulty level, this cake is easier than other layer cakes. When the two layers bake, they pull away from the edges so nicely and plop right out of their pans without any trouble. They're a little denser than other cakes and therefore less fragile when handling. Sturdier. Forgiving. And when you've made delicate cakes that crumbled when removed from the pan, or broke into four giant chunks in your hand during assembly (and broke your heart!), a forgiving cake is something to be thankful for. Ain't that the truth!


Banana Chocolate Chip Layer Cake with Mocha Frosting
Adapted from a recipe by David Lebovitz in Ready for Dessert

Cake
2 1/2 cups all-purpose flour
1 1/2 teaspoons ground cinnamon
1 1/2 teaspoons baking powder
3/4 teaspoon baking soda
1/2 teaspoon salt
1 cup unsalted butter, at room temperature
1 1/2 cups sugar
1 teaspoon vanilla extract
1 tablespoon instant espresso or coffee powder (you can skip this to avoid caffeine)
2 large eggs, at room temperature
6 tablespoons buttermilk, yogurt, or sour cream, at room temperature
2 cups banana puree (3 to 4 very ripe bananas)
1 1/4 cups mini chocolate chips

Mocha Frosting
10 ounces bittersweet or semisweet chocolate, coarsely chopped
1/2 cup strong brewed coffee or espresso (or water if you don't want caffeine)
10 tablespoons unsalted or salted butter, cut into pieces, at room temperature

Preheat the oven to 350 degrees F. Grease the bottom and sides of two 9-inch round cake pans, then place round parchment papers on the bottom.

In a medium bowl, sift together the dry ingredients: flour, cinnamon, baking powder, baking soda, and salt. Set aside.

In a stand mixer, beat the butter and sugar together on medium speed until light and fluffy in texture, about 3 minutes. Add the vanilla and coffee powder. Add the two eggs, beating well after each addition. Beat in half of the dry ingredients, then add the buttermilk (or other dairy option) and the banana puree. Then beat in the remaining dry ingredients. Stir in the mini chocolate chips just until combined, using a spoon or spatula, not the mixer. You don't want a tough cake, so as soon as the chocolate chips are dispersed, put down the spoon!

Spread the batter evenly among the two prepared cake pans. Bake for about 40 minutes until the tops of the cakes are golden brown and the sides pull away from the edges. I recommend checking the cakes at 30 minutes in case your oven is fast (like mine!). Cool at least 15 minutes in the pans on cooling racks before using a sharp knife to cut around the edges, then inverting onto the racks to finish cooling. Remove the parchment from the bottoms.

To make the frosting, melt the chocolate with the coffee in a medium saucepan or in the microwave, taking care not to burn the chocolate. Stir occasionally. The consistency should be perfectly smooth. Remove from the heat and add in the 10 tablespoons butter, whisking until completely melted and combined.

To assemble the cake, place one of the cake layers upside down on your serving plate. Slide pieces of wax paper or parchment paper under the edges of the cake to protect your serving plate from unruly frosting. Spread about 3/4 cup frosting over the cake. Place the second cake layer on top of the first, standing right side up. Use the remaining frosting to cover the top and sides of the cake.


Step-by-Step in Pictures
Sift the dry ingredients together; set aside...

Beat the butter and sugar together...

Add the vanilla and coffee powder...

Add the eggs, one at a time...

Add half the dry ingredients...

Add the buttermilk and banana puree...

Add the remaining dry ingredients...
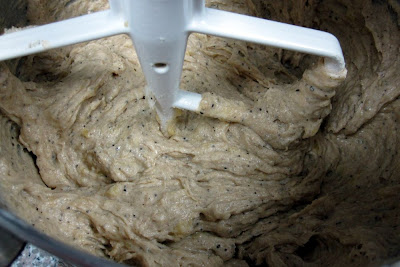
Stir in the mini chocolate chips...

Spread evenly in two prepared cake pans...

Bake at 350 degrees F for about 40 minutes...

To make the frosting, melt the chocolate with the coffee...

Remove from the heat and stir in the butter until completely melted and smooth...

Spread about 3/4 cup of cooled frosting onto the first cake layer...

Place the second layer on top of the first...

Frost the outside of the cake with the remaining frosting...

Decorate with the back of a spoon if desired...
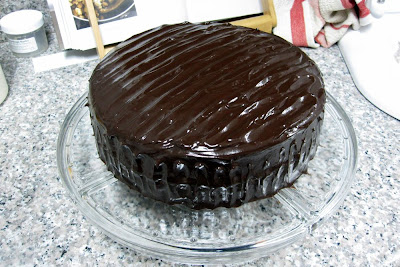
Slice and serve!

Thursday, March 24, 2011

Chocolate Orange Biscotti: Twice-Baked Heaven


NOTE: This post was originally published on Shabby Apple's blog on March 23, 2011, where I guest blogged as part of Shabby Apple's Roamin' Holiday Italian-inspired clothing line launch. If you are a fan of Anthropologie dresses (like I am!), you're going to LOVE Shabby Apple. Check it out here!

Biscotti is an Italian cookie that has superhero powers in the category of shelf life. That's because the cookie is twice-baked, and that process dries it out so it lasts longer. What exactly does it mean to bake a cookie twice? Well, first you shape the dough into a log on your baking sheet and bake it for Round 1. After this first baking period, you take the baking sheet out and slice the log into those familiar long cookies that we love so much. You then place them back on the baking sheet facing upright (imagine they're tanning at the beach and want to get maximum sun exposure), and off they go to bake for Round 2!


Those Italians sure came up with something good. And fortunately for us, it's a cookie that's available all over the place. You don't have to go to Italy to eat one (though a trip to Italy to get a biscotti makes a pretty good story, or an excuse for a vacation). Ever notice while waiting in the line at Starbucks that they sell individually wrapped biscotti? Makes sense. They are great coffee dunkers. And while biscotti just implies a simple twice-baked cookie with basic ingredients, gourmet, exotic, adventurous variations on the traditional can be found in cookbooks and bakeries everywhere. You'll find that nuts, dried fruit, and chocolate chunks all get tossed into the batter, or the finished, baked cookie even gets dipped in chocolate. In fact, a plain biscotti today seems so boring!

One of my favorite flavor combinations is chocolate and orange, so putting them together in a biscotti sounds like my kind of heaven. This recipe is easy to prepare and has a hearty helping of chocolate chunks and orange zest. Do take the time to chop up a chocolate bar. It will work (and taste) soooo much better than using mini chocolate chips. So far, I'm going on one week that these biscotti have kept like new in an airtight container. I love that I feel no sense of urgency to finish eating the whole batch quickly before they go bad. These guys are going to last. And that means I'm going to take my time, savor each bite, and probably still be eating them in two weeks. Truly a cookie with superhero powers.


Chocolate Orange Biscotti
Adapted from a recipe by Marcel Desaulniers in Death By Chocolate Cookies
Makes 4 dozen biscotti

4 cups all-purpose flour plus up to 1/2 cup for shaping the dough
1 tablespoon baking powder
1 teaspoon salt
1 1/2 cups granulated sugar
1/2 pound (2 sticks) unsalted butter, cut into 1-ounce pieces
4 large eggs
2 tablespoons minced orange zest (or more!)
6 ounces semisweet chocolate, chopped into 1/4-inch pieces (don't use chocolate chips because they're not easy to slice)

Preheat the oven to 325 degrees F.

Sift together the flour, baking powder, and salt onto a large piece of wax paper and set aside.

In the bowl of an electric mixer, beat together the sugar and butter on medium speed until soft, about 2 minutes. Scrape down the sides of the bowl as needed, and continue beating for 4 more minutes until very smooth. Beat in the eggs, one at a time. Add the orange zest and beat on high for 30 seconds. On low speed, gradually add the sifted dry ingredients by lifting the wax paper carefully to the mixer and pouring the ingredients in. Add the chopped chocolate and mix on low for 30 seconds. Remove the bowl from the mixer and and continue mixing the chocolate in until well incorporated. A wooden spoon or strong rubber spatula work well.

Prepare two baking sheets by lining with parchment paper or silicone baking mats. Lightly flour a work surface. Transfer the biscotti dough to this surface and divide the dough into four equal portions. Use additional flour as necessary if the dough gets sticky. Shape each portion into a log that measures 8 inches long by 2 1/2 inches wide and 1 1/4 inches high. You can also shape these logs directly onto the prepared baking sheets so you don't have to lift them once shaped. Two logs should fit on each baking sheet, placed about 2 inches apart.

For Round 1 of the two baking times, bake the biscotti logs on the top and center racks of the preheated oven for 35 minutes, until lightly browned and firm to the touch, rotating the sheets from top to center halfway through the baking time (at that time also turn each sheet 180 degrees). Remove the biscotti logs from the oven and reduce the oven temperature to 275 degrees F.

Let the logs cool for about 15 minutes so you'll be able to handle them. Then, place a log onto a cutting board and use a very sharp serrated knife to slice the log into 12 cookies. The slices should be at a diagonal angle and about 1/2-inch thick. The rounded ends of the log can be discarded or eaten (Mmmm, eaten is a much better option). Do the same for the other logs. Return the slices to the baking sheet, this time facing up. You might be able to fit all of them snugly onto the same sheet they were first baked on, but you might need a third sheet.

For Round 2 of the two baking times, bake the biscotti slices on the top and center racks of the preheated oven for 30 minutes until crisp and evenly browned, rotating the sheets from top to center halfway through the baking time (at that time also turn each sheet 180 degrees). Remove the biscotti from the oven and allow them to cool thoroughly before storing in an airtight plastic container.

Storage: The biscotti will last for 2 to 3 weeks stored in an airtight container at room temperature. They also freeze well. Just be sure to wrap them well and place in an airtight container in the freezer.


Step-by-Step in Pictures
Beat the sugar and butter together...

Beat in the eggs, one at a time...

Zest an orange...

Add in the orange zest...

Stir in the dry ingredients...

Measure 6 ounces of chocolate (I use a digital scale to measure - love this thing!! Worth every penny!)...

Chop the chocolate...

Stir the chopped chocolate into the dough...

Transfer the dough to a lightly floured work surface and add flour as needed to form a ball, then divide into four portions...

Shape each portion into a log and place two logs per baking sheet...

Bake at 325 degrees F for 35 minutes...

Allow to cool a few minutes so you can handle the log, then place on a cutting board and cut diagonal slices...

Return the slices to the baking sheets face up, reduce the oven to 275 degrees F, and bake for another 30 minutes...

Enjoy with a cup of coffee! Perhaps even dunk them!

Or package a few up in a treat bag, stick a label on it to let loved ones know who made them their treat, and get to sharing!

Thursday, February 17, 2011

Peanut Butter Cupcakes with Chocolate Frosting and Fleur de Sel


Last year, I attended a talk by a cookbook author at Omnivore Books on Food in San Francisco (an amazing bookstore in one of my favorite neighborhoods of the city - Noe Valley!). The talk was led by Christie Matheson, someone who became so fascinated by salts that she wrote an entire cookbook using various kinds of salts in dessert recipes. It made for a really interesting bookstore discussion. Christie described the difference between Maldon sea salt and fleur de sel and smoked sea salt and all sorts of other types I didn't know existed. I had no idea salt could be an entire new baking adventure. I did, however, know that I loved the taste of sea salt. I also knew that I loved the Chex Mix flavor that combines sweet with salty ingredients, officially and lovingly referred to as Chex Mix Sweet 'n Salty. Don't leave me alone with a bag of that.


It's no secret I love peanut butter and chocolate together. So naturally, when I discovered the photo in Christie's book of these peanut butter cupcakes with a hefty dollop of chocolate frosting, I couldn't turn the page. I stopped in my tracks and my face started to melt. Face melt! These cupcakes were destined to become the next thing I bake. And oh boy, they are delicious! Thank you, Christie! The sprinkling of fleur de sel on the top makes this the perfect marriage of salty and sweet. Wedded bliss. Holy matrimony. And all that jazz.


Peanut Butter Cupcakes with Chocolate Frosting and Fleur de Sel
Adapted from a recipe by Christie Matheson in Salty Sweets
Makes 12 regular size cupcakes or at least 24 mini cupcakes

1 cup all-purpose flour
1 teaspoon baking powder
1/2 teaspoon salt
6 tablespoons (3/4 stick) unsalted butter, softened
3/4 cup creamy peanut butter (regular, not natural)
1/2 cup packed light brown sugar
1/4 cup granulated sugar
1 large egg
2 teaspoons pure vanilla extract
1/2 cup whole milk (I used 1% and it worked just fine)
Chocolate Frosting (see recipe below)
Fleur de sel or chopped salted peanuts for sprinkling (optional)

1. Preheat the oven to 350 degrees F. Use paper liners to line a 12-cup muffin pan, or just grease the inside of each cup. You can also use a mini muffin tray. You'll make a lot more this way. I made about two trays of mini-sized.

2. In a medium-size bowl, sift together the flour, baking powder, and salt.

3. Using a stand mixer, beat together the butter, peanut butter, brown sugar, and granulated sugar on medium speed. The mixture will look light and creamy. Shouldn't take more than 2 minutes..

4. Add the one egg and beat for about 30 seconds. If the mixture has climbed up the sides of the bowl, scrape it back down. Then add the vanilla and beat for a minute. Scrape down the sides of the bowl again.

5. Starting with the flour mixture, alternate between adding the flour mixture and the milk, dividing the flour mixture into three portions and the milk into two portions. Don't overmix. As soon as the mixture comes together, you're done. Turn the mixer off! Walk away from the mixer! :)

6. Pour the batter into the cupcake liners or greased cups, filling each cup three-quarters of the way up the sides. If making regular sized cupcakes, bake for 18-20 minutes. If making mini-sized cupcakes, check the cupcakes for doneness after about 10 minutes. They will bake really fast when they are tiny. You'll know the cupcakes are done when the tops are golden and firm to the touch. Stick a cake tester or toothpick into the center and it should come out clean. Remove from the oven and leave the cupcakes in the pan to cool on a wire rack for 15 minutes. Then transfer the cupcakes to the rack to cool completely before frosting.

7. Prepare the frosting, then frost each cupcake with an offset spatula or use a piping bag and a large round or star tip. Sprinkle the top of each frosting mound with fleur de sel or chopped salted peanuts. The cupcakes will be their freshest for up to two days. Beyond that, they'll still be enjoyable, but drier, especially the mini-sized. They'll keep in the freezer really well if wrapped tightly.


Chocolate Frosting
Makes about 1 cup (enough to frost about 12 regular-size cupcakes or the equivalent in mini-cupcakes)

4 ounces bittersweet chocolate, chopped
1/2 cup heavy cream
3 tablespoons unsalted butter
1 tablespoon light corn syrup
1/4 teaspoon fine sea salt

1. Place the chocolate in a medium-size heatproof bowl, such as a glass bowl, and set aside. In a few minutes, you'll be pouring a cream mixture over this chocolate.

2. In a small saucepan over medium heat, stir together the cream, butter, corn syrup, and salt. The mixture will melt the butter and dissolve the salt and be very hot but not boiling. Should take 5 minutes or less.

3. When the cream mixture is very hot but not boiling, immediately pour it over the chocolate waiting for you in that heat-proof bowl. Leave the mixture alone to heat the chocolate for 5 to 7 minutes. That means no stirring! Then whisk until completely smooth. Make sure there are no lumps of chocolate, especially if you're going to be piping the frosting, because little pieces of chocolate will clog up your piping bag and you'll be frustrated (Note: I'm speaking from experience, and boy was that frustrating! I couldn't figure out why the frosting wasn't coming out of the tip...until I found the chocolate culprit!). Chill the mixture in the fridge for 30 minutes, then beat with an electric mixer until the color changes to light brown and the texture is fluffy and spreadable. Store the frosting in the fridge for up to 3 days in an airtight container. If you do this, you'll need to bring it to room temperature before frosting the cupcakes, and possibly even remixing it with your electric mixer.


Step-by-Step in Pictures
Sift together the flour, baking powder, and salt; then set aside...

Beat together the butter, brown sugar, granulated sugar, and peanut butter...

Add the egg and mix to combine...

Add the vanilla and continue beating...

Add the flour in three increments, alternating with the milk. Begin with flour...

Then add milk. Continue alternating, ending with flour...

Beat until smooth...

Fill each muffin cup three-quarters full...

Bake at 350 degrees F for 20 minutes if making large cupcakes, and about 10 minutes if making mini-cupcakes...

To make the chocolate frosting, first heat together the butter, salt, heavy cream, and corn syrup...

When the cream mixture is very hot but not boiling, pour over the chopped chocolate in a heat-proof bowl...

Stir until melted and smooth, then chill in the fridge for 30 minutes. When ready to use, beat with an electric mixer until light and fluffy ...

Spread or pipe the frosting onto each cupcake...
Related Posts with Thumbnails