Showing posts with label Jewish food. Show all posts

Monday, September 13, 2010

Marmalade 'n' Spice Honey Cake: A Game Changer


This recipe is dedicated to my friend Ephraim. He told me last week that he’s only ever tasted disgusting, dry honey cake and has all but given up on the possibility of a good honey cake. Instead, he says, make an apple cake. I promised him that not good, but GREAT honey cake is within reach, and he said he would be waiting for that recipe on my blog. Well, here it is. And I can think of probably 5 more incredible honey cake recipes, too. So for those like Ephraim who have yet to taste a delicious honey cake, today is your lucky day. End the suffering. Drop everything and bake this right now!


While honey cake is a tradition for Rosh Hashanah, the Jewish New Year, it is also a perfect year round snacking cake to serve with a cup of tea. Because it is moist from the honey and oil, it will stay fresh and delicious for more days than many other desserts. So, despite your desire to devour the whole thing in one sitting, which I promise you you’ll feel, keep in mind you can have the cake three days later and it’ll still put a smile on your face.

But enough of the chit chat. Introducing...your first ever not-dry honey cake. Bon Appetit, Ephraim!


Marmalade 'n' Spice Honey Cake
Adapted from a recipe by the brilliant Marcy Goldman in A Treasury of Jewish Holiday Baking
Makes 12 to 14 servings

1 cup vegetable oil
3/4 cup light honey
1 cup granulated sugar
1/3 cup brown sugar
1/2 cup orange marmalade
4 eggs
3 cups all-purpose flour
1/2 teaspoon salt
1/2 teaspoon baking soda
1 tablespoon baking powder
2 teaspoons ground cinnamon
1 teaspoon ground cloves
1/4 teaspoon ground allspice
1 cup brewed tea, just warm (or for a darker cake, use brewed, strong coffee instead)
1/3 cup slivered or sliced almonds (this is mostly for decorate purposes but it tastes great, too!)

Topping
Confectioners’ sugar, optional
Shredded orange zest, optional

Preheat the oven to 350 degrees F. Grease the bottom of a 9- or 10-inch tube pan. Cut out a circle of parchment paper (you’ll have to poke out the center of it) and line the bottom of the pan.

You are going to need two bowls: a medium mixing bowl for wet ingredients and a large mixing bowl (preferably the one attached to your stand mixer) for dry ingredients.

In the medium bowl, combine the oil, honey, granulated sugar, brown sugar, and marmalade and stir until well combined. Then add the eggs.

In the large bowl, whisk together the dry ingredients: flour, salt, baking soda, baking powder, cinnamon, cloves, and allspice. Make a well in the center of the dry ingredients and pour in the contents of the medium bowl (the wet mixture). Add the warm brewed tea. Blend by hand or use your mixer on low until you get a smooth batter.

Pour the cake batter into the greased, lined tube pan. Sprinkle the top with slivered almonds. Place the pan on top of a baking sheet and bake the cake for 55 to 60 minutes. To check for doneness, press the top of the cake lightly with your fingertip and it should spring back.

Cool in the pan for 15 minutes, then take a knife around the outside and inside rims to loosen from the edges. Invert onto a cooling rack.

If you want, dust the cake with confectioners’ sugar and shredded orange zest when completely cooled. I don’t think it needs the extra garnish because the slivered almonds would be hidden and they are a beautiful topping already.


Step-by-Step in Pictures
In a medium bowl, combine the oil, honey, granulated sugar, brown sugar, and marmalade...

Stir in the eggs...

In a large bowl, whisk together the dry ingredients...

Pour the wet ingredients into the dry ingredients and add the warm brewed tea; stir to combine...

Pour the batter into the prepared tube pan...

Sprinkle slivered almonds on top, then bake at 350 degrees F for about 55 minutes ...

Let cool in the pan for 15 minutes, then remove from pan and cool completely on a wire rack...

There you have it! A very moist honey cake!

Monday, September 6, 2010

Take Your Pick of Round Challahs for Rosh Hashanah

My crazy schedule just got a little bit more crazy. You see, on top of the traveling, High Holidays, working full-time, and various other things going on in my life, I'm about to move and I wasn't expecting that. Not far from where I am now. But still. Moving is moving. Hopefully I don't end up needing to pack all my kitchen equipment until the last second, so I can still enjoy a September full of homebaked goodies.

But that crazy schedule does mean I haven't had a chance to try a new round challah recipe this year. So instead, I'm reminding you of two previous posts I did on round challahs in preparation for Rosh Hashanah this week. If you haven't already tried them, you are in for a treat.

OPTION 1: Vanilla Challah and a Super Cool Round Braid Method
The first option is a very neat braiding technique that looks much harder than it is. Check my step-by-step photos for help. You can do this with any challah recipe, though the one I demonstrate with is one of my all time favorite recipes...a vanilla challah by Beth Hensperger.


OPTION 2: No-Knead Round Challah
The second option is a no-knead where you braid the challah in typical three-strand, straight line fashion, then lift the braid up and place it, curved, into the round baking pan.


Either way, you are going to be really pleased with how they come out. They are delicious and regal-looking!

L'Shanah Tovah!

Tuesday, June 29, 2010

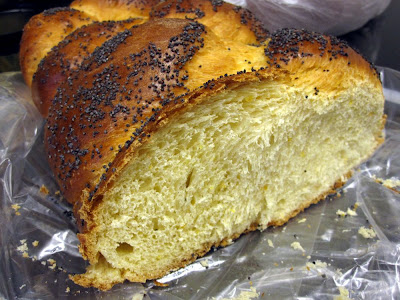
Orange Poppy Seed Challah


I was in the mood to bake bread. On a weeknight. On a night when I didn't get home from work until 7:30pm. The baking project probably wouldn't start until 8pm. So I wasn't feeling too adventurous; I mean, if the bread got challenging and had unexpected fancy technique involved, I might be up really late...on a work night.

Enter: challah. Challah is something I can practically do in my sleep. So all that was left was choosing a challah recipe. I decided on a challah from Marlene Sorosky's Jewish holidays cookbook. And I was inspired by a note she had at the end of the recipe for alternative flavors to traditional challah. I tweaked the orange date alternative she had listed there, and the same old tried and true plain jane loaf quickly became orange poppy seed challah! It just so happened I had orange juice and an orange in my fridge.

The little flecks of orange peeking out of the shaped, risen, ready-to-bake dough got me excited. The aroma of baking bread combined with the citrus in this special version made my place smell amazing. Slicing through the cooled, baked bread, the orange flecks are still apparent. The taste is definitely citrusy, but not over the top in any way. The crumb is perfect, and I'd describe it as feathery rather than chewy or gummy bread. My mom had the brilliant idea to take slices of this orange poppy seed loaf and make french toast sandwiches with a layer of cream cheese and a layer of orange marmalade in between. The thought of that makes me salivate.

To turn a conventional challah into something extra special, try this orange poppy seed version. It will be even better if you knead in a cup of chopped semi-sweet chocolate. I think I'll do that next time.


Orange Poppy Seed Challah
Adapted from a recipe by Marlene Sorosky in Fast & Festive Meals for the Jewish Holidays

1 package active dry yeast
1 teaspoon plus 1 tablespoon sugar, divided
1/4 cup warm water (105 to 115 degrees F)
3 1/2 cups all-purpose flour, plus about 1/2 cup more
2 teaspoons salt
2 large eggs, beaten then divided
1/2 cup boiling water
1/4 cup orange juice, preferably pulp-free
Zest of one medium-size orange, grated
1/4 cup vegetable oil
Poppy seeds for topping

To make the dough, in a small bowl, combine yeast, 1 teaspoon sugar, and warm water. Set aside for 5 minutes, or until foamy.

In a large mixing bowl with beaters, mix 3 1/2 cups flour, salt, and 1 tablespoon sugar on low speed until combined.

In a small bowl, whisk eggs until frothy and then measure out 1 tablespoon to place in a separate tiny bowl to reserve for the egg wash when it comes time to bake the challah. Add the egg (all but the 1 tablespoon reserved) to the flour mixture. Then add the foamy yeast mixture to the flour. Add the boiling water, orange juice, grated orange peel, and oil, and mix for a few minutes on medium-low speed. Scrape down sides of bowl.

Switch to the dough hook and add flour, a tablespoon at a time, until the dough pulls away from the sides of the bowl and is smooth and elastic. You shouldn't need more than about a half a cup of flour for this. You can also do this by hand; just be sure the board and your hands are well-floured and try not to touch the dough with your fingers. Kneading in the mixer will take about 8 minutes but watch it closely because you don't want to overmix it thereby introducing too much gluten into the dough. Transfer the kneaded dough from the mixer onto the dough board and gently knead it for another minute so it forms a nice ball. Kneading by hand will take about 12 minutes.

For the first rise, spray a large bowl with Pam, place dough inside so the bottom of the dough is greased, and then flip the dough so the other side is greased, too. Cover with a lightly dampened towel and place in a warm, draft-free place until double in bulk, 60 to 90 minutes. When you poke the dough with your finger, an imprint should remain. Punch dough down, remove to a lightly floured board, and knead until smooth and shiny, about 2 minutes.

To shape into a long braid, divide dough into 3 pieces. With your hands, roll each piece into a long, smooth rope, about 20 inches long by 3/4 inch wide. Place on a greased baking sheet or silicone baking mat. To braid, bring left rope under center rope and lay it down. Bring right rope under new center rope and lay it down. Repeat to end. Pinch ends and tuck under to seal. If you want to finish the challah tomorrow, you can refrigerate the loaf overnight at this point. If chilled, the second rising will take at least twice as long.

For second rising, let loaf rise at room temperature, covered, in a draft-free place until double in bulk; about 45 minutes if at room temperature, at least 1 1/2 hours if chilled overnight.

To bake, preheat oven to 375 degrees F. Brush loaf with the 1 tablespoon beaten egg you had reserved (you can use a pastry brush or your finger) and sprinkle poppy seeds on top right away (the egg wash will dry quickly and then the seeds won't stick). Bake for 35-45 minutes, or until golden brown and bread sounds hollow when tapped. If crust starts to get dark before the bread is done baking, cover loosely with foil for remainder of baking time. With a giant spatula, remove from baking sheet and cool on wire rack. Cooled bread may be stored at room temperature, sealed in a plastic bag overnight, or frozen.

Makes 1 loaf.


Step-by-Step in Pictures
Combine the yeast, 1 teaspoon sugar, and warm water and let stand a few minutes until foamy...

In a large mixing bowl, combine flour, salt, and the one tablespoon sugar, then add the eggs...

Then add the foamy yeast mixture to the flour...

Zest the orange...

Add the zest, orange juice, boiling water, and oil to the flour...

Switch to the dough hook and add a tablespoon at a time of flour until the dough starts to pull away from the bowl and becomes smooth and elastic...

Knead on a dough board to form a ball...

Place in a greased bowl, then turn dough over to grease other side...

Let rise, covered, about 60 to 90 minutes, until doubled in size...

Turn the dough out onto a floured surface and divide into three pieces...

Roll each piece into a log and place all three strands on a baking sheet...

Shape into a braid on the baking sheet (I started in the center and worked outward in one direction and reverse braid in the other, in order to create a more even-looking loaf)...

Tuck the ends under and pinch to seal...

Cover and let double in size, about 45 minutes...

Brush with the reserved beaten egg, then sprinkle with poppy seeds...

Bake at 375 degrees F for 35 to 45 minutes. Cover with foil during baking if the loaf gets dark too quickly...

Let cool completely, then slice and serve!

Monday, April 12, 2010

Dairy Onion Noodle Kugel


What a kugel! Yummmmmmmy yum yum! This recipe comes from a really neat cookbook my mom and I found at a used bookstore in Mountain View, California. The book is filled with kugel recipes, some printed exactly as they were first hand-written generations ago by some Jewish grandmother from Lithuania (perhaps). Since I let my mom keep the one copy we found at the bookstore, I'm going to have to get myself a copy, too! That's because now that I've tasted a recipe out of the book - this Dairy Onion Noodle Kugel - I am sold. This kugel is that fabulous. Serve it with a salmon dinner or as the main attraction. And it yields a large amount, filling a 9x13 casserole dish to the top even after packing it in.

One note for all you kugel-clueless people out there: It calls for wide noodles. No, that does not mean you can use fettuccine or lasagna noodles. Wide noodles are a specific type of noodle often found in the kosher aisle at your supermarket, often made with egg, though there are yolk-free versions. So don't go buying your favorite Italian pasta for this dish. Or fine, do, but then you've taken the little Jewish Lithuanian grandma out of the recipe.

Enjoy!


Dairy Onion Noodle Kugel
Recipe by Nina Yellin in Kugel, Knishes,and Other Tasty Dishes
Makes 10 servings

1 pound wide noodles, cooked and drained
1/4 pound butter, melted
8 ounces cream cheese, softened
1 pint sour cream
1 large white onion, chopped
4 large eggs, beaten
1/4 cup breadcrumbs
Salt and pepper, to taste

Preheat oven to 350 degrees.

Combine all ingredients and stir thoroughly.

Pour into greased 10" x 10" baking pan (I used a 9 x 13 pan). Sprinkle with breadcrumbs and paprika, and dot with butter. Bake 1 hour.


Step-by-Step in Pictures

Boil the noodles and drain...

Stir in the melted butter and softened cream cheese...

Stir in the sour cream...

Add the eggs...

Stir in the breadcrumbs (I used leftover matzah meal), chopped onion, salt and pepper...

Spread into the prepared pan, then sprinkle additional breadcrumbs and paprika if desired, and dot with butter...

Bake at 350 degrees for about 1 hour...

Sunday, April 4, 2010

Passover Chocolate Spice Cake


The cakes I'm most familiar with for Passover are sponge cakes. This Chocolate Spice Cake is no exception. If you're ever reading through a cake recipe for Passover and wondering how it will turn out, or what kind of cake it is, check the ingredients list and see if you have to separate a bunch of eggs. Whisking the egg whites to stiff peaks is a sign the cake will be light and airy and spongy.

Be sure also to gently fold those perfectly whipped egg whites into your batter rather than stir them in. If you're going to go to the trouble of painstakingly separating 10 eggs and then stand over the mixer and watch them like a hawk as they whip up and fill with air without overbeating, you'll kick yourself if you then carelessly stir them into your batter, thereby deflating them. So the key is, gently fold! Ok, I promise I won't lecture for the remainder of this post.

I love the flavor of this cake, featuring cloves and cinnamon along with the chocolate. It really doesn't need the toasted almonds, and my sister would actually insist that you don't add them in (since she's adamantly opposed to nuts in baked goods), but I appreciated the element of surprise in getting an occasional crunch in my mouthfuls. You'll see I drizzled a little glossy chocolate glaze on top. It's not called for in the recipe, but I had some left over from making the Macaroon Fudge Bars and I thought it looked pretty.

Potato starch is not the easiest thing to work with when greasing and "flouring" a pan during Passover as it tends to clump and not shake off if you hit the bottom of the pan. That was a frustrating experience. But all the more reason I decided to add that chocolate glaze on top to hide some of the pockets created by excess potato starch. I used a pastry brush to flick away some of the extra but at a certain point you just have to say c'est la vie and move on. Your guests won't even notice. It's good practice in the kitchen to turn off your perfectionist tendencies now and then (oh, am I describing myself?). Good luck with that!


Passover Chocolate Spice Cake

Recipe by Marcy Goldman in A Treasury of Jewish Holiday Baking
Makes 10 servings

10 eggs, separated
2 cups sugar
1/3 cup Passover wine or warm coffee
1/4 cup unsweetened cocoa powder
1/4 teaspoon plus a pinch of salt
1/4 teaspoon ground cloves
1 1/2 teaspoons ground cinnamon
1 1/3 cups matzoh cake meal
1/4 cup potato starch, plus extra for pan
1 1/4 cups finely chopped toasted almonds

Preheat the oven to 325 degrees F. Line a 10-inch tube or angel food pan with parchment paper. Lightly grease and dust the sides with potato starch.

In a medium bowl, beat the egg yolks with 1 1/4 cups of the sugar until very thick and pale yellow, about 5 to 7 minutes. Stir in the wine or coffee, the cocoa powder, salt, cloves, and cinnamon. Stir in the matzoh cake meal, potato starch, and the chopped almonds.

In another large bowl, with clean, dry beaters, gently whisk the egg whites with a pinch of salt to break them up. Increase the speed to high, and, gradually dusting in the remaining 3/4 cup sugar, beating until the whites are stiff and glossy but not dry. Briskly and thoroughly fold about one third of the beaten whites into the yolk mixture to lighten it. Then, in 2 separate batches, fold in the remaining egg whites, taking care not to deflate the egg whites but to blend the batter properly.

Pour into the prepared pan and bake for 55 minutes, or until the cake springs back when gently touched. Cool by inverting onto a serving plate. Cake will unmold itself as it cools.


Step-by-Step in Pictures

Beat the egg yolks with sugar...

Stir in the wine or coffee, cocoa powder, cloves, cinnamon, and salt...

Stir in the matzoh cake meal and potato starch...

Add the toasted almonds...

In a separate bowl, beat the egg whites with the remaining sugar until they form stiff peaks...

Fold about one third of the egg whites into the batter to lighten the batter...

In two stages, gently fold in the rest of the beaten egg whites to the batter...

Pour the batter into the prepared pan...

Bake for about 50 minutes at 325 degrees F...

I tested for doneness by inserting a sharp thin knife...

Let cool completely by inverting onto a cooling rack or serving tray...

Drizzle chocolate glaze if you want...
Related Posts with Thumbnails